How to Modify and Pivot Fields in an Excel 2010 Pivot Table


5 of 9 in Series:
The Essentials of Excel 2010 Pivot Tables and Pivot Charts


Pivot tables are much more dynamic than standard Excel 2010 tables because they are so easy to manipulate and modify. Excel makes it just as easy to change which fields from the original data source are displayed in the table as it does originally adding them when a table is first created. In addition, you can instantly restructure the pivot table by dragging its existing fields to new positions on the table.


Modifying the pivot table fields


To modify the fields used in your pivot table, follow these steps:


  1. Click any cell in the pivot table.


    Excel adds the PivotTable Tools contextual tab with the Options and Design tabs to the Ribbon.


  2. Click the PivotTable Tools Options tab.


  3. Click the Field List button in Show/Hide group if it isn't already selected.


    Excel displays the PivotTable Field List task pane, showing the fields that are currently used in the pivot table as well as to which areas they're currently assigned.


  4. Make any of the following modifications to the table's fields:


    • To remove a field from the table, drag its field name out of any of its drop zones (Report Filter, Column Labels, Row Labels, and Values) and, when the mouse pointer changes to an x, release the mouse button; or click its check box in the Choose Fields to Add to Report list to remove its check mark.


    • To move an existing field to a new place in the table, drag its field name from its current drop zone to a new zone at the bottom of the task pane.


    • To add a field to the table, drag its field name from the Choose Fields to Add to Report list and drop the field in the desired drop zone— note that if you want to add a field to the pivot table as an additional Row Labels field, you can also do this by simply selecting the field's check box in the Choose Fields to Add to Report list.


Pivoting the table's fields


As the name pivot implies, the fun of pivot tables is being able to restructure the table simply by rotating the Column and Row fields. In the PivotTable Field List pane, simply drag a label from the Row Labels drop zone to the Column Labels drop zone and vice versa so that the two field names are swapped. Voilà — Excel rearranges the data in the pivot table at your request.


dummies

Source:http://www.dummies.com/how-to/content/how-to-modify-and-pivot-fields-in-an-excel-2010-pi.html

Why You Should Add ETFs to Your Existing Portfolio

Maybe you’re intent on staying put with your existing portfolio, but think you can benefit from an occasional ETF holding. You are right and this tells you why and how to reap the benefits of sprinkling a few ETFs into your existing portfolio.


Improve your diversification with ETFs


Unless you are really rich, like Warren Buffett rich, you simply cannot have a truly well-diversified portfolio of individual securities — not nearly as well-diversified as even the simplest ETF or mutual fund portfolio. Where would you even start?


To have a portfolio as well-diversified as even a simple ETF portfolio, you’d have to hold a bevy of large company stocks (both growth and value), small company stocks (again, both growth and value), foreign stocks (Asia and Europe and emerging markets, growth and value, large and small), and real estate investment trust (REIT) stocks. And that’s just on the equity side!


On the fixed-income side of your portfolio, you would ideally have a mix of short-term and long-term bonds, government and corporate issues, and perhaps (especially if you are Warren Buffett rich and find yourself in the northern tax brackets) some federal-tax-free municipal bonds.


Examine your portfolio. If you have the large majority of your equity holdings in large company U.S. stocks, you can diversify in a flash by adding a small cap ETF or two and a couple of international ETFs. If you, like so many investors who lost their shirts in 2008, are simply too heavily invested in stocks, you may want to tap into some of the more sedate bond ETFs.


Minimizing your investment costs


Now, let’s assume you’re basically a mutual fund kind of guy or gal. You’ve been reading Money magazine and Kiplinger’s for years. You believe that you have winnowed down the universe of mutual funds to a handful of winners, and goshdarnit, you’re going to keep them in your portfolio.


You may or may not have heard the terms core and satellite. They refer to an investment strategy that has been very much in vogue lately. Core refers to a portfolio’s foundation, which is basically invested in the entire market, or close to it. Then, you have your satellites: smaller investments designed to outdo the market. It isn’t such a bad strategy.


Suppose you have four mutual funds that you love: one tech fund, one healthcare fund, one energy fund, and one international growth fund. Each charges you a yearly fee of 1.34 percent (the mutual fund average right now, according to Morningstar).


Now suppose you have $250,000 invested in all four. You are paying ($250,000 × 1.34 percent) a total of $3,350 a year in management fees, and that’s to say nothing of any taxes you’re paying on dividends and capital gains.


Consider trimming those investments down and moving half the money into an ETF or two or three. Turn your present core into satellites, and create a new core using broad-market funds, such as the Vanguard Total Stock Market ETF (VTI). It carries an expense ratio of 0.07 percent.


Your total management fees are now ($125,000 × 1.34 percent) + ($125,000 × 0.07 percent), or $1,675.00 + $87.50, which totals $1,762.50. You’ve just saved yourself a very nifty $1,587.50 a year, and you’ll likely save a considerable amount on taxes, too.


With the newer generation of actively managed ETFs, it’s quite possible that the Kiplinger’s or Money or Wise Money or whatever magazine picks-of-the-month may include ETFs. If you are swapping actively managed mutual funds for actively managed ETFs, you may still save money and lower your tax hit to boot.


dummies

Source:http://www.dummies.com/how-to/content/why-you-should-add-etfs-to-your-existing-portfolio.html

Leaping Over Phone-Service Charges with VoIP

One of the big benefits of VoIP (voice over Internet protocol) is that it makes the POTS-PSTN model, together with its complicated billing structure and weird terminology, just go away. (In case you're curious, POTS-PSTN means "plain old telephone system-public switched telephone network.")


Looking at service categories


Traditional carrier services, unlike VoIP telephony, are heavily regulated. That's why you get a phone bill with more small print than the phone book, filled with monthly line-access charges, per-minute usage charges, service charges, taxes, and special fees all applied to the number and type of individual lines your company or family uses.


To add to the confusion, under the PSTN model used in the United States, recurring service charges are tiered into service categories.


After your phone company charges you line-access costs and for any call features you add to each line, it bills you for per-minute usage charges based on your service category. Each phone line you use may be billed for any of the following five service-charge categories:


  • Local: Refers to the immediate geographical area, usually no more than a one- to two-mile radius from the telephone from which you're placing a call.

  • Intralata: Refers to calls that terminate outside the local calling area but within your local access and transport area (LATA). Also known as local toll, intralata toll, regional toll; local long distance, regional calling.

  • Intrastate: Involves carrier services for calls outside the LATA but inside the boundaries of the state where your local access line is installed. Also known as in-state, interlata, state toll, in-state calling, long distance (usually incorrect, depending on the context, but frequently used).

  • Interstate: Includes calls to a destination outside the local calling area's state but still inside the United States. Also known as long distance, LD, state-to-state, toll-calling services, calling across state lines.

  • International: Phone service originates where you are and terminates in another country.

At the time of this writing, international service is the most highly regulated category. Interstate is the second highest in terms of regulation. Intralata and intrastate come in third in terms of degree of regulation. Local service continues to be the least regulated.


Higher regulation and longer distances don't necessarily mean higher cost anymore. Interstate is more regulated than intrastate and intralata, but it is much cheaper on a per-minute rate basis. For example, a corporate customer calling from Pittsburgh to Los Angeles (longer distance) might pay 2 cents per minute. A call from Pittsburgh to Philadelphia (shorter distance), on the other hand, could cost from 6 cents to 62 cents per minute.


Cutting costs with VoIP


In the POTS-PSTN way of doing telephony, more regulation translates into more add-on service charges per line. Under VoIP, you can eliminate all regulated fees and charges because VoIP is totally nonregulated.


Remember, however, that it's almost impossible for VoIP to eliminate all charges for phone service. For instance, if you're a consumer, you should have at least one POTS line in the home for 911 service and other local calls. Because you must use broadband to get VoIP in your home, you should pay the additional fee to keep your POTS phone connected to your broadband service. Use the POTS phone for local calls and 911 emergency service. When the older PSTN catches up with the newer VoIP technology and can support E911 (enhanced 911) calling, you can drop the POTS connection. (With E911, your contact and address information is transmitted along with your call to the 911 emergency center.)


Local ordinances require businesses to have at least one POTS line for fire control and 911. Your primary goal is to reduce or eliminate the recurring monthly costs with the other four service-charge categories, and your secondary goal is to reduce your local service costs. With VoIP, you can accomplish these goals by making most or all toll-related calls on-net. But until the rest of the world converts to VoIP, you still need some connectivity to the local calling area using POTS.


dummies

Source:http://www.dummies.com/how-to/content/leaping-over-phoneservice-charges-with-voip.html

Finding Items in Outlook Folders

If you need to locate an item in a folder, Outlook offers two Find commands: a simple Find command that you can access through the standard toolbar and an Advanced Find command that requires more effort but can yield more exacting results.


The Contacts folder offers a very convenient means of finding stray contact information. In the Find a Contact text box (you can find it on the Standard toolbar), enter a name or an email address and press Enter. If Outlook can find the name or email address, you see the person's Contact Information.


Searching in the Find pane


Do you think "pain" instead of "pane" when you hear that the Outlook windows are composed of several panes — the Navigation pane, the Reading pane, and so on? As if you aren't already in enough pain, you conduct simple searches in the Find pane. Follow these steps to conduct a simple search in the Find pane:


1. Click the Find button in any window.


You see a Find pane.


2. If you need to, tell Outlook which folders to search by opening the Search In drop-down menu and making a choice.


Choose one of the options on the menu or select Choose Folders and choose a folder name in the Select Folder(s) dialog box. You can search more than one folder by opening this dialog box and selecting folders.


In mail folder searches, Outlook searches the text in messages, as well as the subject of the messages. If that kind of search produces too many messages to look through, open the Options menu on the Find pane and unselect Search All Text in Each Message. This way, Outlook searches messages' subject only, and fewer messages appear in the search results.


3. Enter what you're searching for in the Look For text box.


4. Click the Find Now button.


If your search doesn't bear fruit, click the Clear button and start all over, or open the Options drop-down menu and choose Advanced Find to embark on an advanced search. Click the Find button or the Close button on the Find pane to remove the Find pane from the screen.


Conducting an advanced search


Run an advanced search when a simple search doesn't do the job, you want to search by using more than one criterion, or you want to search in several different folders. To start an advanced search, follow these steps:


1. Either press Ctrl+Shift+F or click the Find button.


2. Open the Options menu on the Find pane.


3. Select Advanced Find.


You see the Advanced Find dialog box. If you have a successful search, found items appear at the bottom of the dialog box. You can double-click to open found items in the search results.


4. In the Look For drop-down menu, choose where you want to search.


If the folder that you want to search doesn't appear on the menu, click the Browse button and choose that folder in the Select Folder(s) dialog box.


5. Choose options on the three tabs — Contacts, More Choices, and Advanced — in the dialog box.


The options that are available depend on which folder you search.


6. Click the Find Now button.


The Advanced Find dialog box offers handy commands for dealing with items after you find them. Select the items and choose Edit --> Move to Folder to move the items into a new folder. Choose Edit --> Delete to delete the items. Type Ctrl+click or Shift+click, or choose Edit --> Select All, to select all items in the Advanced Find dialog box.


dummies

Source:http://www.dummies.com/how-to/content/finding-items-in-outlook-folders.html

Market Your Mobile Website

The mobile web brings some exciting innovations in promotion, but also brings many challenges. Advertising on mobile devices seems, at first glance, to be a losing game. The screen is a tiny fraction of a proper flat-screen TV, the connection to the Internet is far more tenuous than using a cable modem or DSL line, and typing on the itty-bitty keyboard is comfortable only for leprechauns.


The larger size of the iPad solves some of these challenges, although its screen is still smaller and the keyboard still trickier to use than those you find on a laptop or desktop computer.


Nevertheless, even on the more diminutive iPhone, the mobile web offers these important advantages:


  • People carry their mobile phones with them wherever they go. Studies show that people who forget and leave their phones behind in restaurants usually realize the error within an hour or two; however, most people realize in about a day that they’ve left behind their wallets containing their IDs, cash, and credit cards.


  • The mobile phone offers one of the rare times in modern life when you have the undivided attention of your audience. Think of the environment that most advertising gets tossed into ― to sink or swim. Good luck breaking through that level of chaos.


    Researchers say that even in busy and crowded environments, where visitors to your site may be distracted, having the media player in the user's hand creates a special state of connection and concentration.


  • People trust content delivered via their mobile devices. According to research by several mobile marketing experts, the trust is built up from hearing your mom’s voice come out of the device, for example, or relying on it to reach 911 when you witness a car accident.


    That trust translates into a much better chance that your marketing message actually gets through. But don’t just take that at face value; early research shows that, when done properly and integrated with other media, mobile advertising yields a return on investment that's surprising even seasoned advertising executives.


  • Mobile devices increasingly have GPS built in. Using GPS, your mobile phone knows where you are (that’s why it can tell you where to go when you get lost).


    GPS also lets advertisers take advantage of location data to display ads that are more relevant — when an advertising message reaches a potential customer in a particular location, you can do things like promote your coffee shop to anyone within a city block of your front door.


    Targeting your ads to appear where and when your customers need them transforms the ads from intrusive spam that everyone grumbles about into a useful service that solves a need. For instance, you might be glad to know:


    • Where the nearest tire repair shop is when your car blows a tire on the way to work


    • Who can help you remove a red wine stain from a cashmere sweater before the stain sets in


    • Where to find the nearest place to refill your allergy medication before you wind up in the hospital


Of course, location-based targeting raises all kinds of privacy concerns, which is why so many mobile advertising practitioners talk about opt-in marketing campaigns, which require that consumers agree to receive advertising sent to their mobile phones.


dummies

Source:http://www.dummies.com/how-to/content/market-your-mobile-web-site.html

Draw Out a Camera-Shy Dog during a Photo Shoot

Patience is the key with a camera-shy dog. Because the dog is experiencing fear, the goal is to help him build up confidence and to feel secure around the camera. Doing so takes a while, but it’s totally possible. If your dog exhibits signs of fear around your camera, follow these steps to desensitize her:


  1. Sit on the floor with your camera in your lap and allow your dog to approach at her own pace.


    Talk in a high-pitched “happy” (but soothing) voice and praise her as she starts to move toward you.


  2. Provide treats when she gets close enough to you and allow her to sniff your camera while it remains in your lap.


  3. After she sniffs the camera, be sure to provide more treats.


  4. Raise the camera a few inches off of your lap very slowly while watching how your dog responds to this action.


    If she backs up in fear, you’ve probably raised the camera too high or too fast on your first try, so work in smaller increments. Each time you raise the camera and your dog stays near or moves closer to investigate, praise and treat her.


  5. Continue to raise your camera in very slow increments while rewarding her at each stage, until the camera is high enough to look through the viewfinder.


  6. When you’re able to raise your camera without Trudy running for the hills, press your shutter release, give her a treat, and then rest.


    Pet and reassure her, and then repeat. Keep it slow, and stay tuned to how Trudy reacts because she’ll always let you know if you’re moving too fast.


Never force a dog when she’s scared. The goal here is to build up trust and confidence. If you start forcing her to do something she’s afraid of, she’ll lose trust in the activity and possibly lose trust in you in general. If she’s not ready for something, your job is to wait.


Desensitizing a scared dog to the camera may take some time, but with enough patience, they always seem to come around. It’s all about making this a positive, fun experience, so reward every bit of progress, no matter how small!


Keep your voice calm, and try not to raise it too loud, even when you’re praising. Any jump in tone or volume can sometimes alarm a timid dog. If you find yourself getting frustrated, take a break and try again later!


dummies

Source:http://www.dummies.com/how-to/content/draw-out-a-camerashy-dog-during-a-photo-shoot.navId-323785.html

Enterprise Mobile Device: Personal Apple Device Backup and Restore

There are practical things you must tell your employees about mobile device security. You can pass this information along to your Apple device users regarding backing up, restoring and data transfer.


Backing up iPhones and iPads


Apple provides the iTunes software application that can be installed on Windows PCs and Mac computers. The iTunes application (www.apple.com/itunes) provides a simple user interface to control backups as well as to restore data from the computer back to your device, if needed.


To backup an iPhone and iPad to your computer, connect your device to your computer and sync it with iTunes. iTunes makes a backup each time you sync the device to your computer.


Only one copy of the backup is maintained, so even if you backup more than once, only the most recent copy is maintained on the computer.


iTunes backs up most device settings, including call history, apps, contacts, e-mail, Wi-Fi, and VPN settings, and several other pieces of information. You can customize the actual data that's backed up by selecting the appropriate options on the iTunes application.


  1. Connect the iPhone or iPad to the computer that has iTunes installed.


    iTunes should start up automatically when it detects the iPhone or iPad connected to the computer.


  2. In iTunes, under Devices, select the device being synced.


  3. In the right-hand pane, select the application type whose settings you want to customize.


  4. Make changes to the application type as needed and then click Apply to confirm your changes.


You can configure your backed-up data to be encrypted on your computer. On the Summary tab, select the Encrypt iPhone Backup check box and enter a password. Be sure to remember the passcode, though, or you won’t be able to restore to the device.


Restoring data from iPhones and iPads


You can use the iTunes software to restore data on an iPhone or iPad. The first step is to restore the device to its factory-default settings. Doing so deletes all user data from the device. When the device is back to its factory-default configuration, you can restore a previously backed up configuration and data to the device.


  1. Connect the device to your computer.


  2. Select the device from the Devices option in iTunes.


  3. Select Summary, and click Restore.


  4. When iTunes prompts you to backup the device prior to restoring it, click Don’t Backup.


    The device is restored to factory configuration.


  5. When the device starts up again, select a previously backed up configuration to restore to the device.


    Doing so will copy the old configuration to your device.


Transferring data between iPhones and iPads


It’s easy to transfer data from an old iPhone or iPad to a new one. To transfer data from one device to another, follow these steps:


  1. Backup the old iPhone or iPad with iTunes.


  2. Connect the new iPhone or iPad to the computer.


    iTunes prompts you, asking whether you want to restore from an old device or set up the device you’re restoring as a new one.


  3. Select the option that backs up from the old device to the new one.


    iTunes restores contents from your old device to the newly connected device. The new iPhone or iPad restarts when data restoration is complete.


  4. You can choose to sync information selectively to the new device. Select the desired options (such as Music, Photos, or Videos), and then click Apply to continue.


    Your selected data is transferred to your new iPad or iPhone.


dummies

Source:http://www.dummies.com/how-to/content/enterprise-mobile-device-personal-apple-device-bac.html

For Seniors: How to Assemble Your eBay Shipping Supplies

You’ve sold an item on eBay, and now you’re ready to gather your shipping supplies: boxes, filler materials, and other handy items for mailing. Start by using a box that’s larger than the item you’re shipping.


Evaluate the item you’re shipping and choose packing materials specific to the item’s requirements. Make your packing do all the little things that you’d want done if you were the buyer — use double boxes for really fragile items, wrap lids separately from containers, and fill hollow breakables with some kind of padding.


The following table compares the most popular types of box-filler material.


Box-Filler Materials
TypePros and ConsSuggestions
Bubble wrapPros: Lightweight, clean, cushions well

Cons: Cost
Don’t go overboard taping the bubble wrap. If the buyer
has to struggle to remove the tape, the item may go flying and end
up damaged.
NewspaperPros: Cheap, cushions

Cons: Messy, adds considerable weight to the package
Seal fairly well. Put your item in a plastic bag to protect it
from the ink. Shred the newspaper first so that it’s more
manageable and doesn’t stain as much.
Cut-up cardboardPros: Handy, cheap

Cons: Transmits some shocks to item, hard to cut up,
heavy
If you have some old boxes that aren’t sturdy enough to
pack in, this is a pretty good use for them.
Styrofoam peanutsPros: Lightweight, absorb shock well, clean

Cons: Environmentally unfriendly, annoying
Your item may shift if you don’t put enough peanuts in
the box, so make sure to fill the box. Also, don’t buy these
— instead, recycle them from stuff that was shipped to you
(plastic trash bags are great for storing them). And never use
plastic peanuts when packing electronic equipment, because they can
create static electricity. Even a little spark can trash a computer
chip.
Air-popped popcornPros: Lightweight, environmentally friendly, absorbs
shock well, clean (as long as you don’t use salt and butter,
but you knew that), low in calories

Cons: Cost, time to pop
You don’t want to send it anywhere there may be varmints
who like it. The U.S. Postal Service suggests popcorn.

Here are a few other items you need:


  • Plastic bags: Plastic bags protect your item from moisture. If the item gets wet, the extra plastic bag saves the item from being soaked along with the outer box.


    Always protect small items, such as stuffed animals, in a lunch baggie. For slightly larger items, go to the 1-quart or 1-gallon size. Be sure to wrap any paper or cloth products, such as clothing and linens, in plastic before you ship.


  • Bubble-padded mailers: The shipping cost for a package that weighs less than 13 ounces (First-Class mail) is considerably cheaper than Priority. Many small items, clothing, books, and so on will fit comfortably into the many available sizes of padded envelopes. A big plus is that they weigh considerably less than boxes — even when using extra padding.


  • Labels: You’ll need extras because it’s always a good idea to toss a duplicate address label inside the box, with the destination address and a return address, in case the outside label falls off or becomes illegible.


  • Shipping tape, 2- or 3-inches in width: Make sure that you use a strong shipping tape for the outside of the box. Clear plastic will do just fine.


  • Hand-held shipping tape dispensers: It’s easier to pull tape from a tape dispenser than to unwind it and bite it off.


  • Scissors: You’ll want a pair of large, sharp scissors and a hobby knife to trim boxes or shred newspaper.


  • Handy liquids: Three good ones are GOO GONE (available in the household supply section of most retail stores and good at removing unwanted stickers and price tags); WD-40 (the unstick-everything standby that works great on getting stickers off plastic); and Un-Du (to take labels off cardboard).


  • Rubber stamps/stickers: Using custom rubber stamps or stickers can save you a bunch of time when preparing your packages. Purchase some return address self-inking rubber stamps to stamp anything that requires your identification.


  • Thermal label printer: When you begin shipping several packages a week, use a printer for postage, addressing, and delivery confirmations all on one label.


  • Black permanent marker: These are handy for writing information. Big, fat Sharpie markers work well.


  • 10-pound weight scale: If you plan to sell on eBay in earnest, consider adding a 10-pound weight scale (for weighing packages) to your shipping department.


Whatever materials you use, make sure that you pack the item well and that you secure the box. Many shippers will contest insurance claims if they feel you did a lousy job of packing.


dummies

Source:http://www.dummies.com/how-to/content/for-seniors-how-to-assemble-your-ebay-shipping-sup.html

What to Leave Out of Your CV

Your final CV needs to be concise, well-written and not hindered by long-winded phrases or excess content that slows the reader down and sabotages an otherwise competitive document. Here are some items to ditch:


  • Unnecessary document title: You don’t have to begin your CV by flashing across the top ‘Curriculum Vitae’. You know, the employer knows, the entire world knows it’s a CV. Eliminate the document title and use precious space for more vital information.


  • Career objectives: Oh, so ancient! The reason you’re applying for a position is to either change your career or elevate yourself to the next rung of the corporate ladder. Wasting two or three sentences stating your long-term aspirations doesn’t hit the mark.


  • Reasons for leaving other jobs: Usually you’re asked such questions on an application form. The employer knows there are lots of reasons why people leave their jobs, otherwise they wouldn’t called it an ‘employment history’. You can explain your reasons at the interview, if asked.


  • Lessons learnt from your career: Some candidates make the cardinal mistake of stating how many skills they acquired from each position. Instead, use the Key Skills box at the top of your CV to summarise the experience and skills you amassed throughout your career. The CV isn’t a self-searching exercise; it’s there to sell you within two pages.


  • Salary expectations and how much you earn: An employer usually asks you to write salary information or expectations on a cover letter rather than your CV. You’ve seen the job ad, so you have an idea about how much is being offered.


  • Family details: The employer isn’t interested in how many times you have been married, or how many offspring you have! Don’t state that you’ve been married for the last ten years with two beautiful children.


  • Travel memoirs: Don’t write about all the countries you’ve visited and how long you backpacked around them. These details take up too much space and are usually irrelevant. Simply list in your Interests Section that you’ve travelled extensively.


  • Health: Unless your health directly affects your ability to do the job, it’s irrelevant.


  • Employment gaps: Modern recruiters realise that people move around from one place to another, change jobs and sometimes take sabbaticals to convalesce or take stock. Unless you have significant gaps in your CV (more than two years), don’t start explaining the reasons you didn’t work from September to February. The employer assumes you were recovering from illness, on sabbatical or waiting for another position.


dummies

Source:http://www.dummies.com/how-to/content/what-to-leave-out-of-your-cv.html

Common Netbook Characteristics

More than likely you've wondered just exactly what a netbook is and how it’s different from a laptop. Here's the lowdown. A netbook is a shrunk-down, lightweight laptop that often has these key features:


  • 3 pounds (more or less)


  • 10-inch or smaller screen


  • Intel Atom processor


  • 1GB RAM


  • 10/100 Ethernet port


  • 802.11 b/g wireless card (some models support 802.11 n)


  • Audio-in jack (microphone)


  • Audio-out jack (headphones or speakers)


  • Built-in speakers (many models feature a built-in microphone)


  • SD card reader


  • Touchpad


  • USB ports (2 or 3)


  • VGA out (for external monitor or projector)


Netbooks with additional features such as Bluetooth, larger hard drives, longer life batteries, and so on cost more than basic models.


dummies

Source:http://www.dummies.com/how-to/content/common-netbook-characteristics.html

Business Plan Balance Sheet: Intangibles

Intangibles are assets that, by definition, are hard to get your arms around. But these intangibles can turn out to be extremely important to your business. Intangible assets include things like an exclusive contract to supply services, a franchise ownership, or a hard-to-get license or permit to do business.


An intangible asset can also be a patent that protects an invention, software technology, or a production process. Intangible assets are clearly valuable to the company that owns them, but the question is, what are they really worth?


Intangibles are usually not reflected as assets, although some companies allocate a symbolic $1 on the balance sheet to indicate that intangible assets are there and are valuable but aren’t measurable. The exception is a purchased patent that may be amortized over the life of the patent.


As a business owner, one key intangible asset that you should be aware of is goodwill. Goodwill represents the positive value of a company’s name, including its customer relations, its workforce, its reputation, and other factors that contribute to the company’s ability to succeed in its marketplace.


When a buyer purchases a company at a price above its fair market value, the buyer is probably paying extra to acquire the company’s goodwill. Goodwill is only realized when a business is sold, and so it’s not carried on a balance sheet unless it was acquired as part of a business purchase.


dummies

Source:http://www.dummies.com/how-to/content/business-plan-balance-sheet-intangibles.html

Print Contacts from Address Book on Your MacBook

For those moments when you need an archaic hard copy, Address Book offers a whopping four different formats for printing your contacts: mailing labels, envelopes, lists, and even a snappy pocket address book!


By default, Address Book prints on standard U.S. letter-size paper (8-1/2 x 11 inches) in portrait orientation. You can change these settings right from the Print dialog: Choose File and click Print or press Command+P. From the Print dialog, you can choose exotic settings, such as legal-size paper or landscape orientation.


Follow these steps to print your contacts:


  1. Press Command+P.


    Address Book displays the Print dialog. To show all the settings, click the Show Details button at the bottom of the sheet.


    If you need more than one copy, click in the Copies field to specify the desired number.


    Need labels? Click the Style pop-up menu and choose Mailing Labels to specify what type of label stock you’re using on the Layout pane. Click the Label button to sort your labels by name or postal code, choose a font, select a text color, and add an icon or image to your labels.


    To switch to a standard contact list, click Style again and then click Lists. (You can also print envelopes and pocket address book pages in a similar manner — just choose the desired entry from the Style pop-up menu.)


  2. Select the desired Attributes check boxes to specify which contact card fields you want to appear in your list.


    The Attributes list appears only if you’re printing contacts in either the Lists style or the pocket address book style.


  3. Click the Print button to send the job to the selected printer.


    Alternatively, you can create a PDF file in a specified location — a handy trick to use if you’d rather not be burdened with paper, but you still need to consult the list or give it to others. (PDF files are a special document display format developed by Adobe; they display like a printed document but take up minimal space.)


    To display the contents of a PDF file in Mac OS X, you need only double-click it in the Finder window, and the built-in Preview application is happy to oblige. Even faster, select the PDF file in the Finder window and press the space bar for a Quick Look.


dummies

Source:http://www.dummies.com/how-to/content/print-contacts-from-address-book-on-your-macbook.html

Strategic Planning: Types of Market Segments

Strategic market segmenting can be confusing and more difficult than it needs to be. Remember, there’s no right or wrong way to segment your market. Segmenting requires creativity. Take a shot at creating segments that make sense to you and your business situation. You can always revise your segments at a later date.


Market segmentation by benefits


Benefit segmentation is based on dividing customers based on their needs. This process is also called needs-based segmentation. Simply put, you’re trying to solve a need for a customer. Why not group together all the customers who have the same need?


Some marketers argue that using benefit segmentation is the only way to segment a market because people differ only when it comes to paying you for your product based on the benefits your product provides. However, this type of segmentation may not work for your organization, or it may not be as straightforward. Researching your market can provide some insight on how you can segment based on benefits.


Netflix, an online streaming or home-delivery DVD rental service, divides its customers into three groups based on needs. Group one needs the convenience provided by free home delivery. Group two consists of film buffs who want to be able to access any movie possible. Group three wants the benefit of cheap rentals — they’re the bargain hunters who want to watch a bunch of movies for less than $20 per month.


Market segmentation by descriptors


Descriptors are customer characteristics that are significant enough to divide your market. You don’t use all the descriptors, but you may use one or two together from the following list:


  • Behavioral: Grouping customers by product usage (light, medium, heavy users), brand loyalty (none, medium, high), and type of user


  • Decision makers: Grouping customers based on who decides to purchase your product


  • Demographic: Grouping customers by age, income level, gender, family size, religion, race, nationality, primary language, and so on


  • Distribution: Grouping customers based on where they go to purchase your product, such as in store, online, or through the catalog


  • Geographic: Grouping customers by area, such as regions of the country or state and urban or rural


  • Psychographic: Grouping customers into cultural clusters, social sets, lifestyle, and personality type


E*TRADE, an online brokerage and bank company, segmented its markets in two ways:


  • The company looked at behavioral descriptors, such as usage. It found a large customer segment of day traders who wanted inexpensive and fast trades. E*TRADE developed quick-trade products and bulk pricing to serve this market.


  • The company looked at demographic descriptors, specifically income. Through market research, the company discovered that the group of people with $5,000 to $50,000 to invest was a fast-growing segment that was underserved.


Through these descriptors, E*TRADE developed tools to enable the company to profitably serve these customers.


dummies

Source:http://www.dummies.com/how-to/content/strategic-planning-types-of-market-segments.html

Getting Quicken 2005 Ready for Payroll Work

Preparing the payroll? It's no problem with Quicken 2005. To prepare payroll checks and summarize the payroll information that you need to prepare quarterly and annual returns, you need to set up several liability accounts, a payroll expense category, and several payroll expense subcategories. Fortunately, doing so isn't difficult.


This article describes how you do this task for purposes of United States federal income and payroll taxes. If you employ people in one of the states that has a state income tax, you may also have to deal with state payroll taxes. But you can track and process these the same way you process the federal taxes. (Some counties and cities even have income taxes, but these should also work the same way.)


You might also have other taxes to pay if you employ people outside the United States. But, hey, with a couple hundred countries in the world, your best bet is to get specific advice from someone of authority or expertise in the country of employment.


Setting up liability accounts


You need to set up three liability accounts to deal with federal payroll and income taxes:


  • Payroll-FWH (for Federal Withholding) to track federal income taxes owed

(These names are ones that Quicken expects you to use.)


To set up a liability account for any of these payroll tax liabilities, follow these steps:


1. Click the Property & Debt Center button.


Quicken displays the Property & Debt Center window. You've probably seen this window about a hundred times before. If you want to see the window right now, though, choose the command and look at your screen.


2. Click the Add Account button in the Property & Debt Center window.


Quicken displays the Quicken Account Setup dialog box.


3. Select the Liability radio button and then click the Next button.


Doing so tells Quicken that you're going to set up a Liability account. Quicken displays the next Quicken Account Setup dialog box.


4. Type the appropriate account name: Payroll-SS, Payroll-MCARE, or Payroll-FWH.


Move the cursor to the Name This Account text box and type the right name.


5. Click Next.


Quicken displays the next Quicken Account Setup dialog box, which asks for the ending date and balance from your statement.


6. Enter the As Of Date.


Move the cursor to the As Of Date text box. Type the date — probably the current date — on which you owe the balance that you enter in the Balance Due text box.


7. Enter the current amount you owe for the payroll tax liability.


Move the cursor to the Balance Due text box and enter whatever you already owe. Or, if you're just starting and owe nothing, type 0. (If you do owe something but don't know how much, you should figure out what you owe now before going any further. Sorry.)


8. Click Done.


Quicken displays a message box that asks whether you want to set up an amortized loan for this liability.


9. Click No.


This choice tells Quicken that you don't want to set up an amortized loan for the liability account. Quicken displays the Account Register window, which shows your new account.


10. Close the Account Register window by clicking its Close box.


11. Repeat Steps 2 through 10 for all the other payroll tax liability accounts you want to add.


Remember that you need at least three payroll tax liability accounts — Payroll-SS, Payroll-MCARE, and Payroll-FWH — for the people you employ in the United States. And if you live in a state with income taxes, you either need to move or set up a fourth account: Payroll-SWH.


The only trick to naming other payroll tax liability accounts is that you need to start each liability account name with the word Payroll. No, this isn't an arbitrary rule. You can easily create a report that prints information on all the accounts and categories that start with the word Payroll.


Setting up a payroll expense category


You also need to set up a payroll expense category. Here's all you do:


1. Choose Tools --> Category List.


Quicken, with no hesitation, displays the Category List window.


2. Click New.


Quicken displays the Set Up Category dialog box.


3. Enter Payroll as the category name.


Move the cursor to the Name text box and type Payroll.


4. [Optional] Enter a description of the category.


If you want, you can type a description in the Description text box.


5. In the Type section, select the Expense option button.


This choice tells Quicken that you're setting up an expense category.


6. Describe the tax characteristics of this category.


If you're preparing payroll for a business, select the Tax-Related check box.


If you're prepaying payroll for a household employee — like a nanny — don't select the Tax-Related check box. This little check box merely tells Quicken to include this category on the Tax Summary report. Household employee payroll expenses aren't tax-deductible.


Optionally, if you want, you can select the tax form from the Tax Line Item drop-down list box on which this category should be reported for U.S. federal tax purposes using the Tax Line Item box.


7. Click OK.


Quicken adds the category to the category list and redisplays the Category List window.


Setting up the payroll subcategories


You need to do one more thing to get Quicken ready for payroll. You need to set up subcategory expenses for employee gross wages, the company's share of the Social Security taxes, and the company's share of the Medicare taxes. Quicken expects you to use Gross, Comp SS, and Comp MCARE as subcategory names.


1. Display the Category List window if it isn't showing already.


Choose Tools --> Category List.


2. Click New.


Quicken displays the Set Up Category dialog box.


3. Type the appropriate payroll expense subcategory name: Gross, Comp SS, or Comp MCARE.


For example, move the cursor to the Name field and type Gross or Comp SS or Comp MCARE.


4. Enter a description of the subcategory in the Description text box.


Because the subcategory names are a little more cryptic, you may want to use the Description text box to document things such as what Comp SS means. (Try using Company Social Security.)


5. In the Type section, select the Subcategory Of option button.


This option tells Quicken that you're setting up a subcategory.


6. Indicate that the subcategory falls into the Payroll expense category by moving the cursor to the Subcategory Of text box and typing P for Payroll.


Or, because this is a drop-down list box, you can open the list box and select the payroll expense category from it.


7. Click OK.


Quicken adds the subcategory to the category list and redisplays the Category List window. It also automatically adds the tax information you specified for the Payroll category.


8. Repeat Steps 2 through 7 for all the remaining payroll expense subcategories you need.


For employees working in the United States, you need at least three subcategories: Gross (for tracking gross wages), Comp SS (for tracking company Social Security taxes), and Comp MCARE (for tracking employer Medicare taxes).


Congratulations! You created the liability accounts and categories that you need to track the amounts you pay employees and the payroll taxes you withhold and owe.


dummies

Source:http://www.dummies.com/how-to/content/getting-quicken-2005-ready-for-payroll-work.html

Strategic Planning: What is (and isn’t) Competitive Advantage?

Often starting with what something isn’t is easiest. So your competitive advantage isn’t a list of your strengths. (Not to downplay strengths, because they’re important, too.) But if your competitive advantage list only comprises strengths, it’s not very competitive, now, is it? You have to be better than your competitors in order to have a competitive advantage.


In Creating Competitive Advantage: Give Customers a Reason to Choose You Over Your Competitors (Crown Business), author Jaynie Smith provides an example of what a competitive advantage isn’t.


A management team from a mid-sized financial services group reported that its competitive advantages included the following:


  • Good reputation in the community


  • Skilled staff


  • Outstanding team and well-respected leader


  • Knowledgeable


  • Strong client list and loyalty


  • Flexible and responsive


Blah, blah, blah. You’ve heard all this before. Can’t you say these things about almost any professional service firm? This list of strengths shows you why bulleting your strengths isn’t what comprises your competitive advantage.


A competitive advantage is something you do that’s unique. To compete, you must have a unique advantage. If you peek at the previous list, you notice that it doesn’t include unique qualities — basically anyone in business today needs to achieve that level of competency just to be in the game.


Specifically, a competitive advantage comes from leveraging a company’s unique skills and resources to implement a strategy that competitors can’t implement as effectively or copy. Read on to see how Jaynie Smith provides an example of what a real competitive advantage is.


When a financial services firm went through this process, it uncovered its competitive advantages. Here’s what it came up with:


  • Ranked in top 10 percent of money managers who beat Standard & Poor’s nationally


  • Fastest-growing American Funds money manager three years in a row


  • Only firm ever featured by American Funds in its advisory newsletter


That’s more like it! Wow! Doesn’t that say a lot more about the competitive advantage than a good reputation and a skilled staff? This transition from a general to specific, well-thought-out list is the one you need to make when explaining the competitive advantage of your organization or department.


Here are a few more examples provided by Jaynie Smith from businesspeople who answered the question, “What is my company best at?”


  • Sandy, owner of an interior design firm, determined she was best at increasing real estate developers’ sales ratio by 35 percent and was the only design team chosen by the top-ten luxury developers in the state.


  • A clothing manufacturer named Joe said he was the best at wearable clothing because “our clothes fly off the racks.”


  • The emergency service division of a county in Washington is the best at providing disaster management and response and recovery efforts for all agencies within its service territory because of its skilled people and emergency response equipment.


dummies

Source:http://www.dummies.com/how-to/content/strategic-planning-what-is-and-isnt-competitive-ad.html

Controlling Canine Parasites

When people use the generic term worms in describing puppy parasites, they are usually talking about roundworms, or ascarids. That's because hardly a single puppy avoids being born infested with the pest. But puppies can also be plagued by other intestinal parasites such as hookworms, whipworms, tapeworms, and single-cell parasites such as coccidia and giardia.


Left untreated, intestinal parasites can stunt growth and weaken young animals. Worms — roundworms in particular — can present a danger to humans — especially to children, who often aren't as careful around pets as adults are. As with most diseases transmitted from animals to humans — rabies being the most deadly exception — sensible sanitary measures such as keeping pet areas picked up and hands clean minimize the risk of transmission.


The cure for intestinal parasites is easy, if a little repetitious. First, the puppy's stools are examined for signs of infestation at the veterinary hospital, and your veterinarian then prescribes the appropriate drug to kill the parasites. Puppies should be wormed every two weeks from birth on, until a fecal examination reveals no sign of parasites.


icon

Worming medication is available over-the-counter. The problem is, some intestinal worms and other parasites can be treated with medications available by prescription only. Treating your pet for worms he doesn't have is not a good idea; neither is mistreating him for worms he does — while thinking that the medication you've purchased is doing the job.


The only way to be sure which parasites your puppy is carrying is to have his stool examined by a veterinarian.


icon

The mosquito-transmitted heartworm is an internal parasite that's better prevented than treated, even though recent advances have made eliminating the pest safer for pets.


Puppies whose mothers were on preventive medication can continue on daily or monthly medication, starting from about the time of your puppy's first exam. The preventives often contain medications to control intestinal parasites as well. Once your pet has been started on preventive medicine from your veterinarian, a once-monthly dose for the rest of his life will keep heartworms from bedeviling your dog.


dummies

Source:http://www.dummies.com/how-to/content/controlling-canine-parasites.html

The Galaxy Tab Buttons

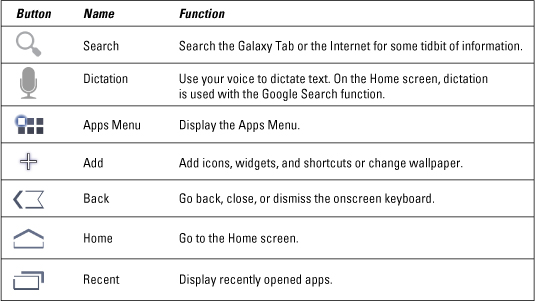
The Galaxy Tab features various icon buttons, found around the touchscreen. You use the buttons to manipulate apps or to control the Galaxy Tab. They provide a welcome consistency, so knowing how they work is important to getting the most from your Tab.


image0.jpg

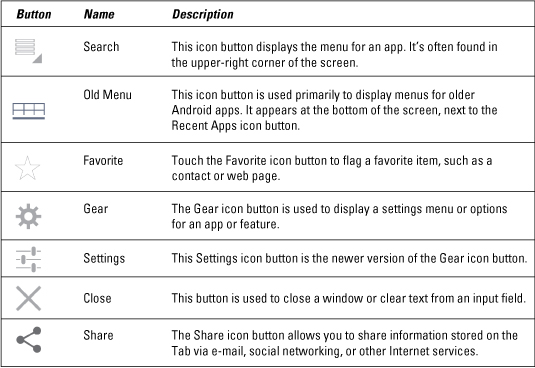
In addition to the icon buttons, other buttons festoon the screen. They aren’t always available, but they provide consistency between the various apps. These buttons are shown here:


image1.jpg


dummies

Source:http://www.dummies.com/how-to/content/the-galaxy-tab-buttons.html

Managing Your eBay Business with Online Resources and Software

Using a site or software to run your eBay auctions makes your selling more efficient, which improves your profits. Some software and services that you can use in your eBay business work on a monthly fee, whereas others work on a one-time purchasing fee. For an application to truly benefit you, it must have the reputation for updating its software each time eBay makes a change in its system.


Most services have a free trial period. Be sure that you don't spend a bunch of your precious time inputting your entire inventory, only to discover you don't like the way the service works. Instead, input a few items to give the service a whirl.


Online management tools


  • Auctiva: This entry-level choice offers some very good free tools that you can try to get an idea of whether you want to use their service.


    Auctiva offers online item-listing software and image hosting for eBay sellers. The easy-to-use site guides you through the process: creating auction listings, posting them on eBay, communicating with buyers, collecting payments, organizing shipments, keeping records of sales, marketing your listings, and much more.


    Their basic plan, at $2.95, gives you 15 listings a month from their site. It features 500MB Image Hosting, a Scrolling Gallery on your eBay listings, and an efficient, one-page listing form with design templates.


  • Vendio: This platform lets you manage items, orders, buyer communications, and your very own store all through one integrated Platform.


  • eBay's Selling Manager: eBay replaced the All Selling tab of your My eBay page with Selling Manager, which displays a summary of your current transactions. Many sellers (even some PowerSellers) rely on Selling Manager to handle their eBay management chores.


    There is no fee for using Selling Manager. It also offers a Pro version that incorporates inventory management and more for $15.99 a month (free to Premium Store subscribers). Many sellers love the Pro version.


Software packages


You can accomplish almost all the same tasks on your own computer as you can with online services, except online auction checkout. You can always use eBay's checkout as your final stop or include a link in your end-of-auction e-mails. And if you want, you can set up a checkout page on your own website that gathers your auction information. Check out these options:


  • Auction Wizard 2000: Way back in 1999, Standing Wave Software developed a product that would handle large inventories and meet the needs of the growing eBay population. In 2000, the company introduced a more robust version, Auction Wizard 2000, to meet the challenges presented by changes on eBay, such as tracking consignment sales, and importing and uploading images.


  • Blackthorne Basic and Pro: eBay's Blackthorne Basic is a solid listing program, offering a variety of templates. Blackthorne puts your standard shipping information and auction messages into your auctions automatically so you don't have to retype them every time. You can customize your e-mail correspondence, and Blackthorne will generate the appropriate e-mail messages after retrieving your completed auction information from the site. The program is available as a monthly subscription fee charged to your regular eBay bill.


  • Turbo Lister: Using Turbo Lister is as simple and straightforward as posting a listing using the Sell Your Item page on the eBay site. One of the benefits of Turbo Lister is that it allows you to prepare auctions while offline and group them for launching all at once to eBay. You can also keep listings in the program for relisting in the future.


    Using the program is a two-step process. First, you download the TurboLister from eBay. Next, you install Turbo Lister on your computer. What could be simpler?


dummies

Source:http://www.dummies.com/how-to/content/managing-your-ebay-business-with-online-resources-.html

People to Help You Find Sales Prospects

When looking for sales prospects, you don’t need to limit your search to just the people you know. Find sales prospects in the people who know your people. Friends, family, clients, and everyday contacts can help connect you with someone they know — and your list of prospects will grow quickly. Remember, there's opportunity everywhere, even in casual everyday conversation, for finding potential prospects.


Here are people who can help you. Start with the people you’re most comfortable with and work your way down the list:


  • Family members


  • Coworkers


  • Spouse’s coworkers


  • Children’s friend’s parents


  • Church members


  • Club members


  • Neighbors


  • Anyone you are a customer of


  • Your local librarian


  • The Internet


  • Anyone you come within 3 feet of


  • Anyone you can help!


Remember to involve as many senses as possible in every client contact. The more you involve a client’s senses, the more involved the client will remain.


dummies

Source:http://www.dummies.com/how-to/content/people-to-help-you-find-sales-prospects.html

For Seniors: How to Plan for Optional eBay Fees

eBay has options that you can use to get your listings noticed — for example, bold face titles (for appearance) and subtitles (for adding extra item information). The options you choose (and the price you’re willing to pay) depend on the type and price of the items you plan to sell.


Here are eBay listing options and what they’ll cost you.


eBay Optional-Feature Fees
OptionFee (Auction or Fixed-Price) 3, 5, 7, 10 daysFixed-Price Fee (per 30 days)
Value Pack (Gallery Plus, Subtitle, and Listing Designer)$0.65$2.00
Boldface title$2.00$4.00
Featured First (for Top-rated Sellers)$24.95$74.95
List in two categoriesDouble-listing and upgrade feesDouble-listing and upgrade fees
10-day auction$0.40n/a
Listing Designer$0.10$0.30
Scheduled listings$0.10$0.10
Subtitle$0.50$1.50
Picture hostingFirst picture free, each additional $0.15
eBay Motors vehicle BIN fee$1.00 for vehicles
Passenger vehicle reserve fee
$7.00

eBay also charges an upgrade fee when you use the Buy-It-Now option on your listings. This table shows how Buy-It-Now upgrade fees break down.


Buy-It-Now Fees
Buy-It-Now PriceFee
$0.01–$9.99$0.05
$10.00–$24.99$0.10
$25.00–$49.99$0.20
$50.00 or more$0.25


dummies

Source:http://www.dummies.com/how-to/content/for-seniors-how-to-plan-for-optional-ebay-fees.html

How to Reverse Beehive Bodies

Bees normally move upward in the hive during the winter. In early spring, the upper deep is full of bees, new brood, and food. But the lower deep hive body is mostly empty. You can help matters by reversing the top and bottom deep hive bodies. This reversing procedure enables the bees to better distribute brood, honey, pollen, fresh nectar, and water. Reversing gives them more room to move upward, which is the direction that they always want to move.


Doing so also gives you an opportunity to clean the bottom board. Follow these steps:


  1. When a mild day comes along (50 degrees Fahrenheit) with little or no wind and bright clear sunlight, open your hive using your smoker in the usual way.


  2. Place the upturned outer cover on the ground and then remove the upper deep hive body.


  3. Keep the inner cover on the deep and close the oval hole in the middle of the inner cover with a piece of wood shingle or tape.


  4. Place the deep across the edges of the outer cover, so there will be only four points of contact (you’ll squeeze fewer bees that way).


  5. Now you can see down into the lower deep that still rests on the bottom board.


    It probably is empty, but even if some inhabitants are found, lift the lower deep off the bottom board and place it crossways on the inner cover that is covering the deep you previously removed.


  6. Scrape and clean the bottom board.


    This is good opportunity to add a slatted rack, because you won't get another chance until autumn. Slatted racks help with the hive’s ventilation and can promote superior brood patterns. They also encourage the queen to lay eggs all the way to the front of the hive, because of improved ventilation and draft control.


  7. Now stand the deep body, which had been the relatively empty bottom one, on one end, placing it on the ground.


    Then place the full hive body onto the clean bottom board (or on the slatted rack, if you added one).


  8. Smoke the bees and remove the inner cover so that you can place the empty deep on top.


    Replace the inner and outer covers.


Repeat this reversal in about three to four weeks, restoring the hive to its original configuration. At that time you can put on one or more honey supers — assuming the bees are now bringing in their own food, and you have ceased feeding and medicating.


dummies

Source:http://www.dummies.com/how-to/content/how-to-reverse-beehive-bodies.html

The Windows Vista Taskbar

The Windows Vista taskbar keeps track of all your open programs. Although it normally lives along the bottom of your screen, you can move the taskbar to any edge of the screen that you want. To move the taskbar, shown in the following figure, just drag it from edge to edge. If it doesn’t move, right-click it and click Lock the Taskbar to remove the check mark by its name.


image0.jpg

Click buttons for currently running programs on the taskbar.


Rest your mouse pointer over any of the taskbar’s programs to see a thumbnail image of that program, even if that program’s currently covered by other windows on your desktop. (This trick only works if your PC has powerful enough graphics.)


See how the button for Paint Shop Pro looks darker than the other taskbar buttons in this figure? That’s because Paint Shop Pro is the currently active window on the desktop: It’s the program currently waiting for you to start working. One of your taskbar’s buttons always look darker unless you close or minimize all the windows on your desktop.


From the taskbar, you can perform powerful magic on your open windows, as described in the following list:


  • To play with a program listed on the taskbar, click its name. The window rises to the surface and rests atop any other open windows, ready for action.


  • To close a window listed on the taskbar, right-click its name and choose Close from the pop-up menu. The program quits, just as if you’d chosen its Exit command from within its own window. (The departing program gives you a chance to save your work before it quits and walks off the screen.)


  • If the taskbar keeps hiding below the screen’s bottom edge, point the mouse at the screen’s bottom edge until the taskbar surfaces. Then right-click the taskbar, choose Properties, and remove the check mark from Auto-hide the Taskbar.


dummies

Source:http://www.dummies.com/how-to/content/the-windows-vista-taskbar.html

How To Add a New User to NaturallySpeaking

Setting up a new user in Dragon NaturallySpeaking is a lot like setting up the original user: You’re off to see the New User Wizard. Invoke the wizard’s name in either of the following ways:


  • Click the New button in the Open User dialog box when NaturallySpeaking starts up.


  • From the NaturallySpeaking DragonBar, choose Profile→New User Profile from the menu.


After the New User Wizard starts up, it takes you through the same series of steps that you (may) remember from original installation: creating the user speech files, selecting the user type, audio setup, general training, and vocabulary building.


You may be able to skip over the most time-consuming part of the New User Wizard (General Training) if you already have NaturallySpeaking user files that you trained on another machine or with another copy of NaturallySpeaking.


If the user you want to add isn’t really new to NaturallySpeaking but is just new to that copy of NaturallySpeaking on a different (or new) computer, you will have to transfer your user files to the new computer.


Getting a new computer can be fun. Everything runs faster, the hard drive is bigger, it may cause you to get a bunch of fun, new apps that you can play with, and the screen is cleaner than your old screen ever was. But just like moving to a new neighborhood, moving to a new machine means going through a period of uncertainty as you wonder whether all your possessions will make it in one piece or whether you have to leave anything behind.


Or maybe it isn't a brand-spanking-new machine. Maybe you’ve just decided that your NaturallySpeaking assistant should follow you onto your office computer or home computer, or vice versa.


In either case, the two main possessions that you would like to wrap in plastic and move to the new machine are your NaturallySpeaking software and your user files.


Owning a copy of NaturallySpeaking entitles you to have multiple User Profiles of your own voice (for example, from different sources) on your computer. You can also install it on your other computers if you don’t use them simultaneously. You are also allowed to enable two or more people to use NaturallySpeaking on your single computer and keep separate profiles for each person.


When you install NaturallySpeaking, the activation process will follow how many computers you install it on. If you run over your allotted amount, you will have to uninstall one to load it onto a new one. See the Nuance website for more information on licensing users and activation.


Because you already ran the New User Wizard when you installed NaturallySpeaking on the new machine, you don’t need to do it again. The next time you start NaturallySpeaking, it knows about the existence of your newly transferred user. What it hasn’t done is calibrate the audio system of this machine for your voice.


Open your new User Profile from the Open User dialog box that appears when NaturallySpeaking starts. (If you don’t see the Open User dialog box, it means that your new user is the only one NaturallySpeaking knows about, so it opened that user without asking.)


NaturallySpeaking realizes on its own that the Audio Setup Wizard hasn’t been run for this user. When it offers you the opportunity to run Audio Setup, click Yes.


dummies

Source:http://www.dummies.com/how-to/content/how-to-add-a-new-user-to-naturallyspeaking.html

How to Test Accrued Payroll Liabilities

Making sure the company books its payroll accruals properly is fairly easy. By the time you conduct your audit, all employees whose unpaid payroll transactions should have been accrued have been paid. All you have to do is get payroll records for the first pay period of the new year and pro-rate them.


The concept of accruals is easier to understand when you consider how you personally get paid. Regardless of how often a company pays its employees, paychecks are usually in arrears.


Here’s a typical scenario: You’re paid every two weeks with two weeks in arrears. A paycheck with a date of October 15 is for work you did from September 16 to September 30. Companies pay this way mostly because doing so is easier. It gives the payroll clerks two weeks from receiving the timecards to enter payroll items, investigate any weird reporting, run paychecks, and get them signed (or, in the case of electronically paid employees, get the payroll amounts approved).


When you start a new job, you normally have to wait a pay cycle to get your first paycheck. At the end of the year you receive a W-2 reporting your payroll with the employer for all completed payroll cycles.


Here are the accounts normally debited and credited when accruing payroll transactions, with the affected financial statement in parentheses:


And here are the accounts affected when accruing payroll tax expense:


  • Debit payroll tax expense for all mandatory employer taxes. This includes the FICA match and any taxes for which the employer is solely liable, such as state and federal unemployment tax (income statement).


  • Credit payroll taxes payable for the same amount as the debit (balance sheet)


Finally, here some accounts affected by other accruals such as accrued vacation pay and accrued postretirement benefits:


  • Debit the related expense account such as wages or the annual postretirement expense


  • Credit a liability such as accrued vacation or prepaid/accrued postretirement cost


If a company is trying to cook the books related to the payroll process, it normally understates accruals, which is the reason why completeness is the primary assertion in this area. If accruals are understated, total liabilities are similarly understated, which throws off any ratio analysis (you may plan to do. The understatement of expenses also serves to overstate net income, which isn’t good.


dummies

Source:http://www.dummies.com/how-to/content/how-to-test-accrued-payroll-liabilities.html