Writing a Sonnet

Learn to write a sonnet in iambic pentameter, just like Shakespeare did. Discover the rhythm and rhyme scheme of the quatrains and couplets that make up a Shakespearean sonnet.


Here are the rules:


  • It must consist of 14 lines.

  • It must be written in iambic pentameter (duh-DUH-duh-DUH-duh-DUH-duh-DUH-duh-DUH).

  • It must be written in one of various standard rhyme schemes.

If you're writing the most familiar kind of sonnet, the Shakespearean, the rhyme scheme is this:


A

B

A

B

C

D

C

D

E

F

E

F

G

G


Every A rhymes with every A, every B rhymes with every B, and so forth. You'll notice this type of sonnet consists of three quatrains (that is, four consecutive lines of verse that make up a stanza or division of lines in a poem) and one couplet (two consecutive rhyming lines of verse).


Ah, but there's more to a sonnet than just the structure of it. A sonnet is also an argument — it builds up a certain way. And how it builds up is related to its metaphors and how it moves from one metaphor to the next. In a Shakespearean sonnet, the argument builds up like this:


  • First quatrain: An exposition of the main theme and main metaphor.

  • Second quatrain: Theme and metaphor extended or complicated; often, some imaginative example is given.

  • Third quatrain: Peripeteia (a twist or conflict), often introduced by a "but" (very often leading off the ninth line).

  • Couplet: Summarizes and leaves the reader with a new, concluding image.

One of Shakespeare's best-known sonnets, Sonnet 18, follows this pattern:


Shall I compare thee to a summer's day?

Thou art more lovely and more temperate.

Rough winds do shake the darling buds of May,

And summer's lease hath all too short a date.

Sometime too hot the eye of heaven shines,

And often is his gold complexion dimmed;

And every fair from fair sometime declines,

By chance, or nature's changing course, untrimmed;

But thy eternal summer shall not fade,

Nor lose possession of that fair thou owest,

Nor shall death brag thou wanderest in his shade,

When in eternal lines to time thou growest.

          So long as men can breathe or eyes can see,

          So long lives this, and this gives life to thee.


The argument of Sonnet 18 goes like this:


  • First quatrain: Shakespeare establishes the theme of comparing "thou" (or "you") to a summer's day, and why to do so is a bad idea. The metaphor is made by comparing his beloved to summer itself.

  • Second quatrain: Shakespeare extends the theme, explaining why even the sun, supposed to be so great, gets obscured sometimes, and why everything that's beautiful decays from beauty sooner or later. He has shifted the metaphor: In the first quatrain, it was "summer" in general, and now he's comparing the sun and "every fair," every beautiful thing, to his beloved.

  • Third quatrain: Here the argument takes a big left turn with the familiar "But." Shakespeare says that the main reason he won't compare his beloved to summer is that summer dies — but she won't. He refers to the first two quatrains — her "eternal summer" won't fade, and she won't "lose possession" of the "fair" (the beauty) she possesses. So he keeps the metaphors going, but in a different direction. And for good measure, he throws in a negative version of all the sunshine in this poem — the "shade" of death, which, evidently, his beloved won't have to worry about.

  • Couplet: How is his beloved going to escape death? In Shakespeare's poetry, which will keep her alive as long as people breathe or see. This bold statement gives closure to the whole argument — it's a surprise.

And so far, Shakespeare's sonnet has done what he promised it would! See how tightly this sonnet is written, how complex yet well organized it is? Try writing a sonnet of your own.


Poets are attracted by the grace, concentration, and, yes, the sheer difficulty of sonnets. You may never write another sonnet in your life, but this exercise is more than just busywork. It does all the following:


  • Shows you how much you can pack into a short form.

  • Gives you practice with rhyme, meter, structure, metaphor, and argument.

  • Connects you with one of the oldest traditions in English poetry — one still vital today.

See also:


Looking at Rhythm and Meter in Poetry


A Shakespeare Mini Glossary


Understanding the Tone of a Poem


dummies

Source:http://www.dummies.com/how-to/content/writing-a-sonnet.html
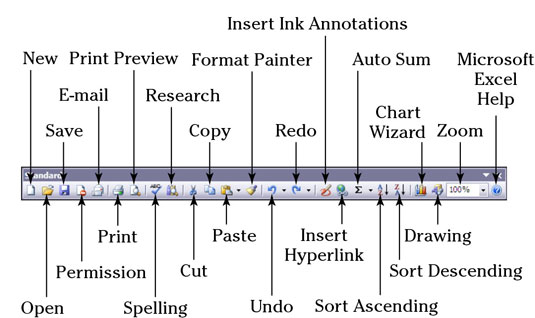
Excel 2003 Standard Toolbar

The Standard toolbar in Excel contains a variety of buttons for doing things like opening a new workbook, zooming in and out on your current worksheet, and sorting selected items. Get to know the buttons for performing common tasks on the Standard toolbar of Excel versions 2003 and earlier by using the helpful figure below.


image0.jpg


dummies

Source:http://www.dummies.com/how-to/content/excel-2003-standard-toolbar.html

Finding Your Way around the Layers Palette in Photoshop

The Layers palette is the Grand Central Station for managing layers. To display the palette, choose Window-->Show Layers or just press F7.


Here's what you need to know to navigate the Layers palette:


  • The Background is the bottom layer in the image. Every image has a Background (unless the Background has been turned into a layer).


  • The order of the layers in the Layers palette represents their order in the image. The top layer in the palette is the top layer in your image, and so on.


  • You can edit only one layer at a time — the active layer. The active layer is the one that's highlighted in the Layers palette and that has a little paintbrush icon to the left of its layer name. To make another layer active, just click its name.


  • You can use the keyboard shortcut Alt+] (right bracket) (Option+] on a Mac) to move up one layer; Alt+[ (left bracket) (Option+[ on a Mac) to activate the next layer down. Press Shift+Alt+] (Shift+Option+] on a Mac) to move to the top layer; press Shift+Alt+[ (Shift+Option+[ on a Mac) to move to the Background or bottom layer.


  • An eyeball icon next to a layer name means that the layer is visible. To hide the layer, click the eyeball. To display the layer, click the eyeball column to bring the eyeball back.


icon

  • To hide all layers but one, Alt+click (Option+click on a Mac) on the eyeball in front of the name of the layer you want to see. Alt+click (Option+click on a mac) again to redisplay all the layers.


  • If you hide the Background layer, you see a checkerboard pattern surrounding your images. The checkerboard represents the transparent areas of the visible layers.


  • You can use the blend mode pop-up menu and the Opacity setting at the top of the palette to mix the colors between layers and adjust the translucency of the layers.


  • To create a new, blank layer, click on the new layer icon at the bottom of the palette. To create a duplicate of an existing layer, drag the layer to the new layer icon.


    You can alternatively create a layer by choosing the New Layer or Duplicate Layer command from the Layers palette menu (click on the right-pointing arraorw at the top of the palette), or by choosing Later-->,New-->Layer or Layer-->Duplicate Layer. If you use this method to create a layer, Photoshop prompts you to give the layer a name..


  • When you create a new layer, Photoshop gives the layer a name like Layer 1, Layer 2, and so on. If you want to name the layer, you can now simply double-click on the layer name in the Layers palette and enter a name directly in the Layer Palette. No more having to remember to hold the Alt (Option) key down and enter the name in the dialog box. This shortcut works throughout Photoshop. If you want to rename a layer the long way, you also can select the layer and choose Layer Properties from the Layers palette pop-up menu, or choose Layer-->Layer Properties.


icon

  • To delete a layer, drag it to the Trash icon. Keep in mind that you're throwing away the layer along with the image on it. Layers can also be deleted via Layer-->Delete Layer or by choosing Delete Layer from the Layers palette pop-up menu.


  • Just in case you ever want to re-create that selection outline around the elements on a layer, though, Photoshop gives you an easy way to do it. Just Ctrl+click (Command+click on a Mac) on the layer name in the Layers palette.


dummies

Source:http://www.dummies.com/how-to/content/finding-your-way-around-the-layers-palette-in-phot.html

Items to Have on Hand during Dog Photo Sessions

Besides all the doggie accouterments you'll need to have on hand, you also need to focus on your accessories to have during dog photography sessions. These aren’t requirements at all, but they may come in handy along the way.


  • Air blower: An air blower is a handy little device with a plastic bulb on one end that shoots out air when it’s compressed. It’s a great tool to clear away dust (or dog hair) from your camera lens!


    Never use compressed cans of air on your photography equipment though, because every once in a while, they have a habit of releasing liquid, which you don’t want to get on your gear.


  • Lens cloth: When photographing dogs, you’re bound to get a wet nose to the camera lens eventually. A lens cloth is a specially designed piece of fabric that won’t scratch that expensive glass.


  • Lens filter: To protect an expensive camera lens from scratches, consider purchasing a clear filter that screws on to the front of your camera lens. It’s way cheaper to replace a scratched filter than a scratched camera lens.


  • Extra batteries: Most digital cameras come with batteries that last many hours before needing to be recharged. If you plan on shooting for an entire day, though, have a charged backup battery in your camera bag.


  • Clothes to get dirty in: Choosing an outfit you don’t mind rolling around on the ground in is especially important if you’re photographing outdoors. You may find yourself having to lie face first in the grass to get certain angles of your pooch.


  • Patience: Patience may not be a tangible accessory you can fit in your camera bag, but patience is one of the single most important traits a dog photographer can possess. This is especially true if your dog happens to be an obedience school dropout. What can we say, school’s not for everyone!


  • Assistant (wrangler/treat dangler): Having a friend or family member available to help out during a photo session makes your experience more enjoyable and allows you to spend more time focusing on your photography than on whether Gottlieb is sitting still.


dummies

Source:http://www.dummies.com/how-to/content/items-to-have-on-hand-during-dog-photo-sessions.navId-323773.html

Purchase or Make Your Own Macro Photography Gear

A lot of specific equipment is available to macro photographers and in some cases it may be best for you to go ahead and purchase it. Still, sometimes you’re better off finding an alternative product or simply making your own equipment.


Here are some cases where you need to weigh the pros and cons before making a decision.


Light reflectors


Any reflective surface can function as a reflector for bouncing light into your — even a white piece of foam core or poster board. You can cut these to any size you desire; they are lightweight, easily replaced, and no problem to store. The downside to this type of reflector is that it’s not stable in high winds and isn’t weather resistant.


You can make a more stable white reflector out of a thin piece of plywood that’s painted white. You could even attach foil to one side to make a multipurpose reflector. Foil provides a more intense light than a white reflector. A plywood reflector isn’t as easy to travel with as the foam core version.


A photo-specific light reflector comes in a round shape that is made of cloth material. You can twist the reflector down to a smaller size, making it easier to store and carry around.


This tool is more expensive than the other two options but typically comes with variable layers (diffusion, white, silver, gold, and black), making it a very versatile piece of equipment. This type of reflector holds up fine in inclement weather but tends to bend and is difficult to hold steady in high winds.


Grip materials


Some of the most common grip materials, such as clamps, putty, tape, and brushes are available in photography stores, but you can usually get a better deal if you buy them somewhere else. A photo-specific clamp may be made in the same exact factory as the clamps found at a general hardware store, but because it’s deemed for photography use it gets a higher price tag.


Go on a reconnaissance mission into your favorite photography supply store and look at the various grip materials that are available to macro and close-up photographers. Determine what you need based on your shooting style, and then figure out which items you can realistically find cheaper somewhere else and which items you can build yourself.


dummies

Source:http://www.dummies.com/how-to/content/purchase-or-make-your-own-macro-photography-gear.html

Evaluating Governments in Emerging Markets

Governments in emerging markets care about financial markets because the markets can be sources of power — or threats to it. As you do research on a country, you’ll get a sense of whether the government is promoting trade or hindering it. Entering into trade agreements is a good sign; talking about putting restrictions on profiteers is not so good.


A government needs to provide the stable ground rules that make commerce work, including fair regulation with consistent enforcement. The greatest responsibility of a government is to manage the nation’s economy. Governments have many tools to intervene in the economy:


  • Planning priorities: Governments use budgets and plans to make decisions about national spending priorities. The citizens and the businesses within a country have their own budgets and plans, too. Ideally, all the plans come together to form a clear blueprint for growth. Planning agencies may include:


    • Central planning: The government sets the national economic priorities and allocates funds accordingly. This method is often associated with authoritarian governments.


      Everyone knows what the plan is and what’s expected and central planning is a good way to get big infrastructure projects up and running, which many emerging markets need. However, decisions have to go through a bureaucracy, which can be downright slow and rigid. And central planning itself lacks flexibility.


    • Market planning: When a government is weak or disinterested, planning gets pushed to the market. On the upside, the market can respond to changes in needs quickly and efficiently. On the downside, businesses usually balk at infrastructure and development projects because they’re not likely to be profitable. The other problem is that some efforts overlap, wasting money and effort.


    • A mix of central and market planning: Most governments mix. For example, the government may plan infrastructure projects to encourage development in certain parts of the nation and then leave it to entrepreneurs to decide to set up businesses there.


  • Tax collection: Some services can be provided only by a central authority, such as a national defense and an effective court system. Other services, such as schools, roads, and parks, can be provided by the private sector in theory but probably won’t be. Taxes on corporate profits and employee earnings can give a government the money it needs to take on projects that it wants to accomplish. As long as businesses generate the funds that the government needs, the government will have an interest in helping businesses grow.


  • Regulation: Governments have a vested interested in protecting the health and welfare of the people. Regulations that protect workers, customers, and the environment can make a nation more stable and increase people’s trust in business. Effective regulation protects businesses, too by protecting intellectual property rights and enforcing contracts.


    Emerging markets don’t necessarily have a long history of successful and responsible businesses, and both the people and the politicians of an emerging-market nation may be less willing to have a light hand with regulation than people and politicians in developed markets.


    The key to regulation is ensuring that it’s reasonable and is enforced consistently. If regulations are too strict, ethical businesses play by the rules and suffer because the rules are too onerous, while their unethical competitors start paying bribes to circumvent the rules. Likewise, if regulations are enforced capriciously or not at all, businesses learn to ignore them.


  • The job market: Politicians like to create jobs for voters, and many politicians appreciate the private sector and its ability to create jobs because they know that employed people tend to be happy people who reelect politicians.


    But the private sector can also compete for workers with government agencies, and many government officials would prefer that the country’s top college graduates take government jobs in order to make a difference in the country instead of serving a private-sector, profit-maximizing company.


    A nation’s economic success depends on the talent and commitment of the people in it. If the people have no interest in working for companies in the private sector, then development will be very slow. And slow development can affect the growth of businesses and of investment opportunities for emerging markets investors.


dummies

Source:http://www.dummies.com/how-to/content/evaluating-governments-in-emerging-markets.html

How to Navigate with the MacBook Trackpad

As a MacBook owner, the trackpad is your primary navigational tool. You move your finger over the surface of the trackpad, and the pointer follows like an obedient pup. The faster you move your finger, the farther the pointer goes. You click an item by tapping once on the trackpad. It opens, you do your thing, and life is good.


However, you can always customize how your trackpad operates! For example, click the System Preferences icon in the Dock, then click the Trackpad icon. From the Point & Click pane, you can:


  • Enable the Tap to Click check box. Now, when you tap the trackpad quickly, your Mac laptop counts that as a click, and two fast taps act as a double-click.


  • Enable the Secondary Click check box. Suddenly a single tap with two fingers displays the right-click menu.


  • Enable the Three Finger Drag check box. (Sounds like a dance from the1960s, doesn’t it?) By using three fingers, you can drag windows around on your desktop to reposition them.


  • Enable the Look Up check box. Tap your trackpad with three fingers to look up a selected word in the Dictionary.


  • Adjust your tracking speed. Click and drag the Tracking speed slider to speed up or slow down the rate at which your pointer moves.


dummies

Source:http://www.dummies.com/how-to/content/how-to-navigate-with-the-macbook-trackpad.html

Touring the Drupal Dashboard

All Drupal site-building, maintenance, content management, and user management is controlled through the Drupal Dashboard menu bar's administration menus. You can also monitor your Drupal site through status reports accessible through the Reports menu. Here's an overview of the main menu options:


  • Home icon: This takes you to a view of the live site, while leaving the administration menu visible across the top of the page.


  • Dashboard menu bar: Think of this as an administrator's home page. You can configure this page to give you a custom view of the latest activities on the site.


  • Content: Here's where you add and manage existing content on the site. This form allows you to search, move, publish, unpublish, and delete content by type or status.


  • Structure: This menu contains options to control the way your Drupal site is arranged and structured.


  • Appearance: This form lets you install and manage the themes your site uses.


  • People: All user management options are available on this form. Find, add, delete, block users, and manage user roles.


  • Modules: Opens a form that lets you add, delete, enable, and configure modules.


  • Configuration: This menu contains links to configure all the customizable features of your Drupal site. There are many!


  • Reports: Configure, fine-tune, and view information about your site with the report links offered on this menu.


  • Help: This is a built-in set of help pages to assist you in building and maintaining your site.


dummies

Source:http://www.dummies.com/how-to/content/touring-the-drupal-dashboard.html

The Cellular Data Network and Your Samsung Galaxy Tab

The cellular Galaxy Tab is designed to connect to the Internet by using the digital cellular network. This signal is the same type used by cell phones and cellular modems to wirelessly connect to the Internet.


Wi-Fi–only Galaxy Tabs can’t access the digital cellular network.


Several types of digital cellular networks are available:


4G LTE: The fourth generation of wide-area data network is as much as ten times faster than the 3G network and is the latest craze in cellular networking. Verizon is busily covering the country in a coat of 4G LTE paint; if the signal isn’t available in your area now, it will be soon.

3G: The third generation of wide-area data networks is several times faster than the previous generation of data networks. This type of wireless signal is the most popular in the United States.

1X: There are several types of original, slower cellular data signals available. They all fall under the 1X banner. It’s slow.

Your Galaxy Tab always uses the best network available. So, if the 4G LTE network is within reach, that network is used for Internet communications. Otherwise, the 3G network is chosen.


  • A notification icon for the type of network being used appears in the status area, right next to the Signal Strength icon.


  • Accessing the digital cellular network isn’t free. Your Galaxy Tab most likely has some form of subscription plan for a certain quantity of data. When you exceed that quantity, the costs can become prohibitive.


  • A better way to connect your Galaxy Tab to the Internet is to use the Wi-Fi signal. The digital cellular network signal makes for a great fallback because it’s available in more places than Wi-Fi is.


dummies

Source:http://www.dummies.com/how-to/content/the-cellular-data-network-and-your-samsung-galaxy-.html

Consulting For Dummies

If you’ve decided to become a consultant, stay ahead of the competition using tested techniques. A professional Web site and a commitment to your clients will increase your chances of referrals and add to your consulting client base.


>


>


Ten Secrets to Consulting Success


Many different ways exist to become a more efficient consultant, however, some are better than others. Incorporating the following methods into the way you do business will keep you way ahead of the consulting competition:


  • Listen to your clients. To determine the best solutions for your clients, you must listen to them and understand what it is they want. Make it a point to listen to your clients more than you talk.


  • Quickly establish rapport with your clients. Consulting is very much a one-to-one, person-to-person kind of business. Establishing rapport with your clients builds a bridge that enables trust to grow.


  • Be direct and honest. Your clients are hiring you because they need help — sometimes a lot of help. You are doing them no favors by sugarcoating any bad news you may have for them. Give them your best assessments and advice at all times.


  • Be flexible and responsive. Flexibility is one of the main reasons why people hire consultants. You will have a tremendous advantage over the competition if you can quickly respond to customer needs as they present themselves.


  • Don’t overprice your services. The higher your price, the less demand there will be for your services. That may be fine if you can survive with a relatively few, high-paying jobs. However, if your prices are significantly higher than the competition, be prepared to explain the additional value you bring to the table.


  • Don’t under-price your services. If your price is too low, you may find it difficult to make a profit. Don’t forget: There’s not a client on the face of the Earth who will tell you that you should charge a higher rate!


  • Have more than one primary client. Trusting the success of your business to just one or two clients is never a good idea. Secure a number of clients in a variety of fields instead of just one or two, even if your main client keeps you busy full time.


  • Accept as much work as you can without compromising quality. Small jobs may lead to big jobs. Avoid turning down new work unless doing so will cause the quality of your current work to suffer.


  • Treat your current clients like gold. Not only do your current clients pay your bills, but they are your best source for referrals to new clients. Don’t forget your most important clients: your current clients.


  • Constantly market to bring in future business. You need a constant stream of future clients to keep your consulting business afloat. Set aside one-third to one-half of your time prospecting for new clients.


>


>


>


Building Your Consulting Business with Current Clients


While you’re throwing money and time at marketing your consulting business don’t forget your current clients. They’re your best source for new consulting business because they know you and your quality of work first hand. Take care of current clients first with these proven techniques:


  • Be on time and within budget.


  • Anticipate your clients’ needs (and be ready with suggestions to address them).


  • Be easy to work with.


  • Keep in touch with your clients.


  • Be honest and ethical.


  • Give a little more than you promise.


  • Ask your clients for testimonials and referrals.


  • Offer financial incentives for continuing to do business with you.


  • Educate your clients about all the services that you offer.


  • Do great work.


>


>


>


How to Build an Effective Consulting Web Site


When putting together a first-class Web site for your consulting business, your goal is to create a professional image, make the site easy to navigate and enhance client contact. Try these Web site building tips:


  • Consider hiring a pro. Your Web site may be the first impression a potential client has of your business, and first impressions are important. By hiring a pro to design and build your Web site, you have a better chance of making the first impression a good one.


  • Be easy to find. Make sure your Web site address (URL) closely matches the name of your business or is otherwise linked to it.


  • Get out the word. Be sure to include your Web site address wherever you can, including on your letterhead and business cards, marketing brochures, within your e-mail signature, on the side of your car — anywhere a potential client might see it.


  • Capture contact information. Encourage visitors to leave their contact information so you can open up a dialog with them. Provide them with a free subscription to a useful monthly newsletter — or a free assessment of their issue or opportunity — in exchange for their e-mail address.


  • Give clients a reason to visit. Your Web site should contain information that is of value to them and that entices them to visit on a regular basis. This information may include articles as well as links to other Web sites and blogs.


  • Visit your site regularly and check Web stats. It’s always a good idea to check your site regularly to make sure it’s up and running, and that all links and interactive elements are working the way they should. And be sure to monitor your Web stats so you know who is visiting and what pages they find of greatest interest.


  • Consider blogging. The latest trend is for people to set up blogs — which are personal online journals that easily can be set up and maintained, and are usually current and interactive — instead of static Web sites. Before you set up a blog, research what other consultants in your field are doing, and be sure to take your findings into account.


>


>


>


How to Form Strong Relationships with Your Consulting Clients


As a consultant, the relationships you build with your clients are key to your success and they should be built on the strongest foundation of respect and honesty. Maintain the highest code of ethics and always do the right thing, including:


  • Account for your time accurately and honestly.


  • Don’t make promises that you can’t keep.


  • Don’t recommend products or services that your clients don’t need.


  • Be candid and give your honest opinion.


  • Protect your clients’ confidentiality.


  • Follow through on your promises.


  • Disclose conflicts of interest.


  • Don’t use inside information to your advantage.


  • Don’t break the law.


>


>
dummies


Source:http://www.dummies.com/how-to/content/consulting-for-dummies-cheat-sheet.html

How to Explain Your Dairy-Free Diet to Others

Your dairy-free diet doesn’t have to be anyone’s concern but your own, and you don’t owe anyone any explanation about your diet. It’s even possible that some people may never find out that your diet is different — unless, of course, you tell them.


The more-likely scenario, though, is that your diet is going to be an issue at some point. If you’re dairy-free, you’re different. The way dairy-free diets are viewed is changing, but at this point, dairy products are still highly integrated into meals nearly everywhere you go in North America and Europe.


Because dairy-free diets aren’t mainstream yet, you’re the one who will likely have to do the adapting when you’re in social situations. Adapting often entails telling people about your dietary restrictions and explaining why you don’t do dairy.


You may prefer privacy and feel uncomfortable sharing personal details with people outside your closest circle of family and friends. If so, that’s okay. However, realize that when it comes to your diet, you’re likely to find yourself in social situations that force you to explain what you’re eating — or not eating — and why. You don’t have to respond when people probe, but it’s easier if you can be prepared with a diplomatic response.


If someone asks about your decision to go dairy-free, the best response is a simple, straightforward answer. For example, you can say:


“I’ve realized that dairy products don’t agree with me, so I’m learning to replace them with other foods.”

If your reasons for avoiding dairy have to do with ethical or political motivations, this isn’t the time to pontificate or criticize someone else’s lifestyle. Simply stick to the facts about your own eating style. Rely on your own judgment, but realize that when most people ask questions about your diet, they’re just curious. The idea may be new to them, and they’re exploring, not criticizing or judging.


You may be dairy-free because you don’t absorb lactose well, or it may be because you’re trying to control your saturated fat intake to protect your heart. These are good reasons to avoid dairy, and people may find them interesting. After they discover that you eat a dairy-free diet for health reasons, they may begin to wonder whether they should be doing the same thing.


The way you talk to others about your diet choices — and the choices that other people make — has the potential of cementing or dissolving relationships. Food choices are a very personal matter, so you need to be careful about how you approach the topic with others. If you’re overbearing — bossy or belligerent — you’ll come off as being unstable or uncouth. If you’re preachy or harsh, you’ll put people off.


Your diet may be healthier, and it may follow the ethical high road and the ecologically responsible path. However, you won’t convince others if you hit them over the head with it. Instead, answer questions politely, and be open to sharing your knowledge and experience when somebody cares enough to approach you for insight. Lead by example. Show others that it’s possible to follow a dairy-free diet easily, deliciously, and nutritiously.


dummies

Source:http://www.dummies.com/how-to/content/how-to-explain-your-dairyfree-diet-to-others.html

Enterprise Mobile Device VPN Requirements

Virtual private network (VPN) refers to the secure connectivity between a mobile device and a VPN gateway or server installed within the corporate network. When a VPN tunnel is established between a device and the VPN gateway, all communication over that tunnel is encrypted. This encryption provides security for data being exchanged between the device and the corporate network.


Hackers can snoop on data that isn't encrypted as it's on its way to the device. For example, it's possible for a hacker at a café to snoop on unencrypted data being received on another person’s device. This is why you want end users to connect via VPN when they're accessing corporate data in public places.


You may have used a VPN to connect to your corporate network from your PC at home. Similar technology is available for several mobile devices. A VPN connection encrypts the data communication from and to the device, thereby making it impossible for hackers to intercept and steal the data being exchanged.


So, the most critical requirement of data encryption is to enforce VPN access as a compliance requirement. If you are an IT administrator, that means enforcing VPN for all mobile device users to connect to their work e-mail or other applications. Most VPN vendors like Cisco and Juniper have VPN solutions available for some or all device types.


Enforcing VPN on mobile devices requires you to have a VPN server or gateway installed in your network. The devices need to connect to the server when setting up the VPN tunnel.


Here are the VPN policies you may want to enforce on mobile devices:


  • Allow users to check corporate e-mail, browse intranet pages, and/or use client-server applications.


  • Enforce strong authentication on the devices, including one or more of the following types:


  • Username and password


  • Certificate-based authentication


  • One-time password (passwords expire after just a single use)


  • Manage a single set of policies to set consistent VPN policies for not just mobile devices, but also Windows and Mac computers.


Certificate-based authentication and one-time password authentication require you to deploy certificates to mobile devices as well as set up infrastructure to configure the one-time password server in-house. Be sure to look up the vendor documentation for deployment guides and instructions.


Finally, VPN — or, in general, secure connectivity from mobile devices to the corporate network — may differ from corporate devices to personal devices. For example, BlackBerry devices maintain a secure connection to the BlackBerry Enterprise Server that is typically installed within a corporate network, which saves you from needing a VPN. For all other mobile device types, you're better off requiring and enforcing a strong VPN policy.


dummies

Source:http://www.dummies.com/how-to/content/enterprise-mobile-device-vpn-requirements.html

Major Italian Red Wines

Italian red wines bring up the image of grape-stomping parties that provide fun for the whole village. Fortunately, you don't have to press the grapes yourself to enjoy a bottle of good Italian red wine. The major reds are described in the following list:


  • Amarone: Lusty, full-bodied wine from partially-dried Corvina grapes, in the Veneto region. Dry and firm wine, but its ripe, concentrated fruitiness suggests sweetness. Needs rich, savory foods or flavorful cheeses.


  • Barbaresco: Similar to Barolo, from the same grape in a nearby area, but generally a tad lighter in body and slightly more approachable. Drinks best at 8 to 15 years of age, depending on the producer.


  • Barbera: Varietal wine produced mainly in the Piedmont region. Dry, light- or medium-bodied, with intense berry flavor, mouth-watering acidity, and little tannin. Particularly versatile with food. Many of the best wines are from the Alba or Asti zones.


  • Barolo: Dry, full-bodied, magisterial wine from Nebbiolo grapes in the Barolo area of Piedmont. Has complex aromas and flavors of strawberries, tar, herbs, and earth, as well as a firm, tannic structure. Drinks best at 10 to 20 years of age, depending on the producer.


  • Brunello di Montalcino: Full-bodied, intense, concentrated wine from Sangiovese grapes grown in the Montalcino zone of Tuscany. Dry and quite tannic, it drinks best when it's at least 15 years old.


  • Chianti: Very dry, medium-bodied, moderately tannic wine with lovely tart-cherry flavor, mainly from Sangiovese grapes grown in the Chianti area of Tuscany. "Chianti Classico" is often the best. Some wines are good young; wines labeled riserva, and pricier wines, are generally more concentrated and age-worthy.


  • Lambrusco: Most commonly a sweet, fizzy wine with delicious, grapey flavors. Made from Lambrusco grapes usually in the Emilia-Romagna region. Dry and sparkling styles also exist.


  • Montepulciano d'Abruzzo: Generally medium-bodied and flavorful with red fruits and a slightly vegetal note. Lighter examples are smooth and easy to drink; the best wines are concentrated and denser in texture. From the Montepulciano grape, in the Abruzzo region.


  • Salice Salentino: Dry, full-bodied wine from Negroamaro grapes in part of the Puglia region. Generally has somewhat intense aromas and flavors of ripe, plummy, baked fruit, and rich, dense texture. Suitable with robust foods.


  • Valpolicella: Medium-bodied wine mainly from Corvina grapes in the Valpolicella area of Veneto region. Dry, lean, and only moderately tannic, with more or less intense cherry aromas and flavors. Some versions, such as single-vineyard wines, are particularly good.


  • Vino Nobile di Montepulciano: Medium-bodied, dry, and lean, with red cherry flavor, similar to Chianti but slightly fuller. Made from Sangiovese grapes in Montepulciano, in the Tuscany region.


dummies

Source:http://www.dummies.com/how-to/content/major-italian-red-wines.html

Keep Dogs Safe during Photo Sessions

Your first priority in general should always be to keep your dog safe, and that applies when you’re taking photos of him as well. If you don’t want to have him on a leash (otherwise known as having him “off-leash”), use a secure, enclosed area (like your house or yard). Otherwise, make sure he’s on a strong leash and never let go, even for a second.


And if you’re taking photos in a public place, never leave your dog unattended. Another good idea is to have someone help you by doing the handling or wrangling. Because you’re photographing him, you’re not able to devote 100 percent of your attention to his safety.


Nothing is more important than the safety of you and your dog. Nothing. That goes for emotional and mental safety, too. If your dog feels threatened, you won’t be able to work with him to get good photos.


Be conscious of things that are particularly spooky to your dog — loud noises, tall people, other dogs — and make sure to avoid them. You want your dog to feel relaxed during your photo shoot, and that won’t happen if he’s too worried that the big guy over by the tree is coming to get him.


Don’t take chances with your dog’s safety just for a cool photo. It only takes a second or an inch for something to go wrong.


dummies

Source:http://www.dummies.com/how-to/content/keep-dogs-safe-during-photo-sessions.html

Optimizing before Building Your Site

A fully optimized site is not built from the outside in — in other words, as a visitor conceives it. Instead, you build an optimized site from key concepts and keywords, and its pages never stray from a tight connection to those concepts and their related keywords. Furthermore, business-oriented Web designers are always focused on their target audience — the people who search for the key concepts and keywords embedded in the Web page. This circular thinking — the relentless integration of design with result, of keyword with content — distinguishes a finely optimized site.


In theory, you would construct a perfectly optimized site in roughly this order:


1. Conceive the site.


Conception means determining the site's purpose in specific terms. An optimized site can have more than one purpose (information publishing and Amazon affiliation, for example), but those purposes should be tightly related. Conception means also identifying your target audience.


2. Identify keywords.


Boiling down the site's mission to key concepts and keywords is essential. Keywords can be single words or phrases, but keep phrases short for now — three words at most. For example, using the fictional The Coin Trader site, the keywords and phrases might be coins, coin trader, coin trading, trading, collecting, coin collecting, and so on.


Eventually, you need keywords for every page of your site, and they might differ from the core words used to distill the subject matter of your entire site. During the entire keyword process, think about your target audience — not only as a topical demographic, but as searchers going into Google with certain keywords. When you identify keywords, you identify your customers.


3. Register a domain.


Choose a domain name that incorporates core keywords.


4. Design the site.


Use spider-friendly principles, such as placing only relevant outgoing links on your pages.


5. Write and acquire content.


Content development is an ongoing process that starts while you design the site.


6. Optimize content by keyword.


Embedding keywords in your page's text helps visitors and Google understand the content quickly.


7. Tag the site.


Tagging means embedding keywords into important HTML tags that Google's spider observes.


You may be thinking, so much for theory. Few Webmasters deal with optimization issues from the very start. Most people optimize after the fact, which is why SEO professionals stay in business: It's harder to fix problems than avoid them. But no matter how you approach the prospects, improving your optimization isn't hard at all. And the knowledge it provides about sound page design, content development, concise communication, and smart tagging translates to invaluable online marketing technique.


dummies

Source:http://www.dummies.com/how-to/content/optimizing-before-building-your-site.html

Helpful Hints for Working in Windows 7

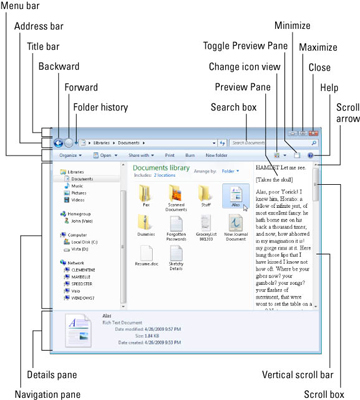
Many people are dragged into using Windows 7 without a choice because their new computers probably came with Windows 7 installed. Working in Windows 7 isn't so hard if you consider the helpful hints in this list. You'll save time and prevent a headache or two!


  • Don’t know what a certain button does in a program? Rest your mouse pointer over the button for a few seconds. A helpful box often pops up to explain the button’s purpose.


    image0.jpg

  • If you’re baffled, try pressing F1, that “function key” near your keyboard’s upper, left corner. A Help window appears, often bringing hints about your current problem.


  • To see what you can do with something in Windows, right-click it. A menu appears, listing all your available options.


  • Press Alt to reveal any hidden menus in any program, including Media Player.


  • To find lost windows on the desktop, hold down Alt and press Tab. Windows displays thumbnail images of open window. Keep holding down Alt, press Tab until Windows selects your desired window, and then let go of Alt to bring that window to the top.


  • To share files with all the users of your computer, copy them into one of Windows’ Public folders: Double-click the name of any of your libraries, and two folders appear. The folder named Public is accessible to everybody on your PC (and even a network).


  • If your computer acts weird after you install new hardware or software, use System Restore to set it back to a time when it worked. Click All Programs from the Start menu, click the Accessories menu and choose System Tools, and then click System Restore.


  • Retrieve accidentally deleted files and folders by opening the Recycle Bin on your desktop. Right-click the deleted item and choose Restore to return it to its original location.


  • To return to an older version of a file you’ve changed, right-click the file and choose Restore Previous Versions. When Windows lists the date of the version you want to retrieve, click the Restore button.


dummies

Source:http://www.dummies.com/how-to/content/helpful-hints-for-working-in-windows-7.html

Use Your Business Plan to Generate Growth

The objective of a business plan is always the same: to acquire customers and to generate revenue and profit. The variables are how your business will grow — and how big you want it to get. Think through your answers so you can include them in your business plan.


Companies grow in two basic ways:


  • By acquiring new customers: You can grow your clientele by


    • Heightening promotion of established products


    • Developing and marketing new uses for your established products


    • Developing and marketing new products


  • By generating increased sales volume from established customers: You can grow your business from within by


    • Making changes in your pricing or product line


    • Repackaging your products, or bundling products and services


    • Developing and marketing new products


If you’re planning for a new business, your entire emphasis will be on acquiring new customers, while established businesses will likely plan to increase business from established customers while also attracting new customers in order to achieve desired growth.


If your growth plans rely on the development of new products or new customers, dedicate sufficient patience, assets, and capabilities to the task. Product and market development often require time, which you need to account for in your business model.


dummies

Source:http://www.dummies.com/how-to/content/use-your-business-plan-to-generate-growth.html

What to Remember about Mortgages

Your home is likely to be your most expensive purchase, ever. So getting the finance right is vital. Follow these guidelines when deciding on which mortgage to go for.


  • Don’t accept the first mortgage offered to you by your bank. Shop around to see whether it’s competitive.


  • Use an independent mortgage broker to find a home loan; doing so can save you time and effort searching the market for the best deal.


  • Make sure you don’t overstretch yourself. Can you afford to meet the repayments if interest rates rise? To find out, write down your incomings and outgoings. The balance is the amount you can afford to spend on the mortgage each month. If it’s not enough to afford a decent loan, make sacrifices or delay the purchase until you can afford it.


  • Save up a deposit. Not all lenders require one, but if you have a deposit, you’ll get a better rate, have lower monthly repayments, and won’t have to pay mortgage indemnity guarantee.


    Ask your parents for help because they may be able to stump up a deposit or act as guarantors.


  • Avoid extended redemption penalties. Paying a penalty for switching mortgages before a fixed offer comes to an end is fair enough, but don’t accept a mortgage with penalties that extend beyond this period.


  • Watch out for compulsory insurance. Some lenders charge borrowers a one-off fee if they don’t take out their buildings or contents insurance. It might be cheaper to pay this and buy your insurance elsewhere.


dummies

Source:http://www.dummies.com/how-to/content/what-to-remember-about-mortgages.html

HTML Resources for Building a Web Site

HTML is the language of the Web. Every Web site is built on this language or on a variant of it. However, HTML shouldn’t be intimidating; it’s a relatively straightforward technology. If you need help, here are a few great online resources to get the information you need.


Site NameWeb Site
Builder AUwww.builderau.com.au
HTML Goodieswww.htmlgoodies.com
HTML Specificationwww.w3.org/TR/html
HTML Stationwww.december.com/html
HTML Writers Guildwww.hwg.org
HTMLcenterwww.htmlcenter.com/tutorials/index.cfm
Index DOT Htmlwww.eskimo.com/~bloo/indexdot/html/index.html
Introduction to HTMLwww.wdvl.com/Authoring/HTML/Intro
Validome Validation Serviceswww.validome.org
W3C Markup Validation Servicehttp://validator.w3.org
Web Developer’s Virtual Librarywww.wdvl.com


dummies

Source:http://www.dummies.com/how-to/content/html-resources-for-building-a-web-site.html

Green Gift Giving: Regifting

Regifting — giving a gift you’ve received to someone else as a gift — is a way to recycle unwanted or unneeded items. You can also regift something that’s important to you and thus share its value — perhaps creating an heirloom for the recipient. For example, you may regift a painting or a book that has given you inspiration or encouragement to a loved one undergoing a difficult experience.


Regifting isn’t for everyone; in fact, some consider it quite rude. And you need to be conscious about what you regift to whom. For example, it may not be the wisest idea to regift the birthday present your parents gave you, and it’s definitely not a good idea to regift an item if there’s a chance that either the new recipient or the original giver could find out and be offended.


In the right circumstances, regifting offers significant advantages:


  • You aren’t buying new goods. You’re subscribing to the principle of reducing waste and thus reducing the amount of energy used to produce new products.


  • You’re reusing something. You’re giving something to someone who will make use of it, thereby keeping the item out of a landfill site.


  • You’re eliminating the need to recycle the item. You’re saving the energy required to reprocess the item.


dummies

Source:http://www.dummies.com/how-to/content/green-gift-giving-regifting.html

Home Theater For Dummies

Adding surround sound is a must for your home theater. Take a look at options for surround-sound formats to maximize your movie-watching and music-listening experience.


>


>


Home Theater Surround-Sound Formats


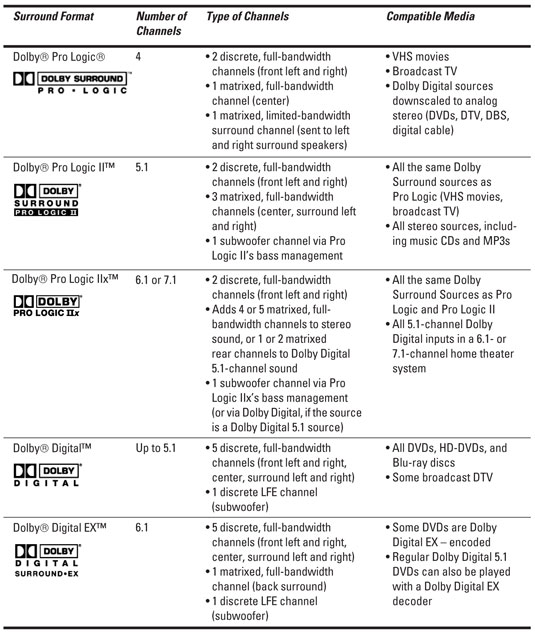
So you’re not confused by all the surround-sound formats, take a look at the following chart, which describes different terms, brand names, and gear involved when deciding on surround-sound capability to optimize your home theater:


image0.jpg
image1.jpg


>


>
dummies


Source:http://www.dummies.com/how-to/content/home-theater-for-dummies-cheat-sheet.html

Recognizing Common Health Issues in Dachshunds

In general, your Dachshund will probably stay pretty healthy throughout most of her life. Know how to recognize common health issues in Dachshunds so you can get your dog the right treatment right away. When treated promptly, most conditions can be treated successfully.


Identifying back injuries


Back injuries are the most common type of Dachshund health problem. The Dachshund's funny body shape makes them particularly susceptible to CIDD — essentially a ruptured or leaking disk. When this happens, every second counts; consequently, it is important to know how to recognize a back injury as soon as possible.


Spinal cords can't take much pressure. A ruptured disk that presses on the cord can quickly deprive the spinal cord of essential blood and oxygen, causing lasting damage.


When a back injury occurs, you must know what to do, and you must do it fast. However, you can't do anything if you don't know that your Dachshund is having a problem in the first place. Look for the following signs:


  • Shivering — especially when combined with unusual inactivity


  • Refusal to get up and play, even for food


  • A yelp when you pet your Dachshund or try to pick him up


  • A pulled-in head, arched back, or any other strange position


  • A refusal to bend down to the food or water dish to eat or drink


  • Limping of any kind


  • A “drunken” rear end, which moves but looks as if it isn't completely under control


  • Dragging of the back legs


If your Dachshund shows any of these warning signs, call your vet immediately and drive immediately to the vet's office or nearest pet emergency facility. Don't wait; you have just hours to act. Immediate surgery on a Dachshund with a Type I ruptured disk has a success rate around 95%, but if you wait longer than 24 hours after a disk injury, the success rate drops to 5 percent.


Other serious health issues


Bad backs aren't the only health problem that Dachsies experience. Take a few minutes to learn how to recognize Dachshund health issues before permanent damage occurs.


  • Bloat—Bloat occurs when the stomach twists on itself, cutting off the blood supply to several organs. Without immediate treatment, bloat is fatal.


    If your Dachshund suddenly starts pacing, salivating, and acting upset, nervous, or in pain—or it just seems like something is very wrong—call your vet immediately. The only hope is emergency surgery.


    Some experts theorize that you can prevent bloat by keeping a dog from eating or drinking too quickly.


  • Canine epilepsy—a seizure disorder that happens in some Dachshunds.


    If your Dachshund suddenly goes stiff, starts shaking, or becomes completely non-responsive or totally limp, call your vet immediately. You can't prevent epilepsy, but it is treatable with medication.


  • Hypothyroidism—a disorder in which the thyroid doesn't secrete enough of its hormone.


    If your dog starts showing signs of weight gain, fatigue, sluggish behavior, dry skin, hair loss, and severe behavioral changes. Your vet can treat the condition with medication.


  • Progressive retinal atrophy—a degenerative eye disease that eventually results in blindness.


    There are often few symptoms until the dog is almost completely blind; however, some dogs will show reluctance to go down stairs or go into dark areas (night blindness can be an initial stage of the disease). In some dogs, the eye lens looks more opaque or cloudy. There is no treatment for PRA; however, blind dogs can live a happy life, with a little extra care.


    Longhaired Miniature Dachshunds may be particularly prone to PRA. However, your breeder can perform a DNA test to determine whether a dog is a carrier for PRA. Find out more information about the test from the DCA.


  • Allergies—skin problems that are caused by allergies — possibly to environmental contacts and inhalants or food.


    If your dog develops rashes, itchy sores, and plenty of scratching, switch to a higher quality food with a single protein source and consult your vet.


dummies

Source:http://www.dummies.com/how-to/content/recognizing-common-health-issues-in-dachshunds.html

Coaching Junior Football Teams For Dummies (UK Edition)


>


Supporting Your Junior Football Players


Your young football players are counting on you for guidance and support all season long. The following are some helpful ways to meet their needs.


  • Be specific with your praise.


  • Stop training sessions to point out when a player does something well rather than when he or she makes a mistake.


  • While providing feedback, use the ‘sandwich’ method by placing a critical remark between two encouraging comments.


  • Pile on the praise for kids giving their best and displaying good sportsmanship.


  • Provide constant positive reinforcement – it’s the key to improvement.


  • Focus on fun and safety instead of wins and losses.


  • Be passionate and enthusiastic – it carries over to your players.


  • Have reasonable expectations and set attainable goals for the kids.


  • Remember that kids making mistakes is all part of the learning process.


>


>


>


Delivering the Pre-game Talk to Your Junior Football Team


What you say to kids before their football game, and how you say it, makes a big difference in how they approach taking the field. Here are some helpful pointers to prepare them for competition.


  • Speak in a calm and relaxed manner.


  • Be brief.


  • Conduct the talk away from any distractions.


  • Stress the importance of having fun and displaying good sportsmanship at all times during the game.


  • Stay away from overused clichés; speak from the heart to get your point across.


  • Avoid pressure phrases like ‘Let’s score five goals today.’ Kids can give you their best effort, but they can’t control the outcome of games.


  • Be enthusiastic with your tone of voice and body language. The kids will be more responsive.


>


>


>


Following a Pregame Routine with Your Junior Football Team


A good pregame routine helps set the tone for a safe and fun-filled day of soccer. Keep these tips in mind before the game begins.


  • Inspect the pitch for loose rocks, broken glass, raised sprinkler heads, or anything else that could injure a child.


  • Verify that all the kids brought the proper equipment.


  • Have the kids warm up. Keep the drills light, cover all the muscle groups that will be used in the game, and involve a large number of soccer skills to properly prepare kids for the game.


  • Give the kids a toilet break before the game begins.


  • Provide encouraging words and a pat on the back to boost kids’ confidence and enhance self-esteem.


>


>
dummies


Source:http://www.dummies.com/how-to/content/coaching-junior-football-teams-for-dummies-cheat-s.html

The Five Basic Ballet Positions

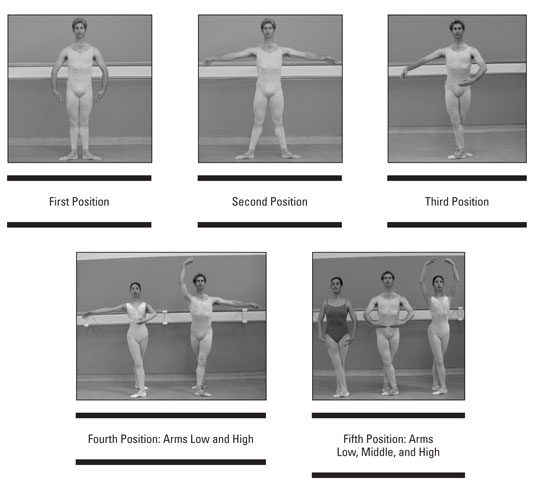
All ballet steps start from one of five positions, and these basic ballet positions involve your whole body — how you hold your arms is as important as what you do with your feet. The following figures show the five basic ballet positions along with variations on arm positions:


image0.jpg


dummies

Source:http://www.dummies.com/how-to/content/the-five-basic-ballet-positions.html

Understanding How Wine is Sold in Restaurants


1 of 9 in Series:
The Essentials of Pairing Wine with Food


When you buy a bottle (or glass) of wine in a restaurant, you get to taste it then and there: instant gratification. Choose a wine that pairs well with the food you’ve selected for the best experience. Be sure to ask questions if you're not sure which wine to select.


Wines available for sale in a restaurant generally fall into four categories:


  • The house wines, usually one white and one red, and sometimes also a sparkling wine. These can be purchased by the glass or in a carafe (a wide-mouthed, handle-less pitcher). They are the wines you get when you simply ask for a glass of white or a glass of red.


  • Premium wines, available by the glass. These offer a wider selection than the house wines and are generally better quality. (These wines are usually available also by the bottle.)


  • Wines available by the bottle from the restaurant’s regular, or standard, wine list.


  • Older or rarer wines available by the bottle from a special wine list, sometimes called a reserve wine list (not every restaurant has such a list).


House wines by the glass


Usually, a restaurant’s house wines are inferior stuff that the restaurant owner is making an enormous profit on. House wines can range in price from $4 up to $10 a glass (with an average of $6 to $8). Often, the entire bottle costs the proprietor the price of one glass or less!


Under most circumstances, avoid the house wine. For the same reasons, avoid asking for “a glass of Chardonnay” or “a glass of Merlot.” If the house wine is your only option, ask the server what it is. Don’t be satisfied with the response, “It’s Chardonnay”; ask for specifics. Chardonnay from where? What brand? Ask to see the bottle.


Premium pour wines


Ordering premium wines by the glass is a fine idea, especially if you want to have only a glass or two or if you and your guests want to experiment by trying several wines. Premium wines usually range from $9 to $14 per glass.


A restaurant may offer just one premium white and one red, or it may offer several choices. These premium wines are identified for you somehow — on the wine list, on a separate card, verbally, or sometimes even by a display of bottles. In some informal restaurants, wines by the glass are listed on a chalkboard.


If two or three of you are ordering the same wine by the glass, ask how many ounces are poured into each glass (usually five to eight ounces) and compare the price with that of a 25.4-ounce (750 ml) bottle of the same wine. (You usually do have the option of buying an entire bottle.) Sometimes, for the cost of only three glasses you can have the whole bottle.


The standard wine list


Most of the time, you’ll probably end up turning to the restaurant’s standard wine list to choose your wine. The standard wine list distinguishes a restaurant’s basic wine list from its special, or reserve, wine list. Unfortunately, there’s nothing standard about wine lists at all. They come in all sizes, shapes, degrees of detail, degrees of accuracy, and degrees of user-friendliness.


Special, or reserve, wine lists


Some restaurants offer a special wine list of rare wines to supplement their standard wine list. These special lists appeal to two types of customers: very serious wine connoisseurs and “high rollers.” If you’re not in either category, don’t even bother asking whether the restaurant has such a list. Then again, if you’re not paying for the meal or if you seriously want to impress a client or a date, you may want to look at it! Try to get help with the list from some knowledgeable person on the restaurant staff, though: Any mistake you make can be a costly one.


dummies

Source:http://www.dummies.com/how-to/content/understanding-how-wine-is-sold-in-restaurants.html

C Language Escape Sequences

When you're programming in the C language, sometimes you need to refer to a key press that doesn't result in a specific character. Other times, you need to refer to a specific character literally that normally has a different meaning in C. In either case, you need an escape sequence. The following table lists the escape sequences you need to program in the C language.


Escape sequences always begin with a backslash.


Escape SequenceCharacter
\aBell (speaker beeps)
\bBackspace (non-erase)
\fForm feed/clear screen
\nNew line
\rCarriage Return
\tTab
\vVertical tab
\\Backslash
\?Question mark
\'Single quote
\"Double quote
\xnnHexadecimal character code nn
\onnOctal character code nn
\nnOctal character code nn


dummies

Source:http://www.dummies.com/how-to/content/c-language-escape-sequences.html

The Three Standard Ukulele Sizes

Unlike most instruments in the guitar family, ukuleles come in a number of different sizes. The three regular sizes of ukulele are soprano, concert, and tenor. All three sizes are tuned exactly the same way, however, and so when you’ve learned to play one, you can play them all!


In addition to these three types, you can also buy a baritone ukulele, which is a very different beast: it’s larger and tuned differently (the same as the top four strings of a guitar), lower than the other types. Therefore, you have to use a whole different set of chords and notes, and your skills are not transferable to the other three types. So don’t start your ukulele foray with a baritone ukulele.


Meet the ukulele family: soprano, concert, and tenor ukes


A ukulele’s size is determined by the scale length, which is the length of the part of the string you play (between the nut and the bridge). Here’s a rundown:


  • Soprano: The soprano is the smallest ukulele, sometimes referred to as standard size. Originally, all ukuleles were sopranos, and this size is what most people envision when they think about ukuleles. Soprano is a great size to choose for people who want to do a lot of chord strumming and are looking for the traditional ukulele sound.


  • Concert: The concert is the Goldilocks ukulele; not too big, not too small. You get the ukulele sound but with a little extra room on the fretboard.


  • Tenor: The tenor is the largest of the standard ukuleles, with a longer neck that allows for more intricate playing (or more wild showing off). The larger body can give you a fuller, more guitar-like sound.


Deciding which ukulele is best for you


Most people find that the soprano is the best place to start. You don’t have to stretch to make the chord shapes, sopranos are cheap and easy to find, and they sound great when you strum simple chords on them.


But whether you start on soprano, concert or tenor, you can easily transfer your skills between them with no problem.


Whatever your first instrument, you may well end up with a collection of ukuleles before long. The term for this fascinating ‘addiction’ is ukulele acquisition syndrome (UAS).


dummies

Source:http://www.dummies.com/how-to/content/the-three-standard-ukulele-sizes.html

How to Read a Trust Instrument and Create a Trust Plan

After you’ve been named as trustee of a trust, you will need to understand the trustee’s duties and powers as soon as possible in order to create a plan for administering the trust. The conditions of the trust are usually spelled out in a trust instrument. Read the instrument carefully and ask the grantor’s attorney for the answers to any questions you have regarding the document itself or your role as trustee.


Reading the trust instrument


Reading and understanding the trust instrument is the first step in identifying your duties and powers as trustee. In the trust instrument, the trust’s grantor includes all the powers he or she wants you to have and may specify some you can’t have.


The laws of the state the grantor chooses to govern the trust address any issues you can’t find an answer for in the trust instrument. That state’s laws also trump the trust instrument if it goes against them.


With respect to the validity of a trust, the grantor must choose a state’s laws with some connection to the trust. The grantor has the option of choosing either the domicile of the grantor, a trustee, a beneficiary, or even the location of trust assets.


For real property held in the trust, the laws of the state in which the property is located govern that property. After you read the trust instrument, you’ll also know what the grantor’s plans are for the trust over time and for the people included in it as beneficiaries.


If you know about the trust before you actually assume any power over the property, it’s a good idea to talk with the grantor about his or her intentions for the property and exactly what benefit he or she wants the beneficiary to derive from the trust. Many trust instruments are couched in nonspecific language to allow the trustee the widest possible latitude, but the grantor’s actual intent may be much more specific.


Creating a plan based on the trust’s terms


The terms of the trust govern what happens to the trust assets: who takes care of them (the trustee), who benefits from them (the beneficiaries), and how they will be invested. The terms of the trust instrument also dictate whether the property funding the trust remains in a single trust or is divided into multiple trusts governed by the same instrument.


If the grantor wants multiple trusts, the instrument also directs when to divide the assets and when and how to make payments to beneficiaries. You as trustee create a plan for caring for the trust assets and beneficiaries based on what the trust instrument tells you to do and when to do it.


For example, say the terms of a grantor’s trust instrument stipulate that you divide the trust upon his or her death equally into three trusts, one for each of his or her children. As trustee, you have broad discretion under the trust instrument to pay or accumulate income and principal from each trust.


If one child is a spendthrift, you may want to place a fair amount of the assets in long-term growth investments. If another child is preparing to purchase a home, you may decide to place a portion of the assets in his or her trust in a fairly liquid investment so it will be available for a down payment. And if the third child is planning to go to college, you might decide to place funds to cover college costs in liquid investments staggered to mature at one-year intervals.


dummies

Source:http://www.dummies.com/how-to/content/how-to-read-a-trust-instrument-and-create-a-trust-.html

Flow of Credits and Debits in Double-Entry Bookkeeping

In double-entry bookkeeping, you enter all transactions in the books twice: once as a debit and once as a credit. This chart shows you how debits and credits affect your various business accounts:


Account TypeDebitsCredits
AssetsIncreaseDecrease
LiabilitiesDecreaseIncrease
IncomeDecreaseIncrease
ExpensesIncreaseDecrease


dummies

Source:http://www.dummies.com/how-to/content/flow-of-credits-and-debits-in-doubleentry-bookkee0.html

Video Inputs on an A/V Receiver

When connecting video devices in a home theater, it's generally best to connect them directly to the A/V receiver's video inputs and let the receiver switch (that is, select) which video source goes to the display. If you try to connect video devices directly to the TV or display instead, you'll discover that most displays have a rather limited set of inputs on the back (though some do have a ton).


Analog video inputs


There are four common types of analog video connections (in order of best to worst):


  • Component: Component video connections can be found on DVD players, HDTV tuners, gaming consoles such as the PS3, Xbox 360, and Nintendo Wii, and on many PVRs (such as TiVo and those built-in to high-definition set-top boxes for cable and satellite TV).


  • S-video: S-video connections can be found on better VCRs (the S-VHS models), most DVD players, DSS receivers, digital cable set-top boxes, PVRs, and older gaming consoles (Xbox, PlayStation 2, and Nintendo GameCube, for example).


  • Composite: Not a great choice, relative to S-video and component; use it only for low-resolution video sources, such as low-end VCRs.


  • Coaxial (also called baseband — rarely found in a receiver): Coaxial is the pits, so the less said about it the better.


What you want to look for in a receiver are both S-video connections and component video connections for your analog video sources. The picture quality you get when using these connections is almost always better than what you get with a composite video connection.


HDTV signals need a special kind of component video connection called a wideband component video connection. Some receivers have component video connections but can’t handle the higher frequencies of HDTV. If a specification is given, look for something higher than 25 MHz.


Many otherwise excellent displays have only a single-component video input, and few displays have enough S-video inputs for everything you might want to connect to them. This is a strong argument for finding a receiver that has a sufficient number of inputs. Count up what you have that uses S-video or component video and focus your search on A/V receivers that have what you need.


Digital video inputs


Digital HDMI audio/video connections are used for both audio and video — all over a single cable. Here’s an overview of how HDMI fits into the receiver world:


  • HDMI is still a relatively new technology in the receiver market — it’s become pretty much the “go to” video connection technology for HDTVs and for high-definition sources feeding into those TVs (such as DVD, Blu-ray disc, and set-top boxes).


  • Most mid-priced (or better) receivers have at least a few built-in HDMI inputs (and one HDMI output). Many of the less expensive receivers have just component video inputs and no HDMI. Over time, HDMI will become standard on just about all receivers.


  • HDMI has become the primary means of connecting high-definition source devices, so you’ll want to have as many HDMI inputs on your receiver as you can. Expensive receivers often top out at three HDMI inputs (which would allow, for example, a Blu-ray disc player, a high-definition gaming console, and a TV set-top box to connect through your receiver).


If you don’t have enough HDMI inputs on your receiver, you can use HDMI cables to connect some sources directly to the TV, and then connect the audio outputs of those sources to your receiver using digital audio connections. If you have a Blu-ray disc player, make sure you connect it directly to the receiver using HDMI, to ensure that you’ll be able to get the highest quality surround-sound audio using DTS-HD Master Audio or Dolby True HD.


dummies

Source:http://www.dummies.com/how-to/content/video-inputs-on-an-av-receiver.html