You can keep track of a surprising amount of detailed information in the Date Book. Thousands of appointments fit comfortably into the Date Book, along with reminders, notes, and other details. You don't have to enter your appointments directly into your Palm device if you don't want to. In fact, you can do most of the keyboard work on your desktop computer and then HotSync everything to your Palm device. In some situations, though, you may be better off entering appointments directly in your Palm device.
Adding appointments the simple way
Some folks are into dates; some aren't. You don't have to go crazy entering lots of details when you add an appointment to the Date Book. You can enter many types of appointments with very little effort.
Follow these steps to add a new appointment the simple way:
1. With the Date Book visible, tap the line next to the hour when your appointment begins.
A blinking line, called the insertion point, appears on the line you tapped.
2. Enter the name of your appointment by using either the on-screen keyboard or Graffiti.
The name of your appointment appears on the line you tapped.
3. Tap the blank spot at the bottom of the screen to the right of Go To.
The insertion point disappears, and your appointment is set. (If you don't complete this step, nothing terrible happens; your Palm device just waits for you to do something else.)
Adding appointments the complete way
If all your appointments start right on the hour and last exactly one hour, the simple way to enter appointments (see the preceding section) suits you just fine. When you have appointments that start at odd times or don't last exactly one hour, you need to resort to the more complete method for entering appointments.
Follow these steps to enter detailed information about an appointment:
1. With the Date Book visible, tap Go To.
The Go To Date dialog box opens.
2. Tap the date for your appointment.
The Date Book appears in Day view, showing you the appointments you've scheduled for that date.
3. Tap the hour closest to the starting time of your appointment.
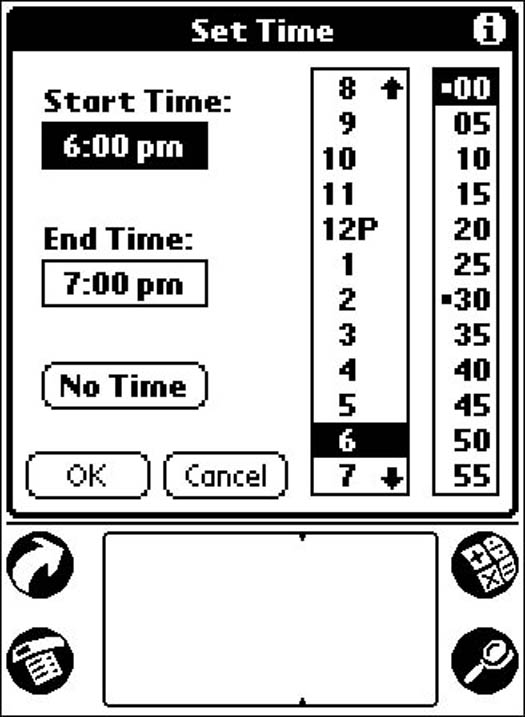
The Set Time dialog box opens, as shown in Figure 1.
>

Figure 1: Setting more accurate times in the Set Time dialog box.
4. Tap the hour and minute for the starting time of your appointment.
The hour and minute you tap appear in the Start Time box.
5. Tap the End Time box.
The End Time box is highlighted to show that you've selected it.
6. Tap the hour and minute for the ending time of your appointment.
The hour and minute you tap appear in the End Time box.
7. Tap OK.
The Set Time dialog box closes, and the Date Book screen reappears.
8. Enter the name of your appointment by using either the on-screen keyboard or Graffiti.
The name of your appointment appears on the line next to the starting time.
9. Tap Details.
The Event Details dialog box opens.
10. If you need to make any changes to the details of your appointment, tap the appropriate box and enter that information.
Because you've already entered the date and time, you probably don't need to change those details.
11. Tap OK.
The Event Details dialog box closes, and the Date Book screen reappears.
There! You've done it! Isn't that satisfying? Okay, maybe not, but you've done all you can do, so take heart. If you didn't find this method helpful or efficient, you can enter your next appointment the simple way by following the steps in the preceding section.
The super-duper fast way to enter a new appointment time is to write the time in Graffiti with the Date Book open to the Day view and no appointment selected. For example, if you run across someone right after lunch and decide to get together at 7:30 that evening, just press the Date Book button and write 7 3 0 on the number side of the Graffiti area. Tap OK and then enter the name of the person you're meeting. Presto! You have a date!
>
dummies
Source:http://www.dummies.com/how-to/content/adding-appointments-to-the-palm-calendar.html
No comments:
Post a Comment