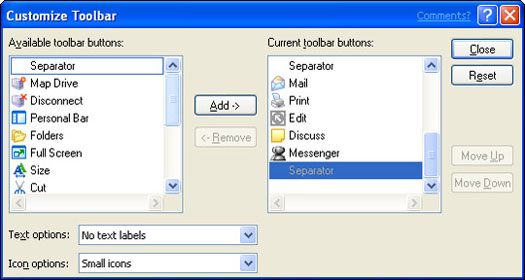
The good people at Microsoft who created Internet Explorer did their best to anticipate which buttons you would use most, putting those buttons in plain view on the Standard Buttons toolbar. However, after stuffing the Standard Button toolbar to the gills with buttons, they had a few buttons left over that they didn't know what to do with. So the Microsoft folks decided to throw them into a Customize Toolbar dialog box, which you can use to add extra buttons to your Standard toolbar, if you want.
Table 1 lists the extra buttons you can add to the Standard Buttons toolbar. Note that the first three buttons — Map Drive, Disconnect, and Folders — are useful when you use Internet Explorer to browse folders on your hard drive or a network server.
Table 1: Extra Buttons You Can Add to the Standard Buttons Toolbar
Button Name | What It Does |
Map Drive | Lets you assign a drive letter to a folder on a network file server |
Disconnect | Disconnects a mapped network drive |
Folders | Shows a treelike display of folders in the left portion of the Internet Explorer window |
Full Screen | Switches to Full-Screen view |
Size | Lets you select the size used to display text on Web pages |
Cut | Cuts the selected portion of the Web page to the Clipboard |
Copy | Copies the selected portion of the Web page to the Clipboard |
Paste | Pastes the contents of the Clipboard at the current cursor position |
Encoding | Lets you select a different language |
Print Preview | Lets you preview how a page will appear when printed before sending it to the printer |
Related | Automatically searches for Web pages on related topics |
To add one or more of these buttons to your Standard Buttons toolbar, follow these steps:
1. Summon the View --> Toolbars --> Customize command.
The Customize Toolbar dialog box appears, as shown in Figure 1. The right side of this dialog box shows the buttons that are already on your Standard Buttons toolbar. The left side of the dialog box lists the extra buttons you can add.
>

>
Figure 1: The Customize Toolbar dialog box.
2. From the Available Toolbar Buttons list on the left side of the Customize Toolbar dialog box, click the button you want to add to the toolbar.
3. Click Add.
The button you selected in Step 2 is moved from the Available Toolbar Buttons list to Current Toolbar Buttons.
4. If you want, use the Move Up or Move Down buttons to change the new button's location on the toolbar.
Each time you click Move Up or Move Down, the button you added in Step 3 changes position. Keep clicking Move Up or Move Down until the button lands where you want it.
5. Repeat Steps 2 through 4 to add more buttons.
Add all the buttons, if you want.
6. After you finish, click Close.
The Customize Toolbar dialog box is dismissed.
Here are a few additional thoughts about the Customize Toolbar dialog box:
- You can remove buttons from the Standard Buttons toolbar by selecting from the Current Toolbar Buttons list the button you want to remove and then clicking Remove. The button is removed from the Current Toolbar Buttons list and added to the Available Toolbar Buttons list.
- If you get your toolbar all jumbled up, you can restore it to its original, pristine condition by clicking Reset.
- You can use the Move Up and Move Down buttons to rearrange the order in which the toolbar buttons appear. Just select from the Current Toolbar Buttons list the button you want to move and then click Move Up or Move Down to change the button's position.
- If you have lots of buttons on your toolbar, you can insert one or more separator lines to visually divide the buttons into groups. The separator is listed at the top of the Available Toolbar Buttons list. You can add it to the toolbar the same way you add a button.
- You can use the Text Options and Icon Options controls to change the way the toolbar buttons appear. The Text Options control lets you select whether descriptive text appears below each button, to the right of just certain buttons, or not at all. And the Icon Options control lets you choose whether to display small or large buttons.
>
dummies
Source:http://www.dummies.com/how-to/content/customizing-the-ie-6-standard-buttons-toolbar.html
No comments:
Post a Comment