Nonprofit Kit For Dummies

The key elements of running a nonprofit organization include securing nonprofit status; managing your budget and the day-to-day work of your staff; and raising money, also called fundraising.


>


>


Securing Nonprofit Status in Ten Fairly Easy Steps


The most important aspect of being a nonprofit organization is having nonprofit status in the eyes of the IRS, or Internal Revenue Service. Take the following steps to gain nonprofit status for your organization:


  1. Choose a name for your nonprofit. While you’re at it, select and reserve a Web domain name.


  2. Form your organization’s incorporating board of directors.


  3. Obtain a Federal Employer Identification Number, or EIN, for your organization by submitting IRS Form SS-4. You can find a copy of this form on the IRS Web site.


  4. Write Articles of Incorporation and submit them, with the required fee, to the appropriate office in your state government.


  5. Develop organizational bylaws for your nonprofit. Bylaws are the rules by which your organization will operate.


  6. Hold your nonprofit’s first board meeting and take minutes.


  7. Review IRS Publication 557, which shows instructions for filing for tax exemption. Visit the IRS Web site to download this publication.


  8. File IRS Form 1023 if you’re applying to become a 501(c)(3) tax exempt organization, preferably within 27 months of the date of incorporation. The latest version of Form 1023 can be found on the IRS Web site.


  9. Sit back and relax. Celebrate when your letter of determination arrives!


  10. Register your nonprofit as a charity in your state.


Note: When securing nonprofit status for your organization, you don’t have to follow these steps exactly as we’ve ordered them here.


>


>


>


Raising Money for Your Nonprofit Organization


Every nonprofit organization needs to raise money. Whether applying for grants, searching for donors, or throwing fundraising events, you’re always going to be looking for new ways to bring in funds. These tips can help your nonprofit successfully raise money:


  • Set clear, reasonable, yet ambitious fundraising goals based on a clear assessment of your organization’s likeliest supporters.


  • Don’t depend on one grant, one event, one donor, or one approach; take steps to draw income from multiple sources.


  • Because it costs money to raise money, be sure to make a fundraising budget.


  • Remember that individual donors represent the largest portion of a nonprofit’s private monetary contributions.


  • Write a strong case statement for your organization, telling how its work benefits people and how contributors’ support will make a difference.


  • Ask. If you don’t ask for a contribution, you won’t get one.


  • Make it easy for donors to respond to your organization’s request.


  • Begin by asking for financial support among those people closest to your nonprofit — the board, volunteers, constituents, and staff.


  • Include some fun in your fundraising. Special events can win friends and inspire new supporters.


  • Do your foundation homework before you ask for funds: Examine each potential grantmaker’s interests, focus, limitations, and policies.


  • Demonstrate the needs of the constituents your nonprofit wants to serve and present a clear plan for addressing those needs.


  • Acknowledge your donors’ financial support and work to deepen their involvement in your organization.


>


>


>


12 Annual Tasks for Every Nonprofit Manager


As a manager at a nonprofit organization, your job is to make sure that each of the following 12 organizational tasks is completed every year:


  • Prepare your budget. Estimate the organization’s income and expenses for the coming year and compare to actual numbers for the current year. Ask the board of directors to discuss and approve the projected budget.


  • Evaluate performance. Review your programs and your employees once a year. Set goals and objectives for both people and activities.


  • File your forms. File your nonprofit’s 990 Form with the Internal Revenue Service when it’s due (four and a half months after the close of your fiscal year), and prepare any required reports for state and local authorities.


  • Have a party. Recognize and acknowledge your organization’s volunteers, board members, and employees with at least one celebration every year.


  • Review your insurance. See that you pay your annual premiums in full and that your organization is covered for all risks.


  • Prepare a fundraising plan. Make realistic estimates and prepare an action plan showing how the organization’s fundraising activities will be carried out for the upcoming year.


  • Communicate with donors. Include them in your news and events throughout the year.


  • Back up your computers. In fact, you should do this task weekly, but it’s often forgotten. Don’t lose your nonprofit’s donor list or financial records due to a computer crash.


  • Review terms of board members. Make a chart to keep track of when officer and board member terms expire, reminding you to recruit new members and fill officer slots.


  • Read your organization’s mission statement. Better still, frame it and hang it over your desk so you’re always reminded of why you’re doing what you’re doing.


  • Review your organizational plan. Plans are made to be followed and, as necessary, revised. If you haven’t looked at your organization’s plan in a while, do so now.


  • Take a vacation. You’ll come back to work with new ideas and renewed energy.


>


>
dummies


Source:http://www.dummies.com/how-to/content/nonprofit-kit-for-dummies-cheat-sheet0.html

The Types of Bankruptcy

If you’re filing for bankruptcy, your basic choice is between a bankruptcy that doesn’t involve any type of repayment plan (Chapter 7 bankruptcy) and one that does (Chapter 13).


  • Chapter 7 — straight bankruptcy: The belly-up version that most people envision when they hear the word bankruptcy. If you file under Chapter 7, most of your debts are eliminated, and some of your property may go to your creditors. You don’t have any repayment plan; your debts simply disappear.


    To qualify for Chapter 7 bankruptcy, you need to jump these hurdles.


    • The Means Test involves a complicated set of calculations that identify those consumers who can pay a significant portion of their bills and should be required to do so instead of shedding all their obligations in Chapter 7.


    • Some judges consider whether you’re acting in good faith. They may ask whether your bankruptcy was necessitated by sudden illness, calamity, or unemployment; and whether you made unnecessary eve-of-bankruptcy purchases far exceeding your ability to pay.


  • Chapter 13 — debt repayment plans: In filing a Chapter 13 bankruptcy, you propose a debt repayment schedule, and for the next 36 to 60 months, you pay what you can afford.


    Creditors usually receive only a small percentage of what they’re owed and typically must settle for pennies on the dollar. After that, you’re home free. Even if you can’t eliminate debts, you can still use Chapter 13 to keep creditors off your back while you pay them in full over three to five years.


    Only individuals with regular income (no corporations, no partnerships) can file under Chapter 13. The source of your income isn’t important, provided it’s regular and stable. Your income can be wages, self-employment profits, unemployment benefits, or even assistance from friends and family.


dummies

Source:http://www.dummies.com/how-to/content/the-types-of-bankruptcy.html

Identifying Facets of Relationship Intimacy

When thinking about intimacy and the areas of your relationship that you want to improve, considering exactly what kind of intimacy you want more of can be helpful. The five facets of relationship intimacy are:


  • Emotional intimacy: Being similar in your emotional expression. That may mean crying or shouting at the same sorts of things or that both of you are equally sensitive or robust to emotion.


  • Intellectual intimacy: Being on the same wavelength. You share thoughts and ideas and feel able to understand each other’s thought processes.


  • Physical intimacy: Being close physically and sharing a meaningful connection through mutual touch, sensuality and sexual pleasure.


  • Recreational intimacy: Being able to laugh, relax and have fun together through similar needs and interests in non-essential pursuits.


  • Spiritual intimacy: Being able to share the big stuff with similar levels of passion and fervour. That may be religion, politics, environmental issues, human rights, animal rights or even sharing a passionate belief in nothing at all.


dummies

Source:http://www.dummies.com/how-to/content/identifying-facets-of-relationship-intimacy.html

Synchronize Podcasts from Your Computer to Your iPad

If you’ve downloaded podcasts to your Mac or PC, you can download them to your iPad by syncing. If you chose to let iTunes manage synchronizing your data automatically, you can still manage your automatic syncing options. Make sure that your iPad is selected in the source list.


To transfer podcasts to your iPad, follow these steps:


  1. Click the Podcasts button and select the Sync Podcasts check box in the Podcasts pane.


    Two pop-up menus allow you to specify which episodes and which podcasts you want to sync.


  2. Select how many episodes of a podcast you want to sync in the pop-up menu on the left.


  3. Choose whether to sync all podcasts or just selected podcasts from the pop-up menu in the upper-right corner.


  4. If you have podcast episodes on playlists, you can include them by selecting the appropriate check boxes under Include Episodes from Playlists.


  5. Click the Sync or Apply button in the lower-right corner of the window.


    Your podcasts are synced.


Regardless of the choices you make in the pop-up menus, you can always select individual episodes by selecting their check boxes.


Podcasts and videos are synced only one way: from your computer to your iPad. Deleting any of these items from your iPad does not delete them from your computer when you sync. The exceptions are songs, podcasts, videos, iBooks, and apps that you purchase or download on your iPad, and playlists that you create on your iPad. Such items are copied back to your computer automatically when you sync.


dummies

Source:http://www.dummies.com/how-to/content/synchronize-podcasts-from-your-computer-to-your-ip.html

How to Manage Your Services in SharePoint 2010

In SharePoint 2010, the context-sensitive Ribbon menu on the Manage Service Applications page in Central Administration enables you to manage all your SharePoint service applications easily from a single place. The content on the management pages varies by Web service, but the basic method of accessing the pages is the same. Follow these steps to access the management pages of a service application by using Central Administration in SharePoint 2010:


  1. Navigate to the Central Administration home page.


  2. In the Application Management section, click Manage Service Applications.


  3. From the Manage Service Applications page, select the service application that you want to manage.


    When you select a service application, the Manage command on the Ribbon menu activates.


  4. In the Ribbon menu, click Manage; in the page that appears, configure the service application as desired.


    A page appears that's specific to the type of service application you're managing. For example, if you're managing a Search Service application, the appropriate Search Administration page appears.


  5. Click OK to save any changes to the service application.


    If you made configuration changes when you were managing the service application, you must save the changes before they can take effect.


dummies

Source:http://www.dummies.com/how-to/content/how-to-manage-your-services-in-sharepoint-2010.html

Ten Habits to Foster for Managing Stress


2 of 3 in Series:
The Essentials of Reducing Stress and Being Happy


If enjoying your life more is one of your New Year’s resolutions, you might want to learn how to manage stress better. The following is a short list of and behaviors for reducing stress and creating stress resilience. See how many of these describe you.


  • Knowing how to relax: You need to know how to let go of tension, and be able to relax your body and quiet your mind.


  • Eat right and exercise often: Be careful about what you put into your mouth. Engage in some form of physical activity regularly during the week.


  • Get enough sleep: Try not to burn the candle at both ends. Get to sleep at an hour that ensures that you can get enough rest.


  • Don’t worry about the unimportant stuff: Learn the difference between what is truly important and what is not. Put things into perspective.


  • Don’t get angry often: Avoid losing your temper, but if you do become angry, try to remain in control of your anger so that it doesn’t become destructive.


  • Get organized: Feel a sense of control over your environment. A cluttered and disorganized life leads to a stressed life.


  • Manage your time efficiently: Know how to use time effectively. Be in control of your schedule.


  • Create a strong social support system: Spend time with your family, friends, and acquaintances. Have people in your life who listen to you and care for you.


  • Live according to your values: Know what is important and what is not. Make sure your goals are significant and worthwhile.


  • Develop a good sense of humor: Laugh at life’s hassles and annoyances. Be able to laugh at yourself, and don’t take yourself too seriously.


If you’re not able to check off all (or any!) of the above, don’t worry — you can change old habits and learn new ones. Managing your stress is not a magical process, but rather one that means mastering new behaviors and finding new ways of looking at yourself and your world.


dummies

Source:http://www.dummies.com/how-to/content/the-ten-habits-to-foster-for-managing-stress.html

Shooting and Passing the Puck in Ice Hockey

Obviously, if you don’t score goals, you won’t win the hockey game. Make sure you're passing and shooting the puck quickly and accurately to make the most of your hockey team's offense. Use these guidelines to help:


  • The younger the player, the shorter the pass.


  • Cradle the puck with your stick when you receive it.


  • Don’t pass to the player; pass to where he or she is going. And try to put the puck on the blade of the recipient’s stick.


  • Don’t pass over two lines; that’s against the rules, and the official will blow the whistle. Then he’ll call a face-off, most likely in your defensive zone.


  • Whenever possible, keep your passes on the ice. But if you must elevate the puck to get it to your teammate, try to make it land flat on the ice so it's easier to receive.


dummies

Source:http://www.dummies.com/how-to/content/shooting-and-passing-the-puck-in-ice-hockey.html

Diabetes For Canadians For Dummies


>


Canadian Guidelines for Diabetes Screening


Follow these screening guidelines if you think you might have diabetes or be at risk of developing the disease. The Canadian Diabetes Association recommends that you be tested for diabetes:


  • Every 3 years once you reach 40 years of age; more frequently and/or earlier if you have risk factors including the following:


    • Having a parent, sibling, or child with diabetes


    • Being a member of a high-risk population (such as people of Aboriginal, Hispanic, Asian, South Asian, or African descent)


    • Having a history of prediabetes, gestational diabetes, or having given birth to a large baby


    • Being overweight


    • Having hardening of the arteries (atherosclerosis), high blood pressure, abnormal lipids (cholesterol and triglycerides), schizophrenia, polycystic ovary syndrome, or a type of skin rash called acanthosis nigricans


  • Immediately, if you are having symptoms of high blood glucose (such as thirst, frequent urination, and weight loss)


>


>


>


Blood Glucose Target Test Results for Canadians


To prevent high blood glucose from damaging your body, be sure to test your blood glucose regularly. The Canadian Diabetes Association recommends the following targets for most adults with diabetes:


  • Blood glucose before meals: 4.0 to 7.0 mmol/L


  • Blood glucose 2 hours after meals: 5.0 to 10.0 mmol/L (5.0 to 8.0 if your A1C is above 7.0)


  • A1C level of 7 percent or less


  • LDL cholesterol of 2.0 mmol/L or less


  • Total cholesterol (TC)/HDL cholesterol less than 4.0


  • Urine albumin/creatinine ratio (“ACR”) less than 2.0 (men) or less than 2.8 (women)


  • Blood pressure less than 130/80


>


>


>


Suggested Frequency of Medical Tests for Canadians with Diabetes


Medical tests are one way that you can avoid potential complications with your diabetes. Different tests are required at different frequencies. The Canadian Diabetes Association recommends the following testing schedule for most adults with diabetes:


  • A1C: Every 3 months


  • Blood glucose meter:


    • On 2 or more injections of insulin therapy per day: at least three times daily


    • On 1 injection of insulin per day: at least once daily


    • Not taking insulin: individualized


  • Lipids: Total cholesterol (TC), HDL cholesterol, TC/HDL ratio, LDL cholesterol, triglycerides (TG) at time of diagnosis and then every 1 to 3 years (more frequently if treatment has been initiated or changed.)


  • Urine albumin/creatinine ratio (“ACR”), blood creatinine, eGFR:


    • Type 1 diabetes: annually if you have had diabetes for more than 5 years (every 6 months if you have kidney damage)


    • Type 2 diabetes: at the time of diagnosis then annually (every 6 months if you have kidney damage)


  • Blood pressure: At every diabetes visit


  • Screening for peripheral neuropathy (with a 10-gram monofilament or tuning fork):


    • Type 1 diabetes: annually beginning 5 years after the onset of diabetes


    • Type 2 diabetes: at the time of diagnosis then annually


  • Foot examination:


    • By your doctor: at least annually (more frequently if you are at risk of foot ulceration)


    • By you: daily


  • Eye exam (by an expert eye specialist):


    • Type 1 diabetes: annually, beginning 5 years after the onset of diabetes if you are 15 years of age or older (more frequent eye exams may be necessary depending on the presence and severity of retinopathy)


    • Type 2 diabetes: at the time of diagnosis and then every 1 to 2 years (more frequent eye exams may be necessary depending on the presence and severity of retinopathy)


>


>


>


Best Diabetes Web Sites for Canadians


Finding dependable, reliable Canadian diabetes resources online can be a challenge. One minute you’re looking at the Canadian Diabetes Association Web site, the next you’re looking at Uncle Bob’s Instant Diabetes Cure. Here’s a trio of trusted Canadian sites that will provide you with helpful information.


  • Dr. Ian Blumer’s site: This site offers general information and advice about diabetes, tips, new developments, and answers to questions.


  • The Canadian Diabetes Association: This site looks at diabetes issues from a Canadian perspective. Particularly helpful is the listing of resources available in your provide or territory or even within your community.


  • Juvenile Diabetes Research Foundation of Canada: Here you can find out the latest information about government programs that emphasize finding a cure for diabetes.


>


>
dummies


Source:http://www.dummies.com/how-to/content/diabetes-for-canadians-for-dummies-cheat-sheet.html

Core Beliefs of Hindus

Hinduism is not an organized religion and has no single, systematic approach to teaching its value system. Nor do Hindus have a simple set of rules to follow like the Ten Commandments. Local, regional, caste, and community-driven practices influence the interpretation and practice of beliefs throughout the Hindu world.


Yet a common thread among all these variations is belief in a Supreme Being and adherence to certain concepts such as Truth, dharma, and karma. And belief in the authority of the Vedas (sacred scriptures) serves, to a large extent, as the very definition of a Hindu, even though how the Vedas are interpreted may vary greatly.


Here are some of the key beliefs shared among Hindus:


  • Truth is eternal.


    Hindus pursue knowledge and understanding of the Truth: the very essence of the universe and the only Reality. According to the Vedas, Truth is One, but the wise express it in a variety of ways.


  • Brahman is Truth and Reality.


    Hindus believe in Brahman as the one true God who is formless, limitless, all-inclusive, and eternal. Brahman is not an abstract concept; it is a real entity that encompasses everything (seen and unseen) in the universe.


  • The Vedas are the ultimate authority.


    The Vedas are Hindu scriptures that contain revelations received by ancient saints and sages. Hindus believe that the Vedas are without beginning and without end; when everything else in the universe is destroyed (at the end of a cycle of time), the Vedas remain.


  • Everyone should strive to achieve dharma.


    Understanding the concept of dharma helps you understand the Hindu faith. Unfortunately, no single English word adequately covers its meaning. Dharma can be described as right conduct, righteousness, moral law, and duty. Anyone who makes dharma central to one’s life strives to do the right thing, according to one’s duty and abilities, at all times.


  • Individual souls are immortal.


    A Hindu believes that the individual soul (atman) is neither created nor destroyed; it has been, it is, and it will be. Actions of the soul while residing in a body require that it reap the consequences of those actions in the next life — the same soul in a different body.


    The process of movement of the atman from one body to another is known as transmigration. The kind of body the soul inhabits next is determined by karma (actions accumulated in previous lives).


  • The goal of the individual soul is moksha.


    Moksha is liberation: the soul’s release from the cycle of death and rebirth. It occurs when the soul unites with Brahman by realizing its true nature. Several paths can lead to this realization and unity: the path of duty, the path of knowledge, and the path of devotion (unconditional surrender to God).


dummies

Source:http://www.dummies.com/how-to/content/core-beliefs-of-hindus.html

Android Phone Help and Support

Ever new technology can catch a bug or two now and then, and an Android phone is no exception. If you ever happen to find yourself in serious phone trouble, here is a smattering of trusted places to check out for help with your Android phone.


Cellular Providers


Phone Manufacturers


Google Android Support


dummies

Source:http://www.dummies.com/how-to/content/android-phone-help-and-support.html

How to Establish Your Core Values

Values bring energy and direction; they’re at the heart of what makes an individual tick. When people deeply understand their values, they can create a way of operating in the world that leads them to a true sense of purpose and meaning.


The following exercise takes you through the process of establishing your initial values list.


  1. On a blank piece of paper, write down a list of your values, such as honesty, power, service or security.


    Your answers to the following questions can help reveal values:


    1. What is important to you?


    2. What do you need in your life?


    3. What’s so critical to who you are that you’d almost forget to mention it?


  2. After you have a list of about 12 to 15 values, see how they group and overlap; refine your values list to no more than 9 items.


    Some words may have a similar enough meaning that you can count them as one value such as ‘integrity/ honesty’ or ‘purpose/direction.’ Find one word that encompasses the overall meaning.


  3. Take each word in turn and ask ‘What does this value give me?’


    Keep asking the question until you’re convinced you have arrived at an end value – that point at which you know you (or your client) have reached a fundamental need.


  4. Capture this fully revised values list as the important building block for future planning, goal-setting and decision-making activities.


    Some people like to keep a list as a note on the wall; others in their diary or mobile phone.


dummies

Source:http://www.dummies.com/how-to/content/how-to-establish-your-core-values.html

Switching Out Guitar Strings

Playing the guitar can be a sweaty, muscular, gritty activity — if you're doing it correctly, that is. And while your guitar can handle pretty much any abuse you deliver (within reason), your strings aren't so hardy. Through repeated contact with hands and fingers, guitar strings lose their tone and won't play in tune; they also wear out and eventually may break. Because of the repetitive use, you eventually have to change them, so do it regularly. Just like changing the oil in your car, it's almost impossible to overdo it.


Knowing when to change your guitar strings


You may need to change your guitar's strings in many different situations:


  • A string breaks, providing a jolting reminder that all the strings may need changing.

  • The strings sound dull and lifeless; they may even look dull.

  • The strings no longer play in tune, exhibiting evidence that they've lost their flexibility.

If you break a string while playing, you need to replace at least one of the strings (the broken one, naturally) immediately. But you should also change all your strings (the entire set of six) every two to three months to keep the strings fresh — that is, in tune and able to produce a bright, lively tone.


No matter how gentle you are on the strings, the tone of your guitar isn't what it used to be after several months of constant playing, biochemical assaults from your fingers, and environmental changes. One sure-fire way to determine whether you need to change the strings? If you can't remember the last time you changed them, then it's definitely time!


Choosing the right guitar strings


Chances are, when you bought your guitar, it had the right type of strings attached. So hopefully, if you bought an electric guitar, it came with strings designed for an electric guitar in the appropriate gauge. But, just so you know what you're looking for when you want to replace your current strings (or if you want to experiment with different types of strings), consider the following list when making your string-changing decisions:


  • The gauge of a string is its thickness and determines how easy the string is to fret and bend.

  • Fretting involves pushing the string down onto the fretboard with your fingers.

  • Bending is the act of pushing or pulling the strings sideways across the fretboard, which raises the pitch of the note.

  • The fretboard is the top of the neck of the guitar — the part where the frets protrude and where your fingers press the strings when fretting.

Higher-numbered gauges (or heavier gauges, as guitarists call them) are stiffer and provide more resistance, but they also hold their tuning and tone better and wear out less quickly than lighter-gauge strings.


Striking a balance among playing comfort, string performance, and longevity is important. Here are a few tidbits to keep in mind when you're choosing your strings:


  • Blues guitarists like their guitars set up with strings that fight back. This give and take allows the guitarist to really dig into the strings.

  • Rock guitars, on the other hand, may use lighter-gauge strings because the light ones facilitate super-fast playing and extreme string bending.

  • The more experienced you are as a player, the better you are at managing heavier gauges. But that doesn't mean you necessarily prefer them.

  • Many guitarists go strictly for playability and comfort and put ultra-light-gauge strings on their guitars and then just get used to changing out the strings a lot.

In the end, the choice of string gauge is completely up to the player's individual preference.


dummies

Source:http://www.dummies.com/how-to/content/switching-out-guitar-strings.html

Pros and Cons of Static Routing

Routing protocols interfaces can be dynamically or statically assigned. Static network routing has benefits and drawbacks as compared to implementing dynamic routing protocols. On the benefit side, you have the following:


  • Predictability: If you change your network design and layout and suffer from a device failure, static routes do not change. You always know the path your data will take.


  • Network bandwidth overhead: Static routing has zero overhead, whereas all dynamic routing protocols have some degree of overhead. For example, on a network with 200 segments, the router will send updates from each interface every 30 seconds, and those updates are about 3KB of data. Over the course of a day, this traffic adds up.


  • Easy to configure: This issue is relative, depending on the size of your network. Although small networks are easy to configure, as a network grows, applying changes to all the routers can become a big task.


The few drawbacks to static routing include the following:


  • Lack of scalability: For the 200 segment network mentioned previously, which possibly contains 200 routers, you could be dealing with thousands of routing table entries. Manually calculating all those routes and keeping them up-to-date would be a Herculean task and very prone to error. Even if you implement a good network-addressing design that allows for route summarization, you are still left with an overwhelming number of routes to manage.


  • Large network implementation: When working with a network of 200 routers, the task of updating one route can become a complex task, especially if you update the routes in the wrong order. In that case, you could lose access to a large section of the network until someone visits that router with a rollover cable or connects from another area of the network.


  • No redundancy: Dynamic routing protocols can update routing tables in the event of device or interface failure, so if there are multiple possible paths, these protocols will continue to allow data flow. Static routes do not allow for this automatic failover or redundant paths, so if you have a failure, you must manually adjust routes to move data through an alternative path.


dummies

Source:http://www.dummies.com/how-to/content/pros-and-cons-of-static-routing.html

How to Set Your Windows Account for Administrator Access

If you tire of typing the administrator’s password, you can reset your account level to a higher one. Technically, you’re resetting the account level from Standard or Limited to Administrator. This can be done in Windows 7, Windows Vista, and Windows XP.


Here’s how to set your account to Administrator level in Windows 7 and Windows Vista:


  1. Display the User Accounts window.


    • In Windows 7, choose the heading User Accounts and Family Safety and then choose User Accounts.


    • In Windows Vista, choose the heading User Accounts and then choose User Accounts.


  2. Choose Change Your Account Type.


  3. Type the administrator’s password (for the last time) to continue.


  4. Choose Administrator.


  5. Click Change Account Type.


  6. Close the User Accounts window when you’re done.


In Windows XP, follow these steps for the Administrator account upgrade:


  1. Open the Control Panel’s User Accounts icon.


  2. Click your account’s icon, found at the bottom of the window.


    The window changes to display detailed information about your account.


  3. Choose Change My Account Type.


  4. Choose Computer Administrator.


  5. Click Change Account Type.


  6. Close the User Accounts window.


Microsoft recommends that you run the computer as a Standard or Limited user. But that is not necessary or even desirable, especially when you’re the only one using the computer. In Windows Vista specifically, using a Limited account adds a level of complexity that is utterly unnecessary for a typical user.


On the other hand, when other people use your computer, you should set their accounts to Standard or Limited. The level of security offered by making their accounts non-administrator-level may be enough to protect your PC from being accidentally infected with malware and helps prevents others from unintentionally changing basic computer settings.


  • You cannot downgrade your account from Administrator. To do that, you have to create a new Standard or Limited account, copy over your files, and then delete your original Administrator account.


  • The whole idea behind account levels is to limit access to key computer functions to only authorized users. The history of DOS and then Windows demonstrates that Microsoft doesn’t understand how necessary the function is. Rather than have a key, superuser account, as with the root account in Unix, you have Standard/Limited and Administrator accounts in Windows.


dummies

Source:http://www.dummies.com/how-to/content/how-to-set-your-windows-account-for-administrator-.html

Gluten-Free Sesame Seed Crackers

Cracker dough, such as the dough prepared with this delectable gluten-free sesame seed cracker recipe, is firm enough to roll out and cut into squares or other shapes. For crisp crackers, some fat is necessary. The fat in crackers is what makes them crisp and flaky.


Preparation time: 20 minutes


Cooking time: 10 minutes


Yield: 48 crackers


1 cup plus 3 tablespoons (132 grams) almond flour


1/2 cup minus 2 teaspoons (62 grams) brown rice flour


1/4 cup (29 grams) tapioca flour


1/2 cup sesame seeds


1/2 teaspoon sea salt


1/4 cup cold butter, cut into pieces


1 egg white


1/3 cup almond milk


More sesame seeds and sea salt


  1. Preheat the oven to 375 degrees F. Line two cookie sheets with parchment paper and set aside.


  2. In a large mixing bowl, combine the almond flour, brown rice flour, and tapioca flour; whisk until blended. Stir in the sesame seeds and sea salt.


  3. Using a pastry blender or two knives, cut in the butter until the particles are fine.


  4. In a small bowl, combine the egg white with 2 tablespoons almond milk. Whisk until foamy and then stir it into the flour mixture. Add more milk, tossing with a fork, a tablespoon at a time until you can form a dough by pressing it together.


    The dough should be moist but firm.


  5. Divide the dough in half and place each half on a prepared cookie sheet. Top with another sheet of parchment paper and roll out until the dough is 1/8-inch thick. Remove the top sheet of parchment paper.


    Repeat with the second half of dough on a second cookie sheet.


  6. Cut into squares or other shapes using a sharp knife, cookie cutter, or pizza cutter. Sprinkle with more sesame seeds and a bit of sea salt.


  7. Bake for 9 to 12 minutes, or until the crackers are light golden-brown.


    Cool the crackers on the cookie sheets for 3 minutes and then carefully move them to a wire rack to cool completely.


Per serving: Calories 42 (From Fat 28); Fat 3g (Saturated 1g); Cholesterol 3mg; Sodium 26mg; Carbohydrate 3g; Dietary Fiber 0g; Protein 1g.


dummies

Source:http://www.dummies.com/how-to/content/glutenfree-sesame-seed-crackers.html

Keeping Tabs on Palettes in AutoCAD 2008

AutoCAD 2008 contains more than a dozen palettes (more than a half-dozen in AutoCAD LT). Palettes, or modeless dialog boxes as the geekier types prefer to call them, made their debut in AutoCAD 2004 and were enhanced and expanded in AutoCAD 2006.


Modeless is just a fancy way of saying that these dialog boxes don't take over AutoCAD in the way that modal dialog boxes do. While a modal dialog box is open, you can't do anything else in AutoCAD. A modeless dialog box, on the other hand, can remain open while you execute other commands that have nothing to do with the dialog box. You return to the modeless dialog box when or if you need its features.


The more commonly used palettes are


  • Properties and DesignCenter: Used to control object properties and named objects (layers, blocks, and so on), respectively.

  • Tool Palettes: Unlike a splodgy painter's palette, each tool palette holds content (drawing symbols and hatch patterns) and/or commands (not regular AutoCAD commands — what would be the point? — but macros that make commands do specific things) instead of paints.

  • Sheet Set Manager: Provides tools for managing all of a project's drawings as a sheet set. (AutoCAD LT does not support sheet sets.)

  • External References: Used to attach external files to the current drawing; file types include raster images, Drawing Web Format (DWF) files, MicroStation DGN files, and other drawing files.

    AutoCAD 2008 adds support for MicroStation DGN files. The External References palette lets you attach DGN files as underlays in much the same way as you can underlay DWF files. You can also import DGN data directly by choosing File --> Import.

  • Markup Set Manager: Displays design and drafting review comments from users of Autodesk Design Review.

  • QuickCalc: A handy pushbutton scientific calculator. You'll know if you need this.

You toggle palettes on and off by clicking their respective buttons near the right end of the Standard toolbar. Alternatively, several palettes have Ctrl-key shortcuts. You can toggle these by pressing Ctrl+1 (Properties), Ctrl+2 (DesignCenter), Ctrl+3 (Tool Palettes), Ctrl+4 (Sheet Set Manager), Ctrl+7 (Markup Set Manager), or Ctrl+8 (QuickCalc).


dummies

Source:http://www.dummies.com/how-to/content/keeping-tabs-on-palettes-in-autocad-2008.html

Troubleshoot Your iPad: Sync, Computer, or iTunes Issues

One category of troubleshooting techniques for the iPad applies to issues that involve synchronization and computer–iPad relations. If you’re having problems syncing or if your computer doesn’t recognize your iPad when you connect it, here are some things to try.


It's best that you try these procedures in the order they’re presented here:


  1. Recharge your iPad.


    If you didn’t try it previously, try it now. If you’re in a hurry, charge your iPad for a minimum of 20 minutes. A full charge is a better idea, but a 20+ minute charge is better than no charge at all. And for faster charging in any circumstances, turn your iPad off while it charges.


    Most “powered” USB hubs, the kind you plug into an AC outlet, will charge your iPad just fine. But “passive” or “unpowered” hubs — ones that don’t plug into the wall for power — won’t cut it when it comes to charging your iPad..


  2. Try a different USB port or a different cable if you have one available.


    It doesn’t happen often, but occasionally USB ports and cables go bad. When they do, they invariably cause sync and connection problems. Always make sure that a bad USB port or cable isn’t to blame.


    Always plug the iPad's dock connector into one of the USB ports on your computer itself. That’s because the USB ports on your computer supply more power than the other ports.


  3. Restart your iPad and try to sync again.


    Just as restarting a computer often fixes problems, restarting your iPad sometimes works wonders.


  4. Reinstall iTunes.


    Even if you have an iTunes installer handy, you probably should visit the Apple website and download the latest-and-greatest version, just in case.


dummies

Source:http://www.dummies.com/how-to/content/troubleshoot-your-ipad-sync-computer-or-itunes-iss.html

How to Record Register Transactions in QuickBooks 2011

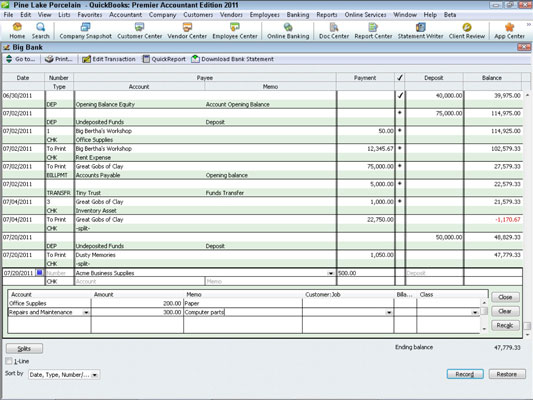
The QuickBooks Register window looks like the regular paper register that you use to keep track of transactions or a bank account. QuickBooks allows you to enter transactions directly into an account register. To enter a bank account transaction directly into an account register, follow these steps:


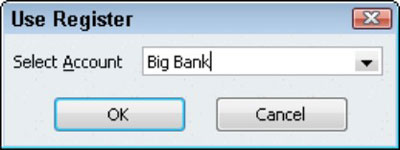
  1. To display an account register, choose Banking→Use Register.


    image0.jpg

    If QuickBooks doesn't display the actual register, select the bank account that you want to display in a register.


    image1.jpg

  2. Use the Date column of the register to record the date of the deposit, payment, or transfer.


  3. (Optional) Assign a transaction number.


    In the case of check transactions, for example, use the Number field to record the check number. For transfers and deposits, you might not need to record a number.


  4. Use the Payee field to record the payee for a check, the customer paying a deposit, or some other bit of information in the case of a transfer transaction.


  5. Provide the transaction amount in the appropriate column, either Payment or Deposit.


  6. Identify the account.


    For check transactions, you use the Account field to identify the expense that a check pays or the asset that a check purchases. For deposit transactions, you use the Account field to identify the sales revenue account that the deposit represents. For Transfer transactions, use the Account field to identify the other bank account involved in the transaction.


  7. (Optional) Provide a memo description.


  8. (Optional) Split the transaction.


    If a transaction needs to be assigned to more than one account, click the Splits button.


    image2.jpg

    You can erase the Splits detail by clicking the Clear button. You can also tell QuickBooks to recalculate the payment or deposit amount by using the split transaction data simply by clicking the Recalc button.


    The Splits area also lets you do something that isn't possible inside the regular register: You can use the Splits area to record customer:job information, class information, and billing information. To do this, use the Customer:Job column, the Billing column, and the Class column.


  9. To record a transaction into the register, click the Record button.


    QuickBooks recalculates the account balance and adjusts the ending balance for the new transaction.


dummies

Source:http://www.dummies.com/how-to/content/how-to-record-register-transactions-in-quickbooks0.html

Speaking French at Work

Speaking French at work and school doesn't have to be complicated. Whether you’re looking for a job in a French-speaking country or just need to talk with coworkers there, you'll need to know some key words and phrases to help ease your way.


Use the following words to describe typical office equipment and supplies.


un stylo (pen)

un crayon (pencil)

un bureau (desk)

une chaise (chair)

un ordinateur (computer)

un écran (screen)

un clavier (keyboard)

une souris (mouse)

une clef USB (USB key)

un carnet (notebook)

un site Internet (Web site)

un courrier électronique (e‑mail)

You’ll need to know the following words when scheduling meetings.


un entretien (interview)

une échéance (deadline)

l’ordre du jour (agenda)

un compte-rendu (minutes)

un agenda (appointment book)

un rendez-vous (appointment)

There are many ways to refer to other people you work with. Whether you refer to your coworkers by the department they work in or their job title, the following words will come in handy in most business settings.


ventes (sales)

marketing (marketing)

finance (finance)

comptabilité (accounting)

ressources humaines (human resources)

département juridique (legal)

recherche et développement (research and development)

support technique (technical support)

secrétaire (assistant; secretary)

président directeur général (PDG) (chief executive officer)

directeur financier (chief financial officer)

directeur/directrice [m/f] (manager)

surveillant/surveillante [m/f] (supervisor)

coordinateur/coordinatrice [m/f] (coordinator)

Try putting some of these terms together into some phrases that might come in handy at the office.


  • Nous allons avoir conférence par telephone à quatorze heures. (We’re going to have a conference call at 2:00.)


  • Pouvons-nous prévoir la réunion pour dix heures mercredi matin? (Can we schedule the meeting for 10:00 Wednesday morning?)


  • Puis-je emprunter un stylo et un bloc-notes? (May I borrow a pen and a notepad?)


  • L’imprimante ne fonctionne pas. (The printer isn’t working.)


  • Envoyez-moi un courrier électronique. (Send me an e‑mail. [formal])


dummies

Source:http://www.dummies.com/how-to/content/speaking-french-at-work.html

Publish a Mobile Website with Adobe Dreamweaver

After you create and test your website for iPhone and iPad so that it’s ready to publish on the web, you can use Dreamweaver’s publishing tools to upload your site to your web server. Which features you use depends on the kind of web server you use.


If you use a commercial service provider, you most likely need Dreamweaver’s FTP features.


You need information from your web hosting service, as described in the following list, before you can configure Dreamweaver’s FTP features. Most service providers send this information in an e-mail message when you sign up for an account. If you don’t have this information, request it from your service provider because it’s unique to your account on your web hosting service. Here’s what you need:


  • The FTP hostname: A human-readable nickname used by the Internet to locate a particular server; for example, ftp.domainname.com.


  • The path to the web directory: A path that looks similar to /web/htdocs/slightlyusedcats. (The path is optional but highly recommended.)


  • Your FTP login or username: Your personal username, which you created or which was assigned to you when you established your web hosting account.


  • Your FTP password: You know this one (and if you don’t, you can get it from your web hosting service).


  • Special instructions from your server: Instructions indicating whether you need to use passive FTP or any other advanced settings, for example. Instructions vary from server to server, so ask your web hosting service. (If you’re having trouble connecting and you aren't sure about these options, you can always experiment by selecting and deselecting the options to see whether a setting enables you to connect.)


dummies

Source:http://www.dummies.com/how-to/content/publish-a-mobile-website-with-adobe-dreamweaver.html

Decorating Windows with the Curtains and Drapes

Curtains and draperies work hard at blocking light, sound, and temperature. In addition to these functions, they’re also extraordinarily decorative, adding enormous personality to a room through color, pattern, and texture.


When choosing a patterned fabric for a curtain, especially an unlined curtain, scrunch the fabric in your hand. Doing so allows you to see how the pattern will look when gathered or pleated as it hangs at your window and how it will look with light streaming behind it. Don’t wait until the fabric has been made into curtains and hung in your room to be surprised!


Traditionally, windows were treated to three types of curtains:


  • A sash curtain (usually sheer, to filter light and provide some privacy)


  • A draw curtain (to block out light)


  • An overdrapery (which was purely decorative and stationary or unfunctional).


Today, draperies usually open and close (or draw) and are called draperies (a noun) never drapes (a verb).


In very formal rooms (with sufficiently high ceilings), all the layerings of window treatments were topped with a cornice or valance (to hide the hardware). This Traditional (expensive) multilayered treatment carries on today in period or very formal or dressy rooms.


Curtains and drapes are readily available as ready-mades in stock or standard lengths to conform to typical window sizes and ceiling heights. Finding ready-mades (generally less expensive than custom curtains) that work in your decorating project is possible. Perhaps they need only customizing with trim that’s available from a drapery or fabric shop. Or, you can embellish them with appliques and ribbons with which you can embellish plain panels.


Custom curtains allow you to choose the exact fabric needed for your interior design. Check out curtain design books, which can help you in deciding how simple or how lavish to make your curtains. Before you begin your curtain search, know that curtain designs often are a matter of selecting a heading (pleats and other decorative devices for gathering fabric into the desired fullness when hung at the window). You can choose from many different headings, but these are the more familiar:


  • Brisby pleats: What curtain makers call the technique of pinching pleats at the top, where rings are attached.


  • French pleats: Narrow folds neatly stacked and attached together (usually in groups of three pulled together) allowing for sewing rings on top or attaching pins for a traverse rod behind.


  • Pencil pleats: Narrow columns of folds that are continuous across the top of the drapery panel. These pleats must be tied or held back because they don’t fold, stack, and stay in place.


  • Smocked heading: A smocking tape (a band of fabric with rows of cords that can be pulled, gathering material as the cords are pulled) creates a dressmaker’s touch.


Curtains and draw draperies are often topped off by a separate item that essentially hides hardware, but may serve additional decorative purposes:


  • Cornice: A cornice is an upholstered wood shape (usually architectural, but it may be entirely fanciful in design).


  • Lambrequin: Think of a cornice that extends to the floor, creating a shadow box effect and adding a sense of architecture to both Traditional and Contemporary interiors. Use lambrequins over bare windows, blinds, or full curtains.


  • Pelmet: A pelmet is an architecturally or artfully shaped fabric stiffened with buckram (a stiffly starched fabric that tailors and dressmakers use).


  • Valance: A valance is a soft, shortened version of a bedhanging or curtain that may be more elaborately pleated, shirred, gathered, and trimmed than the curtain over which it hangs. A valance may match your curtains in the same fabric, or you can coordinate it with your curtains with pattern, color, and/or texture. You can also line your valance with a contrasting fabric for some added oomph.


dummies

Source:http://www.dummies.com/how-to/content/decorating-windows-with-the-curtains-and-drapes.html

Controlling Dust and Dander in Your Home

Allergen avoidance begins at home. Although avoiding or limiting exposure to allergens and irritants outside — as well as at work, school, or other indoor locations — is important, avoidance therapy can actually have the most beneficial impact in your home.


On average, most of us spend one-third of our lives in the bedroom — much of that time in bed. Because we spend such a large amount of time in our bedrooms, your bedroom is the most important single area in your home.


In and around your home, the most common and important sources of allergens that you should focus on when allergy-proofing are


  • Dust and dust mites

  • Pets

  • Mold

  • Pollen

Busting the dust


House dust is one of the most prevalent allergy triggers in any home, and unfortunately, it's everywhere. Think of house dust as one of life's inevitabilities — along with death and taxes. House dust can trigger allergy symptoms either as an irritant to sensitized target organs (such as your eyes, nose, or lungs) or as a result of the specific allergens often contained in house dust.


Studies show that the average six-room home in the United States collects 40 pounds of dust each year. Note, however, that dust is not dirt, nor is it an indication of poor housekeeping. House dust is a normal breakdown product of fibers found in pillows, drapes, clothes, linens, and other furnishings at home, work, school, or even in your car.


Allergy-proofing your bedroom and home likely involves dealing with dust mites more than with any other allergy trigger, because these microscopic creatures produce the single largest component of house dust that triggers allergies. Eighty percent of patients with allergies test positive for sensitivity to the dust mite allergen. The dust mite allergen is also the most significant allergic trigger of asthma attacks.


Although you've probably never seen them, dust mites are a fact of life — they're bound to follow almost anyplace you settle. These tiny spider relatives live in house dust where they feed on human skin scales (hence the scientific name dermatophagoides, meaning skin-eater), which we constantly shed (up to 1.5 grams per day — that's a lot of dust mite chow). The fecal matter (or waste, to put it more delicately) that they produce, at the average rate of 20 particles per day, is the most prevalent form of house dust allergens.


Although eradication of these natural inhabitants of your home is virtually impossible — the females lay 20 to 50 eggs every three weeks — you can take practical and effective steps to minimize exposure to dust mite allergens.


Taking the following measures often results in a significant decrease in allergic symptoms and medication requirements for patients with allergies or asthma.


  • Beds: Encase all pillows, mattresses, and box springs in special allergen-impermeable encasings, and mount all beds on bed frames. Wash all bed linens in hot water (at least 130 degrees) every two weeks. Use pillows, blankets, quilts, and bedspreads made only of synthetic materials. Avoid down- (feather) filled comforters and pillows.

  • Climate control: Don't locate your bedroom in a humid area such as the basement. Likewise, use an air conditioner or dehumidifier to keep the humidity in your home below 50 percent. You may want to use a humidity gauge to monitor humidity levels.

  • Carpets and drapes: If possible, go for the bare look in your home — remove carpeting and thick rugs. Bare surfaces such as hard wood, linoleum, or tile are inhospitable to dust mites and are also much easier to clean, thereby minimizing dust buildup. If you can't remove your carpeting and rugs, treat them with products that inactivate dust mite allergens. Washable curtains or window shades rather than heavy drapery or blinds also are wise alternatives.

  • Housekeeping: Vacuum thoroughly, at least once a week, with a HEPA or ULPA vacuum cleaner. If you have allergies, wear a dust mask when you clean or engage in any activity that stirs up dust. Also, consider cleaning your furniture with a tannic acid solution.

  • Ventilation: Use HEPA air cleaners to keep the indoor air throughout your home as pure as possible. Cover any heating vents with special vent filters to clean the air before it enters your rooms.

  • Decorations and furnishings: Use furniture made of wood, vinyl, plastic, and leather throughout your home instead of furniture made of upholstery. Likewise, make your bedroom as uncluttered and wipeable as possible. Avoid shelves, pennants, posters, photos or pictures, heavy cushions, and other dust collectors. Limit the clothes, books, and other personal objects in your bedroom to the essentials, and make sure that you shut the ones you keep in closets or drawers when not in use.

    If your child has allergies or asthma, don't make his or her bedroom a stuffed animal zoo — try to limit those types of toys to a few machine-washable ones. Keep your child's stuffed animals and toys in the closet or in a closed chest, container, or drawer when not in use.

Regulating pet dander


Pets are cherished members of many households. However, dander (skin flakes) from these animals is a significant source of allergy triggers for many people. All warm-blooded household pets, regardless of hair length, produce proteins in their dander and saliva that can trigger allergies. Dead skin cells in their dander can even serve as a food supply for dust mites. Cat dander residue can linger at significant exposure levels in carpets for up to 20 weeks and in mattresses for years, even after you remove the animal.


If finding a new home for your pet is not likely, try the following measures:


  • Keep your pet outdoors whenever possible.

  • If keeping your pet outdoors isn't possible, by all means, keep the pet out of the allergy patient's bedroom.

  • Make sure that anyone who touches your pet washes his or her hands before contacting the patient or entering the patient's bedroom.

  • Washing your pet with water once a week may remove surface allergens and possibly reduce the amount of dander that can stick to other household members' clothes and body (thereby reaching the patient's bedroom). Although it may take some training (and a few scratch marks), even cats can get used to baths.


dummies

Source:http://www.dummies.com/how-to/content/controlling-dust-and-dander-in-your-home.html

Give Old Christmas Ornaments a New Look

Paint and embellish old Christmas ornaments to change the whole look of your Christmas tree without investing in all new ones. Liven up old ornaments and give them a fresh new personality with these money-saving tips:


  • Spray paint them with pearlescent paint to give them a unified look. Hang ornaments outdoors on a suspended line to spray paint from all sides. Use light layers and several coats to eliminate drips.


  • Add faux pearls, jewels, and beads by applying small amounts of craft glue in a design or pattern and then dipping the ornaments in tiny beads. Set them on wax paper to dry.


  • Stencil them.


  • Dip them in glitter. Spread an even coat of school glue on the ornament with a sponge brush and dip and roll into glitter. Set them on wax paper to dry.


  • Add swirls or stars in dimensional paint. Using a squeezable tube of dimensional paint, draw free-hand swirls on your ornament. Create whimsical stars and fill them in with the paint. Work on one side and set the ornament in an empty egg carton to dry; come back later and finish the other side.


  • Take the shine off the surface by spraying with a glass frost spray paint, or dip them in an etching bath.


  • Decoupage them.


dummies

Source:http://www.dummies.com/how-to/content/give-old-christmas-ornaments-a-new-look.html

How to Become Safer Online

The Internet is an amazing tool, but it poses some safety risks. Before you start "surfing the net," use these tips for being a safe, smart online user:


  • Create stronger passwords. Create passwords that aren’t easy to guess, and don’t share them with others.


  • Don’t expose personal information. Be aware of how much of your personal or financial data you might be sharing with strangers on social networking sites, through e-mail, and on special-interest sites.


  • Don’t fall for e-mail scams. Online criminals may use e-mail to get your personal information and steal your identity. Or an e-mail might entice you to click a link that takes you to a bogus site or downloads malware (malicious software) to your computer.


  • Know who you’re doing business with. It’s quick and easy to create a Web site that looks legit, but not all Web sites are.


  • Be cautious with e-mail attachments. Attached files may contain malware, which can damage your computer — or it may install code that can track your activities


  • Use software to avoid malware. Several types of software products can spot and avoid viruses, spyware, and objectionable online content. Make sure you use protection.


  • Create safe e-mail aliases and usernames. Whether you're creating an e-mail account or a user account on a social networking or special-interest site, be careful how much information you give away even in your usename.


  • Find out how others might expose you. Even if you never go online, your information is probably out there. Learn to identify your exposure and stop others from revealing personal information.


dummies

Source:http://www.dummies.com/how-to/content/how-to-become-safer-online.html

Using Twitter’s Access Points

Twitter isn’t just for computer-users. You can access Twitter from your iPhone, Blackberry, or any mobile phone with Internet access. You can even text tweets from any cell phone with SMS capabilities. All you need to know is the right Twitter access point. Here’s a list of the places where Twitter is available to you:


DeviceAccess Point
Webhttp://twitter.com
Mobile phone — with Internet access (such as an iPhone or
BlackBerry)
http://m.twitter.com
Mobile phone — texting40404


dummies

Source:http://www.dummies.com/how-to/content/using-twitters-access-points.html

Choosing Urban Living for its Green-ness

The most sustainable housing locations are those close to the amenities that enable you to live a green lifestyle. For that reason, living in the city is usually your most eco-friendly choice. Being within walking or cycling distance of the following services means you can reduce your carbon footprint in your daily life:


  • Transportation: Proximity to transportation networks, such as bus stops, light rail systems, and railway stations, reduces your need to travel by vehicle. The inner-city areas of big cities and regional towns, where there's a concentration of stores and jobs, are most accessible for public transportation systems and are beginning to actively promote walking and cycling. A sustainable urban area has safe, well-lit, and good-quality walking and cycling paths and low levels of vehicle traffic.


  • Essential services: The ability to walk or cycle to schools, churches, public open spaces, community services, daycare facilities, libraries, and stores makes life easier and greener for everyone, especially children who don't have to rely on you to drive them everywhere.


  • Cultural and recreational facilities: Easy access to open space, parks, sports facilities, and recreation areas keeps you in tune with Mother Nature's greenery, and nearby concert halls and theatres feed your artistic soul.


  • Community center: You can tell that you're in a vibrant, sustainable community when people of all ages and cultures walk the streets; all the stores and services are open; the streets and sidewalks are clean; and there's a good mix of housing styles and types, which implies a good socioeconomic mix as well.


As your children's social lives become more active, you may have to make endless journeys to and from sports and social gatherings — or the nearest transportation center. When choosing the greenest possible location for your home, consider the needs of your children as well as yourself.


dummies

Source:http://www.dummies.com/how-to/content/choosing-urban-living-for-its-greenness.html

Tips for Navigating in QuickBooks 2009

QuickBooks 2009 aims to make your accounting life easier, and to that end offers keyboard shortcuts, mouse actions, and other user interface tricks like the ones in the following list:


  • To move quickly to a specific list box entry, press the letter.


  • To select a list box entry and choose a suggested command button for the active dialog box, double-click the entry.


  • To move the insertion point to the beginning of a field, press Home.


  • To move the insertion point to the end of a field, press End.


  • QuickBooks can display a list of open windows in its Open Window list. To move to a listed window, just click it.


  • To display the Open Window list, choose View→Open Window List.


  • To tell QuickBooks to use windows the same way every other program does, choose View→Multiple Windows. Or, to tell QuickBooks to just display the active window, choose View→One Window.


dummies

Source:http://www.dummies.com/how-to/content/tips-for-navigating-in-quickbooks-2009.html

Simple Steps to Self-Hypnosis

Self-hypnosis is useful for boosting your confidence, encouraging yourself towards a healthier lifestyle and improving your performance. Follow these basic steps of self-hypnosis to help you move towards your desired goals:


  1. Think about what you want to achieve or change, and state your goal in a single sentence.


  2. Choose a place where you can be completely comfortable, whether sitting in a chair or lying down.


  3. Set a time limit by mentally giving yourself the following suggestion: ‘Exactly ten minutes from now, my eyelids open automatically and I feel calm, rested and refreshed.’


  4. Close your eyes and take a few deep breaths. Progressively relax all your muscles, from head to toe, or toe to head, whichever you prefer.


  5. Count down from ten to one and tell yourself that with each number you’ll become more relaxed, both physically and mentally, and go deeper into trance.


  6. When you’re in a deepened trance state, start using the goal statement you devised for your self-hypnosis session. Remember your single sentence goal statement, and make it as vivid as possible in your imagination. Then simply let go. Trust that you have handed it over to your unconscious mind, and that this wise part of you will now solve the problem.


  7. Count yourself awake, up from one to ten, and tell yourself that you’re no longer in trance.


  8. A few minutes after awakening from self-hypnosis, you are still in a highly suggestible state. Use that time to reinforce how relaxed and calm you feel, and how pleased you are that your unconscious mind is helping you reach your goal.


dummies

Source:http://www.dummies.com/how-to/content/simple-steps-to-selfhypnosis.html

XBRL For Dummies

Your business operates on information, so you need to know the fundamentals of Extensible Business Reporting Language (XBRL). XBRL is, fundamentally, a language that helps businesses effectively and efficiently bridge the current gap between the various business systems used to operate businesses. XBRL is a global standard for business reporting, mandated by the United States Securities and Exchange Commission (SEC), used by stock exchanges around the world, and officially supported by the European Parliament and many other governments.


>


>


High-Level Components of XBRL and Their Definitions


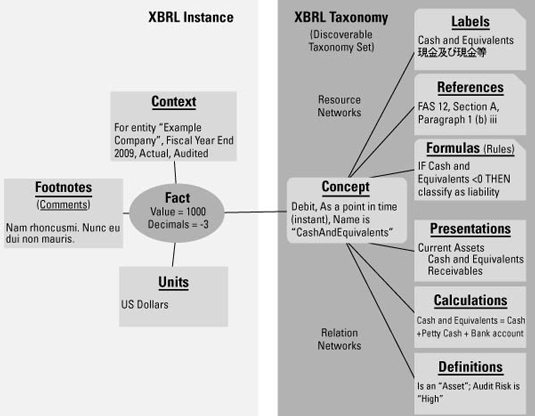
The following figure illustrates the high-level logical components of XBRL. The XBRL Specification defines these high-level logical components and the physical means by which to express them. The following table provides a brief description of each high-level component.


image0.jpg


ComponentDescription
XBRL InstanceBasically, a new type of XML business report format that
contains business information. XBRL instances contain facts being
reported and other information (such as context and units) that
provides context for those facts. May also contain footnotes
(comments). XBRL instances refer to XBRL taxonomies that describe
the facts used within that XBRL instance.
ContextProvides context for facts, including information about the
entity, the period, or other dimensions of the reported
information.
UnitsProvides additional context needed for numeric facts, such as
the currency of the fact or some other unit of measure.
FactInformation being reported or exchanged. A fact has a value, is
associated with a concept from an XBRL taxonomy, and has contextual
information associated with it. Facts can also have footnotes
associated with them.
FootnotesBasically comments that can provide additional information
relating to a fact or that can connect facts together.
Discoverable Taxonomy SetCollection of all XBRL taxonomies referred to by either an XBRL
instance or by an XBRL taxonomy.
XBRL TaxonomySimilar to a dictionary that describes information contained
within an XBRL instance. However, unlike a dictionary, XBRL
taxonomies can also express other information, such as hierarchies
of relations between those dictionary entries.
ConceptUsed by facts in an XBRL instance. Concepts describe facts and
have specific and unique meanings, names, data types, and other
attributes. A concept specifies the XML tag and other constraints
on a fact in an XBRL instance. Concepts are similar to the words in
a dictionary.
NetworkA set of related concepts or resources. You can use networks to
organize an XBRL taxonomy and to express multiple sets of relations
or resources.
Resource NetworkA set of related resources. Resources provide additional
information about a concept.
LabelsAllow the taxonomy creator to create labels for each concept in
the taxonomy. They let humans work with a more user-friendly label
rather than having to work with ugly XML element names. Labels also
provide multilingual and multidialect support. Labels also provide
documentation for a concept, such as a human-readable definition of
the concept.
ReferencesAllow the taxonomy creator to express references to external
sources (such as a paragraph in a manual) that explain or further
define a concept in human terms. References are pointers to a
reference, not the references themselves.
FormulasAllow the taxonomy creator to express various types of business
rules to be enforced. XBRL instances that use an XBRL taxonomy
containing these rules must comply to these rules.
Relations NetworksA set of related concepts. Relation networks allow taxonomy
creators to associate one concept with another concept in various
ways for many purposes.
PresentationAllow for a simple parent-child type of relationship (a
hierarchy) to be expressed. Presentation relations are primarily
intended to help organize the XBRL taxonomy. You can also use
presentation-type relations to help generate human-readable
renderings of an XBRL instance.
CalculationAllow for certain types of computations to be expressed between
concepts within an XBRL taxonomy. Only addition and subtraction are
handled by XBRL calculation relations. You can use XBRL Formulas to
express more sophisticated computations.
DefinitionCan be used for any number of purposes. Definition relations
basically let you express any type of relation, and you can define
any role that explains what type of relation you have created.


>


>
dummies


Source:http://www.dummies.com/how-to/content/xbrl-for-dummies-cheat-sheet.html

Wireless Networking Terminology for the CCENT Certification Exam

At its most basic, wireless communication is the sending and receiving of data through airwaves. But the CCENT certification exam expects you to understand wireless terminology and concepts. The following are some key points to remember for the exam:


Know the following organizations that help define wireless:


  • Institute of Electrical and Electronics Engineers (IEEE): Creates the wireless standards, such as 802.11a/b/g/n


  • Federal Communications Commission (FCC): Regulates the use of wireless devices (licenses of frequencies)


  • WiFi-Alliance: Ensures compatibility of wireless components. The WiFi-Alliance is responsible for testing and certification of wireless devices.


Know the two types of wireless networks:


  • Ad hoc mode: No wireless access point is used. The wireless clients communicate in a peer-to-peer environment.


  • Infrastructure mode: Uses a wireless access point


Know the IEEE Standards for wireless:


  • 802.11a: A wireless standard that uses the 5 GHz frequency range and runs at 54 Mbps.


  • 802.11b: A wireless standard that uses the 2.4 GHz frequency range and runs at 11 Mbps. The WiFi standard was created and 802.11b is part of that standard. This is the frequency used by cordless phones and microwaves, so you may experience interference from those devices. As a correction, you can change the channel of the wireless network or purchase phones that use a different frequency.


  • 802.11g: A wireless standard, which is compatible with 802.11b, that also uses the 2.4 GHz frequency range and runs at 54 Mbps.


  • 802.11n: A new wireless standard that can use either the 2.4 GHz frequency range or the 5 GHz frequency range and is compatible with 802.11a/b/g. 802.11n has a transfer rate of approximately 150 Mbps.


Other wireless terms to know for the exam:


  • Basic Service Set (BSS): A wireless network consisting of one access point using an SSID. If you had three access points, each using a different SSID, then this would be three BSS networks.


  • Extended Service Set (ESS): A wireless network comprising multiple access points using the same SSID.


Be sure to know the configuration requirements to set up an ESS:


  • The SSID on each access point must be the same.


  • The range of the access points must overlap by 10% or more.


  • Each access point must use a different channel.


Know the difference between the different wireless encryption types:


  • Wired Equivalent Privacy (WEP): An old wireless encryption protocol that involves configuring a pre-shared key on the access point and the wireless client that is used to encrypt and decrypt data. WEP uses the RC4 encryption algorithm with the pre-shared key and is not considered secure due to the way the key is used. WEP supports 64-bit and 128-bit encryption.


  • WiFi Protected Access (WPA): The improvement on WEP that adds the TKIP protocol in order to perform key rotation to help improve on the fact that WEP uses a static key. WPA has two modes: personal mode involves configuring a pre-shared key, and enterprise mode can use an authentication server such as RADIUS.


  • WiFi Protected Access 2 (WPA2): Improves upon WPA by changing the encryption algorithm to the Advanced Encryption Standard (AES) and supports both personal mode and enterprise mode.


The following are some key points regarding best practices to improve the security of your wireless network:


  • Disable wireless: If you aren't using wireless, then disable the wireless functionality on the wireless router.


  • Change the SSID: Make sure you change the SSID to something meaningless. You don't want the SSID set to a value that will help the hacker identify the building you're in because he could move closer to the building to get a stronger signal.


  • Disable SSID broadcasting: After disabling SSID broadcasting. the router won't advertise the existence of the wireless network. This makes it harder for someone to connect because they have to manually configure their client for the SSID name.


  • Implement MAC filtering: MAC filtering allows you to limit who can connect to the wireless network by the MAC address of the network card.


  • Implement encryption: Be sure to encrypt wireless traffic with WEP, WPA, or WPA2. WPA2 is the most secure of the three.


dummies

Source:http://www.dummies.com/how-to/content/wireless-networking-terminology-for-the-ccent-cert.html