>
How to Remove a PC Case
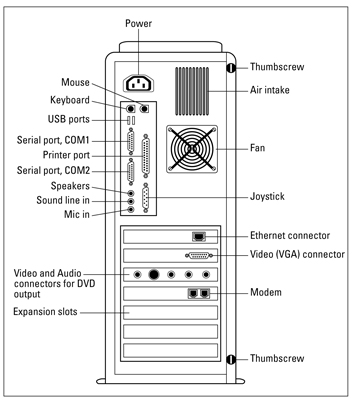
If you want to upgrade or fix a PC, you need to remove the case to get to the inner workings. The steps in the following list tell you how, and the figure shows the key components.
Turn off the computer, monitor, and peripherals.
Make sure that everything normally attached to your computer is turned off and unplugged. Your computer’s easier to move around that way.
Unplug your computer from the wall or Uninterruptible Power Supply.
Unplug the power cord from the back of your PC, too.
Remove the screws from your PC’s back or outside edges.
Many PCs use two large thumbscrews along one edge, as shown in the figure. Some new models have sides that simply flip down when you press a release.
Remove the PC’s cover or side panel.
On some computers, the cover slides toward the front; others come out the back. You might need to pull pretty hard.
While the case is off, take your PC outside and use a can of compressed air to blow out all the dust from inside. Clean away the dust balls clinging to any outside vents, as well.
To replace the cover, reverse these steps.
> >
>The working end of a PC tower.
>
>
>
What Your PC Needs to Upgrade to a Version of Windows Vista
Upgrading your PC to Microsoft Vista means paying attention to which version you’re upgrading to and knowing what that version requires. The following table lists the needs for Vista Home Basic, Home Premium, and Ultimate. Upgrade away!
| Vista Home Basic | Vista Home Premium | Vista Ultimate | |
|---|---|---|---|
| Fast CPU | X | X | X |
| Powerful video | X | X | |
| 5.1 or 7.1 sound | X | X | |
| TV tuner/TV out | X | X | |
| Large hard drive | X | X |
>
>
>
What to Try First to Fix a Microsoft Windows Problem
If you’re in the habit of upgrading or fixing PCs, sooner or later you’ll encounter a problem with Windows. When you do, use the tips in the following list as your first line of defense:
Always install the “Critical” updates listed by Windows Update.
Use System Restore to repair problems caused by damaged settings or software; return to your prior settings if it doesn’t help.
Install a new driver to fix problem parts.
Invite a computer-literate friend to fix your computer using Remote Assistance.
Make daily backups using Windows Vista’s Backup and Restore Center or a more full-featured third-party software.
Turn on Windows Vista’s firewall.
Vacuum dust from your computer’s fan area and vents often to prevent overheating.
>
>
>
How to Add a New Part to Your PC
Upgrading your PC may mean adding a new part to the PC’s motherboard. No need to be intimidated, just use the steps in the following list as a guide and you’ll come through your upgrade with flying colors and a new and improved PC.
Copy any important information on your hard drive to a CD/DVD, another computer on your network, or a portable hard drive for safekeeping. (To be really safe, back up the entire hard drive.)
Read any instructions that came with your new part.
Exit any running programs, turn off your PC, and unplug it from the wall.
Clean off the desk or table space next to your computer.
Put your tools next to the computer.
Remove your PC’s cover.
Touch an unpainted part of the computer’s case to discharge any static electricity that might have built up.
This keeps static electricity from damaging your computer’s sensitive internal parts.
If you work in a particularly static-prone environment, buy a wrist strap or grounding mat from your computer store to help discharge static.
Remove the old item and insert the new one.
Plug in the PC, turn it on, and carefully test the new part to see whether it works.
Turn off the PC, unplug it, and put the case back together.
Plug in the PC and put away your tools.
>
>
>
Important Tips for Upgrading and Fixing PCs
You want your PC to be all it can be, so you upgrade when you can and repair as necessary. When either fixing or upgrading, use the following tips to help keep you and your PC safe:
Turn off and unplug your computer before taking off its cover. Please. This one’s the most important step. You can damage both yourself and your computer if you forget to turn off and unplug the computer.
Install parts one at a time. Always make sure the first one works with Windows before installing the next.
Read a USB part’s instructions before installation. Sometimes you must install the drivers before plugging in the part. Other times, you install the drivers afterward.
The red (or colored) wire is positive. The red (or colored) wire often plugs into the pin or socket marked by a little + sign.
The positive/red wire connects to Pin 1. Look for little numbers printed along the edge of a socket. Can’t see the number 1? Then push the plug into the socket with the red wire facing toward the low numbers on the socket.
>
>
dummies
Source:http://www.dummies.com/how-to/content/upgrading-fixing-pcs-for-dummies-cheat-sheet.html
No comments:
Post a Comment