Administrators are special people. Just ask one; you'll see. Anyway, when an administrator creates or edits the account for a Standard-level user, Mac OS X offers two other levels of specific rights — Limitations — that can be assigned on an individual account basis. Note: Limitations are available only for Standard-level users; administrators don't need them because an Administrator-level account already has access to everything covered by Limitations.
When do you need Limitations? Here are three likely scenarios:
- You're creating accounts for corporate or educational users, and you want to disable certain features of Mac OS X to prevent those folks from doing something dumb. Just tell 'em you're streamlining the operating system. (Yeah, that's it.) For example, you might not want that one particular kid making CD copies of The Illustrated Anarchist's Cookbook in the classroom while you're gone. Therefore, you disable the ability for that account to burn CDs or DVDs.
- In the same environment, you might want to give a specific Standard-level account the ability to view all the settings in System Preferences. If Roger in Accounting is both helpful and knowledgeable — oh, and add trustworthy in there, too — you might want to give him this capability so that he can make necessary changes to the system while you're on vacation.
- You want one or more users to access one — and only one — application on the system, or perhaps just two or three applications. To illustrate: In a hospital, you may need to have a number of computers only display patient records. No Word, no e-mail, nothing but the one program that accessed the medical records database. These machines are called dumb terminals, although they were actually personal computers. (This trick also works well if you're a parent and you'd like to give your kids access without endangering your valuable files. Just don't call your computer a dumb terminal lest your kids take offense. That's experience talking there.) If you want to allow access to a specified selection of applications, you can set them in that account's Limitations.
Time to review what each of the settings does. To display the capabilities for a Standard account, click the account in the list and click the Limitations tab; then click the Some Limits tab (see Figure 1).
>

Figure 1: You can restrict access to all sorts of functions within a Standard account.
The settings are
- Open All System Preferences: When this check box is enabled, this option allows the user to change any setting throughout System Preferences, just as if the account were Administrator-level.
- Modify the Dock: Enable this check box, and the user can remove applications, documents, and folders from the Dock in the Full Finder. (If you don't want the contents of the Dock changing according to the whims of other users, it's a good idea to disable this check box.)
- Change Password: Enable this check box to allow the user to change the account password. If the user isn't allowed to open all System Preferences settings, this check box is disabled.
- If you're creating a single Standard-level account for an entire group of people to use — for example, if you want to leave the machine in kiosk mode in one corner of the office or if everyone in a classroom will use the same account on the machine — you may want to disable the ability to change the account password.
- Burn CDs and DVDs: Disable this check box to prevent the user from recording CDs or DVDs via the built-in disc recording features in Mac OS X. (Note, however, that if you've loaded a third-party recording program like Toast, the user can still record discs with it.)
- This User Can Only Use These Applications: When this option is enabled, you can select the specific applications that will appear to the user. These restrictions are in effect whether the user has access to the Full Finder or just the Simple Finder.
- To allow access to all the programs in the specified folders — Applications, Utilities, and Applications (Mac OS 9) — click the Allow All button. To restrict access to all applications, click the Uncheck All button. You can also toggle the restriction on and off for specific applications that Mac OS X finds in these folders; click the right-arrow icon to expand the list and then either mark or clear the Allow check box for the desired programs.
- To add a new application to the Allow list, drag its icon from the Finder and drop it in the list. Alternatively, click the Locate button and navigate to it, click the application to select it, and then click Add. After you add an application, it appears in the Others section of the Allow list, and you can toggle access to it on and off like the applications in the named folders.
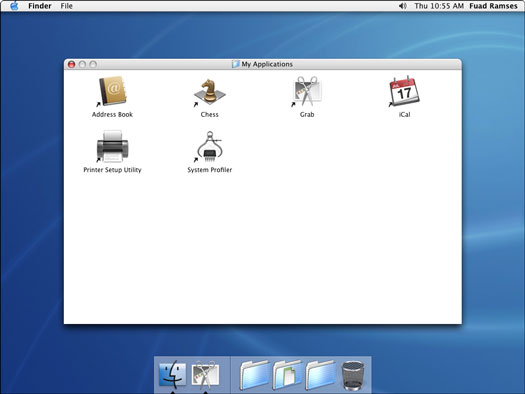
- You can restrict your Standard-level users even further by assigning them the Simple Finder set of limitations. The default Simple Finder, as shown in Figure 2, is a highly simplified version of the regular Mac OS X Finder. The simplified Dock contains only the Finder icon, the Trash, and folders for the user's approved applications, documents, and shared files.
- This is the network administrator's idea of a foolproof interface for Mac OS X: A user can access only those system files and resources needed to do a job, with no room for tinkering or goofing off.
>

Figure 2: Whoa! It's the Simple Finder — less filling, still runs great!
Note that a Standard-level user can still make the jump to the full version of the Finder — click Finder and choose Run Full Finder. The user will have to enter a correct Administrator-level username and password.
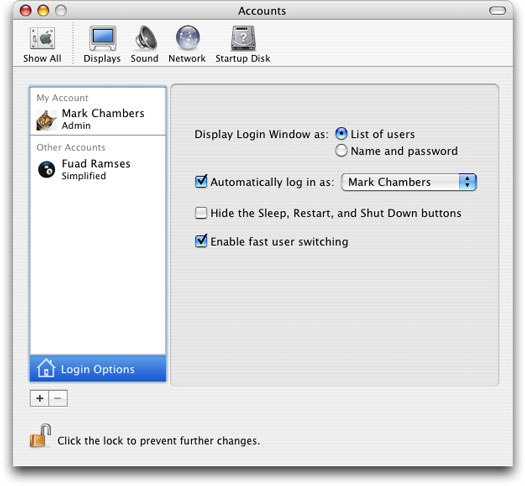
You can also change the Auto Login account from the Accounts panel. Click the Login Options button under the Accounts list, and then enable the Automatically Log in As <username> check box to enable it (see Figure 3). Click the drop-down list box to choose the account that will automatically log in when Mac OS X starts up. This is yet another good feature for those preparing a Mac for public use — if you set the Auto Login to your public Standard-access account, Mac OS X automatically uses the right account if the Mac is rebooted or restarted.
You can always choose Log Out from the Apple menu to log in under your own account. If you need to temporarily disable the Auto Login feature without changing which account it uses, disable the Automatically Log in As <username> check box.
>

Figure 3: Switch Auto Login to a new account.
>
dummies
Source:http://www.dummies.com/how-to/content/setting-user-limitations-in-mac-os-x-panther.html
No comments:
Post a Comment