The Final Cut Pro HD Timeline lets you arrange all your video and audio clips so that they tell the story you want to tell. To understand how the Timeline works, think of it as a page of sheet music, but, rather than place musical notes of different lengths of time (quarter notes, half notes, and whole notes), one after another, you place video and audio clips of different lengths of time, one after another. And, when you want to see how your clips are played together, you can watch your movie in progress in the Canvas window.
When you're editing, you spend lots of time moving media clips from the Final Cut Pro Browser window to the Timeline (more specifically, to a video or audio track on the Timeline) as you weave the clips into your story. Final Cut Pro gives you several options for accomplishing this.
Inserting and overwriting
When you add a clip to a track on the Timeline, you're making an edit. The two edits you're most likely to make in Final Cut Pro are insert edits and overwrite edits. The difference between these two edits is described as follows:
- Insert: With an insert edit, Final Cut Pro creates new room on the Timeline track for your clip so that it doesn't copy over other clips that are already there. (In other words, this edit works and plays well with others.)
- Overwrite: When you do an overwrite edit, Final Cut Pro adds your clip to the Timeline. If the new clip is long enough to run into other clips that are already on that track, however, the new clip erases the existing ones (a decidedly selfish kind of edit).
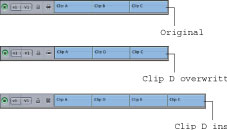
Figure 1 shows the original arrangement of Clips A, B, and C and then shows what happens when Clip D is added after Clip A via both an insert edit and an overwrite edit.
>

Figure 1: The effects of doing an overwrite edit and an insert edit of Clip D.
Which type of edit should you use? The answer depends on what you're trying to do. To add a clip to a bunch of other clips, use an insert edit. If you don't like how a certain clip is working on the Timeline and want to see how a new one does in its place, an overwrite edit probably would work better. The important thing is that you don't "overthink" or fret about these options. You develop a natural feel for this kind of thing soon enough.
In any case, the easiest, most intuitive way to do either edit is as follows:
1. Position the Timeline playhead at the time you want to add your new clip.
Final Cut Pro places your clip at the playhead's location on the Timeline. Click within the Timeline's ruler to position the playhead at that point. (To fine-tune the playhead's position, you can move it frame by frame with your left- and right-arrow keys or move it clip by clip with the up- and down-arrow keys.) The Canvas window shows the current frame that the playhead is on — if a frame is there, as opposed to empty space.
2. Drag your clip from the Browser window to the Canvas window.
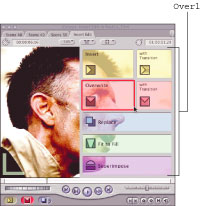
Yes, drag it to the Canvas, not to the Timeline. As you drag, a number of buttons pop up over the Canvas window. These buttons are called sections, and as a group, they make up the Canvas's Edit Overlay feature. This overlay gives you several choices for the kind of edit you want to make, as shown in Figure 2. Don't release the mouse button yet!
>

Figure 2: Drag a clip to the Canvas window, and the Edit Overlay feature appears.
3. Move the mouse pointer over either Insert or Overwrite, and then release the mouse button.
Final Cut Pro either inserts or overwrites your clip to the Timeline. If your clip includes both video and audio tracks, the video portion appears on the Timeline video track and the audio elements are found on the Timeline's audio tracks. (Mono audio uses only one track, and audio that's captured in stereo uses two.)
Choosing the right track on the Timeline
If your Timeline has lots of tracks, you need a way to tell Final Cut Pro which track gets the clip you're inserting or overwriting to the Timeline. For instance, if you have multiple audio tracks for stereo dialogue, sound effects, and music, you don't want to insert a clip of music on a track you're using for dialogue clips. To control which track gets the clip you're editing, you set a destination track. By default, Final Cut Pro sets your V1 video track and the A1 and A2 audio tracks as destination tracks, but you can set as destination tracks any other tracks you have created.
Using a shortcut to insert and overwrite
When you're comfortable doing insert and overwrite edits by dragging clips from the Browser to the Canvas, you may want to try out an even more direct approach.
Select a clip in the Browser window, and drag the clip to any point (regardless of the playhead position) and to any track on the Timeline. As you drag your clip to its track (video or audio), notice that the upper third of the track has a horizontal line running through it. (See Figure 3; this line is easy to miss.)
>

Figure 3: Dragging clips directly to tracks on the Timeline.
Your mouse pointer's position relative to this line determines whether you insert or overwrite the clip to the Timeline, as follows:
- Insert: When you drag your clip above the line, Final Cut Pro assumes that you want to insert your clip on the Timeline. Your mouse pointer becomes an arrow pointing to the right and signals an insert edit.
- Overwrite: When you drag your clip below the line, Final Cut Pro assumes that you want to make an overwrite edit. Your mouse pointer becomes an arrow pointing down when an overwrite edit is in the cards.
If your Timeline is set to display tracks in Reduced view, you can't see or use this helpful line. Any clip you drag to the Timeline is overwritten. To do an insert edit, hold down Option when you drag the clip to the Timeline and then release the mouse button.
>
dummies
Source:http://www.dummies.com/how-to/content/moving-clips-to-the-timeline-in-final-cut-pro-hd.html
No comments:
Post a Comment