Moviemakers are always coming up with creative techniques for making better movies. One of the most common special-effects techniques used today is called compositing. When you composite a scene in your digital video, you actually layer several different clips of video over one other to make a single image.
You can see a common, everyday example of compositing during the weather forecast on the evening news. When you watch it on TV, it looks as if the weatherperson is standing in front of a radar weather map, but in all likelihood, that map is actually a blank wall. Editing software superimposes the image of the weatherperson over the image of the weather map, creating the illusion that you see on TV. (The weatherperson discreetly watches all this on a monitor screen so as not to lose track of where to point.)
After you shoot your video and import it into your editing program, compositing the video takes only a few steps. First, place the clip that you want to serve as the background in the first video track. Next, place the bluescreen clip in the track directly above it.
What you do next depends on the editing program that you're using. (Figure 1 uses Adobe Premiere.) The process is pretty similar in all the editing programs, so you should be able to follow along with these steps, no matter what program you use. To composite video tracks in Premiere, follow these steps:
1. Select the blue screen clip in the timeline and choose Clip --> Video Option --> Transparency.
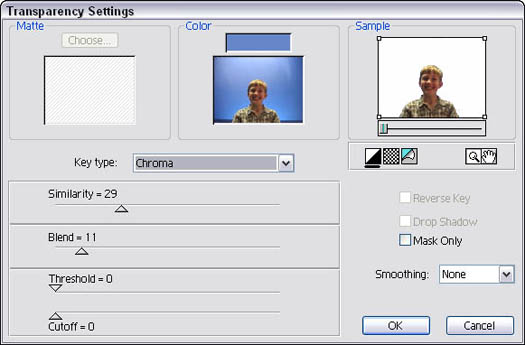
The Transparency Settings dialog box appears, as you can see in Figure 1.
2. Choose Chroma from the Key Type menu.
Although the Key Type menu has a Blue Screen option, the Chroma key is a little easier to work with. With the Chroma key, you can more easily correct minor flaws in the shading of your blue screen.
3. Click somewhere on the blue screen in the image under Color.
When you move the mouse pointer over the video image in the Color box, the pointer turns to a dropper or color picker icon. The color that you click on appears above the video image, and the Chroma key removes that color from the video image. The Sample image shows the parts of your image that now appear transparent.
4. If some parts of the blue screen still appear in the Sample image, adjust the Similarity and Blend sliders until the whole blue screen is invisible.
5. Click OK when you're done.
The blue screen becomes invisible in the video image, making the composite effect complete!
In Adobe Premiere and many other video-editing programs, you may need to render the timeline before you can preview your bluescreen effect. Rendering builds a preview file on your hard drive. To render the timeline in Premiere, choose Timeline --> Render Work Area.
>

Figure 1: In Adobe Premiere, choose Blue Screen from the Key Type menu in the Transparency Settings dialog box.
>
dummies
Source:http://www.dummies.com/how-to/content/compositing-digital-video.html
No comments:
Post a Comment