Now that Access 2003 contains all your coolest information, why not share your stuff with others in your company — or even publish it for the world? Whether you're building a commercial site geared toward fame and online fortune, or a cross-department intranet to supercharge your company, Access 2003 contains all the tools you need to whip your data into Web-ready shape in no time at all.
Access 2003 helps you publish data in two ways: static and dynamic. The method for your project depends on the equipment, goals, and expertise available in your immediate surroundings. Here's a quick comparison of the options:
- Static: This option is a straight conversion from Access 2003 into HTML. Its name reflects the fact that the stuff you convert doesn't change over time — it's a lot like taking a picture of your data. If you add more records to your table and want to include them in your Web-based stuff, you need to re-create the Web pages.
 |
|
- Dynamic: Instead of creating a simple HTML page that contains all of your data, the Dynamic option builds a special goodie that Access 2003 calls a data access page. This is an HTML page that gives people access to your data, so they can see (and even change) your information through the corporate network or the Web. Data access pages work only with Access tables and queries.
 | Thanks to the Data Access Page Wizard, building a data access page isn't tough. But because all this technical magic requires some serious cooperation among the Web server, Access 2003, and your database, implementing the finished data access page isn't necessarily a task for beginners. If your page is to be viewed by more than a few people outside your company, you probably need to enlist the aid of a Web pro. |
Although the details of making a data access page work may require some help from a trained computer professional, literally anyone can create a data access page by using the wizard. Here are the step-by-step details:
1. Open the database containing data destined for your intranet or the Web.
The database window hops to the screen.
2. On the left side of the window, click the Pages button.
The database window changes, displaying three options dealing with data access pages.
3. Double-click the Create Data Access Page by Using the Wizard option.
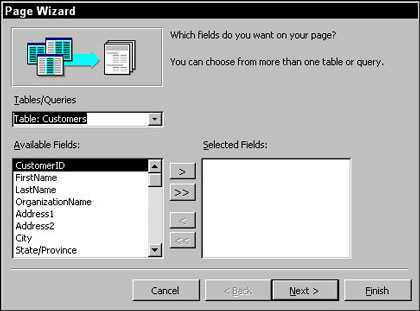
After a gratuitous amount of hard drive activity, the Data Access Page Wizard ambles forth (as shown in Figure 1).
 |
Figure 1: The Data Access Page Wizard looks a lot like the Report Wizard. |
4. In the Tables/Queries box, click the down arrow, and then click the table or query you want on the data access page.
The Available Fields window lists all the fields in the selected table or query.
5. For each field you want in the data access page, click the field name and then click the > (greater than symbol) button.
The highlighted field hops into the Selected Fields list.
 | To copy all of the possible fields into the Selected Fields list, click the >> (double greater than symbol) button. To remove a field, click its entry in the Selected Fields list, then click the < (less than symbol) button. To clear out the whole list and start over, click the << (double less than symbol) button. |
6. Repeat Steps 4 and 5 for each table or query you want to include. After all the fields are ready, click Next.
Data access pages understand how related tables work together so that you can include fields from several tables in one data access page.
7. To show your data in groups on your new data access page, click the fields you want to use to subtotal your records, and click the > (greater than symbol) button to add the new groups. After you finish, click Next.
With grouping complete, Access moves along to sorting and summary information.
 | Groups in a data access page work just like groups in a report. |
8. To sort the detail records even further, select a field on the Sort Order and Summary Information page. Click Next after you finish.
Most of the time, you won't need yet another layer of organization for your data. By this time, the data is sliced and diced a couple of times, thanks to the grouping options. However, if you do need more layers, feel free to add up to four more levels of sorting and summarizing.
9. Type the page title you want and then click Finish.
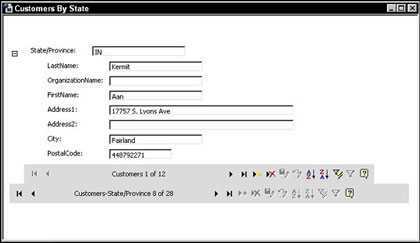
The Wizard clunks, shimmies, and generally ambles around for a bit. After making you wait just long enough to prove that the whole process is woefully complex, the Wizard delivers your finished data access page, as shown in Figure 2.
 |
Figure 2: The finished data access page — looking good! |
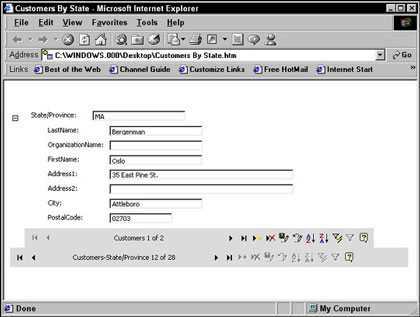
10. Test your new page by running your Web browser and loading the page for a quick look (as shown in Figure 3).
 |
Figure 3: The data access page displayed within Internet Explorer. |
You may not be able to deploy your data access page on a big commercial Web site. Just as ActiveX technology makes it easy to create the page, it also restricts where it can be displayed. As of this writing, only Internet Explorer (versions 5.0 and above) can display data access pages.
dummies
Source:http://www.dummies.com/how-to/content/pushing-your-access-2003-data-onto-the-web.html
No comments:
Post a Comment