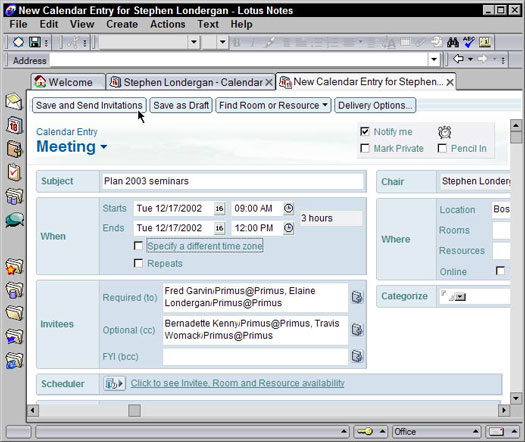
To create a new Meeting, first open your Calendar and then click the Schedule a Meeting button on the Action bar. A blank Meeting form appears. In Figure 1, you can see a sample Meeting form.
>

Figure 1: Creating a new meeting.
Most of the fields on a Meeting form are the same as those on an Appointment form. You need to fill in the basics, such as a subject, when, duration, and location. Next, you'll move on to consider who to invite.
Inviting the Invitees
In the simplest case, you simply enter the names of the people whom you want to come to your meeting. Just fill in the fields of the Invitees section (bottom-left side) as well as the date, time, and location sections of the new Meeting form. As you can see in Figure 1, you can invite three types of people: Required, Optional, and FYI.
- Required: Anyone whose name you list in this field is considered by Notes to be a mandatory participant of your meeting. This is especially important when you ask Notes to find the best times for a meeting using the Scheduler.
- Optional: As far as Notes is concerned, these folks are really just like Required people. Notes consults their schedules if you ask Notes to find the best times for your meeting. If a person is listed as an Optional invitee in a Meeting invitation, his attendance isn't necessarily mandatory.
- FYI: Use this field if you want to send a Meeting notice — different than an invitation — to someone. Suppose that you need to schedule a meeting with your team members. You could enter each team member's name in the Required field but put your boss's name in the FYI field. That way your colleagues each receive an invitation to the meeting, but your manager just gets a meeting notice instead. That way your boss knows that you're having the meeting and that you sent the invitations but also that she isn't expected to attend.
The people in the Required and Optional fields won't see the names of anyone whom you list in the FYI field of a Meeting invitation.
Click the buttons that look like a little phone book to the right of the Required, Optional, and FYI fields to select names from the Public Directory.
The simplest way to create a new Meeting invitation is the following:
1. In the Subject field, enter a subject.
2. In the When fields, choose a start and end date and time for the meeting.
3. In the Where fields, set the location.
4. In the Invitees fields, enter the names of the people whom you want to invite.
5. Click the Save and Send Invitations button on the Action bar.
All your Invitees receive a message in their Inbox asking them to come to your meeting.
The only problem with this approach — although it's certainly direct — is that it typically starts a volley of e-mail messages back and forth between you and your guests. You know, the "I can't make it at 9:30, but how about 10, instead?" variety. Depending on the number of people whom you invite to any particular meeting, you may actually spend quite a bit of time after sending the invite trying to coordinate them as they all get back to you with these "Yes, I can" or "No, I can't" responses.
You can easily skirt this dilemma. Rather than using the simple process that listed above, ask the Notes Scheduler to first review each invitee's Calendar to find a common time when everyone is available. Armed with this information, you can set a meeting time convenient for (hopefully) everyone. Your invite arrives in your guests' Inboxes already pre-loaded with a date and time that you know (heh, heh) when they're free. Any of your guests can still decline, of course, but you reduce the chance of that happening pretty dramatically because you avoid most schedule conflicts up front.
Using the Scheduler
To have Notes suggest an optimal time for a meeting based on when your Required and Optional meeting participants are available, hold off clicking that Save and Send Invitations button just yet. Rather, fill out your Meeting form as usual and then click the Click to See Invitee, Room, and Resource Availability button, which you can find in the Scheduler section (bottom) of the Meeting form. (Refer to Figure 1.)
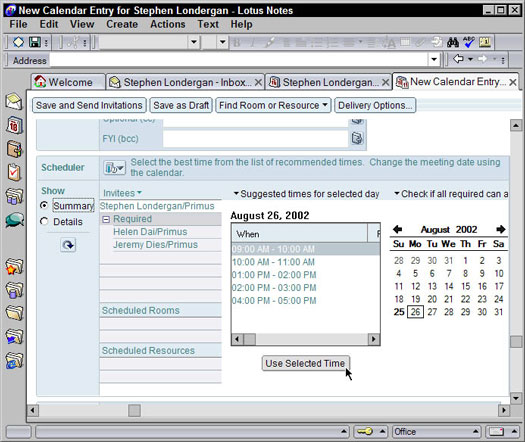
Figure 2 shows a sample Meeting invitation with the Scheduler opened.
>

Figure 2: Use the Scheduler to find out when your guests are available to meet.
When you use the Scheduler to have Notes find meeting times for you, you have two ways to look: by best times or by schedule details. First, select the Summary radio button (under the Show heading, left side) to secure that view. This view is probably the easiest to use because you can see at a glance a blow-by-blow set of time suggestions during which all the people you're inviting are available.
To use one of the times that Notes suggests, just select a time convenient to everyone from the Suggested Times for Selected Day drop-down list and then click the Use Selected Time button below it. Notes will then adjust the times of your Meeting invitation. You can see the fields in the Whensection at the top of the Meeting form change accordingly when you click an entry in this list.
You can also click any of the dates in the small month calendar (bottom-right of the form) to examine a different day and to see when your pals are available on that day.
Check out the little arrow next to the Suggested Times for Selected Day list heading. Click this arrow to display more schedule availability choices. From the drop-down list that appears, you can choose to search for compatible free time during a particular day, week, or month. This is especially useful if the people you're inviting don't have any availability on the original date you chose.
If you have trouble finding a time that works for all your Invitees, click the Check if All Required Can Attend option and then use the ensuing drop-down list to pick a time for a smaller group of people. This is helpful when you're trying to schedule a meeting with a larger number — greater than 20 — people.
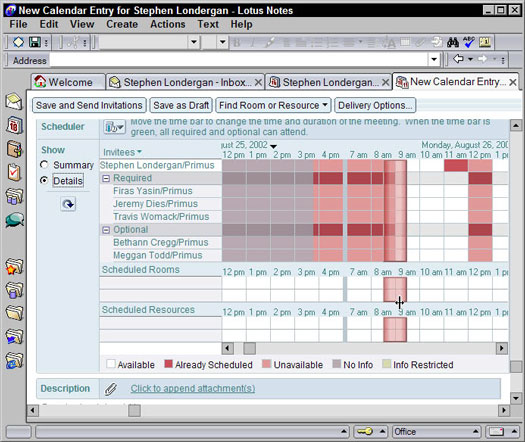
Another more visual way to find times when your Invitees are available is to view them by schedule details. Select the Details radio button (under the Show heading) to see a table that shows the times when each of your guests are available. You can see such a view in Figure 3. One advantage of this scheduling table is that you can see, per person, the free-time availability over the course of two weeks.
>

Figure 3: View individual schedule details to find free time.
Drag the big, transparent vertical bar until you find a time when everyone is available. (It turns green when this happens.) The white blocks in the table represent the times that are open and available, and the colored blocks represent the times when the given participant is otherwise occupied. If all the invitees aren't available, the vertical bar turns red to let you know that your entire posse cannot attend. (A key at the bottom of the screen reminds you of what status each color indicates.)
No matter which method you choose to find a time when you can all meet, you must click the Save and Send Invitations button on the Action bar when you're finished.
>
dummies
Source:http://www.dummies.com/how-to/content/scheduling-a-meeting-with-lotus-notes-6.html
No comments:
Post a Comment