You’ve probably noticed that all the text within your first Keynote Title slide appears within boxes. Keynote uses boxes to manipulate text and graphics. You can resize a box (and its contents) by clicking and dragging one of the handles that appear around the edges of the box. (Your mouse cursor will change into a double-sided arrow when you’re “in the zone.”)
The side-selection handles drag only that edge of the frame, whereas the corner-selection handles resize both adjoining edges of the selection frame.
To keep the proportions of the box constrained, hold down Shift while dragging the corner handles.
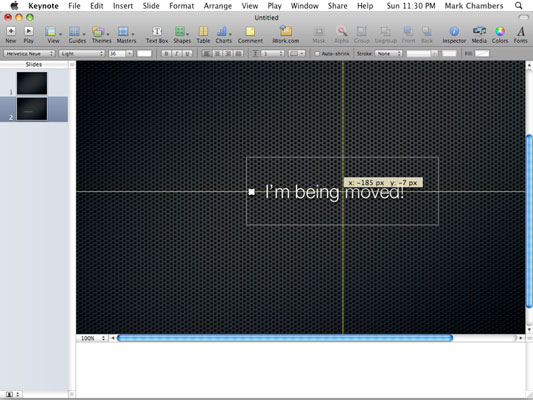
Boxes make it easy to move text and graphics together (as a single unit) to another location within the Layout pane. Click in the center of the box and drag the box to the desired spot; Keynote displays alignment lines to help you align the box with other elements around it (or with regular divisions of the slide, like horizontal center).
As you can see, when moving a box on the slide to a new location, Keynote has supplied alignment lines to help you place it correctly.

To select text or graphics within a box, you should double-click the box.
If you’re resizing a photo in a box, don’t forget to hold down the Shift key as you drag the frame. Doing so specifies that Keynote should preserve the aspect ratio of the image so that the vertical and horizontal proportions remain fixed. You can also flip images horizontally or vertically from the Arrange menu.
dummies
Source:http://www.dummies.com/how-to/content/how-to-work-with-text-and-graphics-boxes-in-keynot.html?cid=RSS_DUMMIES2_CONTENT
No comments:
Post a Comment