Look to the Future of Location-based Marketing

The rate of change in location-based marketing presents both opportunities and challenges. Knowing the trends in location-based marketing is critical to ensuring that today’s decisions translate into tomorrow’s successes.


Opportunites to target market at decision point


  • Geo-targeting: One of the things that will only become more prevalent over the next couple of years is geotargeted (messages and offers based on location) advertising. For example, adding location to services such as DART for Publishers (an online ad-serving system now owned by Google).


    One thing that you can start thinking about as you test location-based services (LBS) is how you could use your LBS or recommendation engines like WHERE (or even Twitter) to start to serve more geographically relevant ads to your customers.


  • Day-parting: What’s really exciting about the promise of geotargeted advertising is that it comes with the advantage of day-parting (serving up time-sensitive ads, such as lunch ads around noon) and demographic targeting. Most important is that prospective customers will actually have a way to act on these targeted ads via an LBS.


Challenges of a changing technology landscape


  • Hardware in the location to support passive check-in: As location-based marketers try to make checking in easier on their customers, more LBS providers will move to on-premise hardware.


    Right now, a majority of LBS providers rely on GPS to allow customers to check in to a venue.Only shopkick — a company that powers LBS programs for the likes of Simon Malls, Sports Authority, Target, and Best Buy, among many others — requires retail stores to install physical hardware in their store that will passively check in customers if they have the shopkick application open on their smartphone.


  • Geofencing: You will also start to see more LBS and businesses using geofencing, which is isolating a particular location for privacy reasons. But as more companies adopt LBS and offer richer incentives to customers to check in, concerns around “gaming the system” will grow. To combat this problem, geofencing allows tighter controls over ensuring that a customer is physically in your venue (or at least within a 20-yard perimeter).


  • Wireless network technologies: Wi-Fi, 3G and 4G, LTE, WiMax microwaves are able to connect mobile devices over longer distances and are becoming more pervasive.


    This trend is creating a need for LBS to create enough elasticity around its check-in rules. For example, someone can go from a Wi-Fi network (which can sometimes interfere with GPS) to a 3G or 4G network, and then pick up public Wi-Fi networks.


    Location-based providers have to understand these patterns and not penalize customers if a local coffee shop’s Wi-Fi connects to a router five miles away and thus makes it appear that the customer is not actually in the store but rather next to the building housing the router.


dummies

Source:http://www.dummies.com/how-to/content/look-to-the-future-of-locationbased-marketing.html

Taste-Testing a Bottle of Wine when Dining Out

The process of tasting wine from a bottle that you've ordered in a restaurant can be intimidating, but this quick guide to the wine-tasting ritual makes it easy. Evaluating wine involves a bit of ceremony, but there’s logic behind it. Step by step, the wine-presentation goes like this:


  1. The server or sommelier presents the bottle to you (assuming that you’re the person who ordered the wine) for inspection. Check the label carefully and feel the bottle with your hand to determine whether its temperature seems to be correct. If you’re satisfied with the bottle, nod your approval to the server.


    This step enables you to make sure that the bottle is, in fact, the bottle you ordered.


  2. The server removes the cork and places it in front of you. Inspect the cork and sniff it to make sure it’s in good condition.


    In rare instances, a wine may be so corky that the cork itself will have an unpleasant odor. On even rarer occasions, the cork might be wet and shriveled or dry and crumbly; either situation suggests that air has gotten into the wine and spoiled it.


    If the cork raises your suspicions, wait to smell or taste the wine itself before deciding whether to reject the bottle.


  3. The server pours a small amount of wine into your glass and waits. Now is when you swirl the wine in the glass, take a sniff, perhaps a little sip, and then indicate whether you find the wine acceptable.


    If the wine is fine, you can nod or murmur, “It’s fine.” If something is wrong with the wine, now is the time to return it — not after you’ve finished half the bottle!


    If you decide that the bottle is out of condition, describe to the server what you find wrong with the wine. If the sommelier or wine specialist agrees that it’s a bad bottle, he may bring you another bottle of the same, or he may bring you the wine list so you can select a different wine. Either way, the ritual begins again.


  4. If you accept the wine, the server pours the wine into your guests’ glasses and then finally into yours.


    Now you’re allowed to relax.


dummies

Source:http://www.dummies.com/how-to/content/tastetesting-a-bottle-of-wine-when-dining-out.html

Strategic Planning: What Is Scenario Planning?

In the strategic planning world, scenario planning is a way of simplifying a complex future by providing the opportunity to ask the what-if questions and to rehearse how you may respond should a certain event or trend happen in the future. Pierre Wack sums up the outcome that scenarios seek to change our mental maps of the future.


Scenario planning was first developed and used by the U.S. Air Force during World War II. It gained acknowledgement in the business world when Shell Oil utilized scenario planning techniques to predict the oil crisis of the 1970s. For organizations, scenario planning provides an invaluable opportunity to have a strategic discussion around key drivers and critical uncertainties in your operating environment.


Scenarios aren’t an end in themselves. They’re a management tool to improve the quality of organizational decision making. You may not always have time to do scenario planning, but consider doing a scenario analysis to push the bounds of your thinking. You never know what you may come up with. Use scenario planning in the following situations:


  • When the CEO and her core thinkers need to push their planning horizon far into the future to sharpen their perspectives


  • When you’re starting to update your plan and need to re-imagine your vision, especially if the future is less than clear


  • When you’re starting from scratch and want a robust way to ensure you’re developing a strategic direction that incorporates all the environmental trends


  • When you’re trying to get your team to think outside of the box


  • When you want to develop mini action plans for short-term risks


With scenario planning, you’re imagining not just one but a variety of future possibilities. All the great opportunities in the world aren’t enough unless you have contingencies in place. And remember, you’re not only preparing for unexpected threats but also trying to foresee unanticipated opportunities.


dummies

Source:http://www.dummies.com/how-to/content/strategic-planning-what-is-scenario-planning.html

Diagnosing and Treating Osteoarthritis

Nearly 50 percent of those suffering from osteoarthritis don't know what kind of arthritis they have and therefore can't make good decisions about their treatment.


Say your knee hurts. The first time that you visit your doctor complaining of the pain, he will put you through the standard round of interviews, examinations, and tests. He'll review your medical history, and make a detailed list of the injuries you have sustained, especially to your knees. He may palpate your knee to see if it's painful to the touch, carefully bend your knee and straighten it several times (it may hurt a little and seem stiff), and listen for cracking or popping in the joint. Then, your doctor may send you to the lab to get some blood drawn to rule out other forms of arthritis. At this point, all your doctor has to go on is a history of knee injuries, some pain and stiffness upon movement, and a little cracking in the joint. These symptoms certainly may sound like osteoarthritis, but it may not be a sure thing yet.


The next step would be to order an X-ray of your knee to see if one or more of the following signs are present:


  • Cartilage degradation

  • Cartilage overgrowth

  • Narrowing of the joint space

  • Bone spurs

  • Bits of cartilage or bone floating in the joint fluid

  • Joint deformity

After a diagnosis of osteoarthritis is confirmed, you and your doctor can begin to devise a treatment program — confident that you are headed in the right direction. Although the symptoms may not disappear completely, there is a good chance that with proper treatment, your pain will diminish significantly and joint degradation can be kept to a minimum.


A good treatment plan for osteoarthritis should include the following elements to help you manage pain and discomfort on a daily basis.


Medication for osteoarthritis


Both prescription and over-the-counter remedies are commonly used to relieve osteoarthritis pain. Whether prescription or nonprescription, the drugs usually fall into one or two categories:


  • Acetaminophen: These remedies relieve pain but don't reduce swelling (for example — Tylenol, Liquiprin, or Datril).

  • Nonsteroidal anti-inflammatories or NSAIDs: These relieve pain and do reduce swelling, as well as lessen fever (for example, aspirin, Advil, Aleve, or Motrin).

If your joints are swollen, the doctor will probably prescribe an NSAID. If swelling is not a problem, he or she may give you acetaminophen.


To avoid drug interactions, overdose, or side effects, make sure that you check with your doctor before taking any over-the-counter medications.


Exercise for osteoarthritis


If you're in pain, you'll probably want to stop moving, and it's certainly advisable for you to rest your joints when you're feeling achy. However, too much sitting around can actually be the worst thing for you in the long run. Exercise is a great way to "oil and feed" the cartilage. Under-exercised joints don't get the lubricating and nourishing benefits of the in-and-out action of the joint fluid, so cartilage can become thin and dry, losing its resilience and capability to cushion the bones.


You should include three types of exercises in your overall physical fitness program:


  • Flexibility exercises: You should do stretching, bending, and twisting exercises every day to increase your range-of-motion and reduce stiffness. Flexibility exercises will help keep your joints loose and flexible.

  • Strengthening exercises: Weight lifting or isometric exercises should be done every other day to build your muscles and help keep your joint supporting structures stable. These types of exercises will help increase your muscle strength.

  • Endurance (aerobic) exercises: These should be done at least three times a week for at least 20 to 30 minutes each session to increase overall fitness, strengthen your cardiovascular system, and keep your weight under control. Brisk walking (especially up hills), jogging, cycling, dancing, jumping rope, and so on, increases your fitness and capacity for exercise.

Before starting a new exercise program, check with your doctor to find out what kinds of exercise and which levels of activity are appropriate for you. Doing the wrong exercises — or doing the right exercises in the wrong way — can cause further injury.


More osteoarthritis treatments


Knowing and applying the techniques of body alignment, proper standing, sitting, walking and running, and correct lifting can go a long way toward sparing your joints from excessive wear-and-tear and protecting them from future injury. You may also find it helpful to wrap affected joints with elastic supports or take a load off with assistive devices, such as canes or crutches, whenever necessary. Other joint-protective techniques include alternating your activities with rest periods, varying your tasks to avoid too much repetitive stress on any one area, and pacing yourself. Don't try to do too much at once.


Some people prefer heat, others cold, but use whatever works for you. Hot baths, heating pads, electric blankets, and hot tubs can relax painful muscles, while ice packs can numb the affected area. Just make sure you don't use either method for longer than 20 minutes at a time to avoid damaging tissues.


A good rule to keep in mind is to give your skin time to return to its usual temperature before reapplying hot or cold packs.


If you're overweight, your hips, knees, and ankles are probably suffering. Not only are they subjected to a force equal to three times your body weight each time you take a step, they can be pummeled by ten times your body weight if you jog or run! So that extra 10 pounds around your middle may translate to an extra 100 pounds slamming away on certain joints at certain times. And that's only one reason why it's so important to keep your weight at an acceptable level.


Fifty percent of patients who develop knee osteoarthritis have been overweight for between three and ten years.


Strategies for pain management, foods and supplements that can help heal, positive thinking, prayer, spirituality, massage, relaxation techniques, and alternative healing methods can add to your arsenal in the fight against pain and disability. Don't ignore their enormous potential to improve the quality of your life.


When you have a painful joint that isn't going to get better and the pain is seriously compromising the quality of your life, you may want to consider surgery. These days, arthroscopic surgery, cartilage transplants, and joint replacement surgery are routinely performed and can make a huge difference for those who live in pain.


dummies

Source:http://www.dummies.com/how-to/content/diagnosing-and-treating-osteoarthritis.html

Key Dates in Irish History

Ireland has had a vast history of vast invasions, revolutions, wars and conflicts. Take a look at the major periods in Ireland’s history through the ages broken down.


Ancient Ireland


c. 12000 – 2750 BCNeolithic Ireland
2750 – 600 BCThe Bronze Age
700 – 150 BCArrival of the Celts
430 – 800Christianity Established

The Middle Ages


800 – 900Viking invasions
1170 – 1270Norman Ireland
1270 – 1366English settlement and repression
1370 – 1455Irish Revival and the Pale
1455 – 1541Wars of the Roses and Geraldine domination

Early Modern Ireland


1532 – 1603Ireland and the Reformation
1558 – 1647The Plantations
1649 – 60Cromwellian Ireland
1660 – 90Establishment of Protestant supremacy

The Modern Age in Ireland


1695 – 1782Penal Laws and repression
1782 – 1800Period of Irish parliamentarianism
1800 – 1922Ireland and Union
1845 – 51Famine and Emigration
1875 – 1916Campaign for Home Rule
1916 – 23Irish Revolution
1921 – 72Stormont government of Northern Ireland
1922 – 48Irish Free State
1949 – 2000sThe Irish Republic
1960s – 2000sTroubles in Northern Ireland


dummies

Source:http://www.dummies.com/how-to/content/key-dates-in-irish-history.html

Chinese Potstickers

Potstickers are Chinese dumplings that are steamed and then fried. The combination of steaming and pan-frying the potstickers gives the dumpling wrappers an irresistible balance between smooth and noodlelike on top, and crispy and caramelized on the bottom. Potstickers, despite the name, shouldn’t actually stick to your wok, though.


Preparation time: 1 hour


Cooking time: About 30 minutes


Yield: 30 potstickers


8 dried black mushrooms


1 napa cabbage


1 teaspoon salt


3/4 pound ground pork, chicken, or beef


4 green onions


Fresh ginger


2 tablespoons oyster-flavored sauce


2 teaspoons Chinese rice wine


1 teaspoon sesame oil


1 1/2 tablespoons cornstarch


1/4 teaspoon white pepper


30 potsticker wrappers


3 tablespoons cooking oil


1 cup chicken broth


  1. Soak the mushrooms in warm water until softened, about 20 minutes.


    Be sure to completely cover the mushrooms with the water.


  2. Drain the mushrooms, discard the stems, and mince the caps.


  3. Shred the napa cabbage.


  4. In a large bowl, toss 4 cups of the cabbage with the salt; squeeze to remove the excess liquid.


  5. Chop the green onions and mince the ginger.


  6. Combine the mushrooms, napa cabbage, ground pork, green onions, oyster-flavored sauce, rice wine, sesame oil, cornstarch, white pepper, and 1 1/2 tablespoons of the minced ginger in a bowl; mix well.


  7. Place a heaping teaspoon of the filling in the center of a potsticker wrapper.


    Keep the remaining wrappers covered to prevent drying.


  8. Brush the edges of the wrapper with water.


  9. Fold the wrapper in half, crimping one side, to form a semicircle.


  10. Pinch the edges together to seal.


  11. Set the potsticker, seam side up, in a baking pan.


    Cover the potstickers with a wet towel to prevent drying.


  12. Place a wide frying pan over medium heat until hot.


  13. Add 1 tablespoon of the cooking oil.


  14. Add 10 potstickers, seam side up.


  15. Cook until the bottoms are golden brown, about 3 minutes.


  16. Add 1/3 cup chicken broth.


  17. Reduce the heat to low, cover, and cook until the liquid is absorbed, 4 to 5 minutes.


  18. Remove the potstickers from the pan.


  19. Repeat with the remaining potstickers, cooking oil, and chicken broth.


Tip: Most potsticker wrappers come in 1-pound packages. The number of actual wrappers in a 1-pound package varies, depending on the wrapper thickness. Because potsticker wrappers should be thick to survive pan-frying without tearing, scope out those packages that appear to have fewer, thicker wrappers.


dummies

Source:http://www.dummies.com/how-to/content/chinese-potstickers.html

Venues to Choose when Planning a Meeting or Event

Choosing the right site for a business event is critical — it's the framework for your whole effort. When seeking a venue for a meeting or event, you have several options. Depending on the number of people attending and the type of event, you can go the traditional conference center route or try a road — or a cruise ship — less traveled. The following list contains places to consider when selecting a site:


  • Hotels


  • Conference centers


  • Convention centers


  • Resorts


  • Retreat centers


  • Cruise ships


  • Unique environments, such as museums, stately homes, sporting venues, and theaters.


When in doubt about the choices available in a specific location, ask the local Convention and Visitors Bureau in your destination city for advice.


dummies

Source:http://www.dummies.com/how-to/content/venues-to-choose-when-planning-a-meeting-or-event.html

How to Create Multiple E-mail Accounts on the Samsung Galaxy Tab

The Samsung Galaxy Tab 10.1 Email app can be configured to pick up mail from multiple sources. If you have a Yahoo! Mail or Windows Live account, or maybe your corporate account, in addition to your ISP’s account, you can add them. Follow through with these steps:


  1. Visit the Apps Menu and start the Settings app.


  2. Choose Accounts & Sync.


  3. Touch the Add Account button.


  4. If your account type is shown in the list, such as Yahoo! Mail, choose it. Otherwise, choose the Email icon.


  5. Type the account’s e-mail address.


  6. Type the password for the account.


  7. Touch the Next button.


    In a few magical moments, the e-mail account is configured and added to the account list.


    If you goofed up the account name or password, you’re warned: Try again. Or if the account requires additional setup, use the information provided by the ISP or other source to help you fill in the appropriate fields.


  8. Set account options.


    Most of the preset choices are fine for a web-based e-mail account.


    If the account is your primary e-mail account, place a green check mark by the option Send Email from this Account by Default.


    You might also consider a more frequent update interval, especially if you get a lot of mail or need to respond to it quickly.


  9. Touch the Next button.


  10. Name the account and confirm your name.


    Feel free to change both the account name and your own name.


  11. Touch the Next button.


    The account is added to the list on the My Accounts screen.


You can repeat these steps to add more e-mail accounts. All the accounts you configure will be made available through the Email app.


dummies

Source:http://www.dummies.com/how-to/content/how-to-create-multiple-email-accounts-on-the-samsu.html

How to Deal with Problem Employees

Problem employees require you to follow some general steps when handling any difficult situation with them. You must deal with a business employee who's either unintentionally or willfully acting against your business's standards.


  1. Notify your employee that he or she isn't meeting your business's standards.


    You should give this warning verbally, in a one-on-one meeting. Make a memo to yourself about what both the employee and you said.


  2. Issue a second warning.


    If the employee hasn't improved his or her behavior, have another one-on-one meeting. This time, deliver a memo that outlines areas that need improvement and explains how the employee’s actions are negatively affecting business.


  3. Issue a final warning.


    If the individual’s conduct doesn’t improve, ask your human resources or legal representative to guide you. In some instances, a final warning is appropriate. In other cases, termination without a final warning may be the right step.


  4. Terminate the employee.


    At this point, you've given him or her plenty of chances to meet your expectations. Termination becomes the only option.


dummies

Source:http://www.dummies.com/how-to/content/how-to-deal-with-problem-employees.html

How to Grow Potatoes

There are various ways to grow tasty, nutrient-packed potatoes, all of which are reasonably easy and straightforward. Choose the variety that works best for you and follow these instructions for the perfect crop of root vegetables.


Potatoes can be grouped according to how long they take to mature. There are three types – early, second early and main crop. If you grow a selection of all three, you can harvest potatoes from June to October.


Chitting to start a potato crop


Never plant shop-bought potatoes – you risk introducing diseases to your plot. Buy seed potatoes, which you can either plant directly or chit beforehand.


Chitting calls for placing seed potatoes in a cool, dry, light place for a couple of weeks before planting them in the ground. This important step allows them to start sprouting, which will help produce a better crop.


To chit:


  1. Examine the potatoes carefully to find the side with the most eyes. Place the potatoes in single layers in trays so that the eyes are facing upwards.


  2. Store them in a cool, frost-free place out of direct sunlight. Each eye will protrude a shoot.


  3. As the shoots grow, keep the potatoes cool and check that the shoots look healthy and plump. Rub away any spindly, weak ones.


  4. When the shoots are 1.5-2.5cm long, they’re ready to plant.


Planting your potato seedlings


  1. Plant earlies in late March, second earlies in mid-April, and mains in late-April.


  2. Mark out a trench with a taut line of string. Allow 60cm width for first and second earlies; allow 75cm for mains.


  3. Dig the trench into a V shape about 8-15cm deep.


  4. Add a generous layer of well-rotted organic matter to the bottom and incorporate it into the soil.


  5. Place the chitted tubers, shoots up, in the bottom of the trench at 40cm intervals. Cover them with 13-15cm of soil.


Routine care to prevent disease and damage


If you suspect frost, cover the new shoots with a layer of soil or shredded newspaper. Make sure that tubers are not exposed to light, as this will cause them to become inedible. Keep potatoes moist once they’ve become established, or the roots might split.


Weed crops thoroughly, making sure that annual weeds are pulled out in the first weeks after planting your potatoes. Earth up your plans up at least a few times during the growing period. To do this, use a rake, hoe or spade to build up soil gently over the developing shoots. This protects them from frost and encourages higher yields.


Using the no-dig method for growing potatoes


This is a very simple way to grow potatoes. The advantages are that it eradicates slug problems and can help keep diseases like blight at bay.


  1. Clear an area of all weeds and cover it in a layer of compost which is 9-12 inches thick.


  2. Push your seed potatoes into the compost as far as you can with digging, with the same spacing stated earlier on.


  3. Cover the area with black landscape fabric and pin it down.


  4. As the shoots start to push up into the fabric, cut a slit for them to grow through.


When and how to harvest a potato crop


Harvest first earlies when the flowers have opened. Earlies should be lifted as close to eating as possible, because they’re still growing and full of carbohydrates which deteriorate quickly. Second earlies can be left as late as September, while mains should be lifted once the foliage has died back. Lift potatoes carefully using a fork. Be careful when using the fork: if you stab any spuds they will rot quickly.


dummies

Source:http://www.dummies.com/how-to/content/how-to-grow-potatoes.html

How to Do Business in the African American Community

African American consumers and businesspeople aren't all the same. You can differentiate the African American community with which your business interacts by factors such as economic status:


  • Common greeting: Shaking hands for both men and women is commonly practiced. Be formal at the beginning and never call an African American by his or her first name unless the person invites you to do so because this could be extremely insulting.


    Show respect by saying something like, “It’s really good to meet you.”


  • Personal space: Closer and less formal than other Americans may be used to at 1 to 1 1/2 feet, but you must establish trust before assuming familiarity or closeness.


  • Eye contact: Can be very direct, especially when speaking or may be somewhat indirect when listening.


  • Approach to time: Punctual.


  • Language: English.


  • Communication: African Americans tend to prefer very direct communications and “telling it like it is.” Gestures can be more enthusiastic than most non-African American salespeople are used to. Nonverbal communication is very important and can convey more meaning than in almost any other culture. Men may not always be comfortable talking about themselves. The African American culture has a long history of storytelling, so tell stories instead of lecturing.


  • Topics for building rapport: Anything you would normally talk about with other long-established American culture group, such as entertainment, sports, or education.


  • Negotiations: Older African Americans may not negotiate much, whereas the younger generation seems more adept at the art of haggling.


  • Actions to avoid: Calling African American females “Miss,” which can be demeaning. Don’t ask an African American woman about her husband unless she brings up the subject first because many African American households are headed by single women.


  • Tips for businesswomen: Women professionals are generally treated with a great deal of respect by African American men. Black women can be very independent and may prefer to deal with a man.


dummies

Source:http://www.dummies.com/how-to/content/how-to-do-business-in-the-african-american-communi.html

Drupal Optional Modules Overview

A number of optional modules are installed with Drupal. Some of these are enabled by default; most are not. Here’s a quick look at most of them:


  • Aggregator: This module allows you to grab content from other sites and publish it on yours. You can add, edit, and delete RSS, Atom, and RDF feeds from other sites.


  • Blog: A module that allows you to create blog entries.


  • Book: An organized set of web pages. They can be organized like a book’s table of contents — especially useful if you want to publish anything structured, such as a manual or user guide.


  • Color: Some themes have settings that allow users to choose their own colors. This module has to be enabled for such settings to work.


  • Contact: Rather than publishing a page with an e-mail address for your visitors to contact you, this module lets you create a contact form. Visitors can fill out and submit the form.


  • Content Translation: This module helps you translate your published content into different languages.


  • Database Logging: This handy module keeps track of system events — such as user postings or people trying to browse to a nonexistent page on your site — and keeps a record of when anything changes.


  • Forum: Like a bulletin board, a forum allows registered users to post content and other users to respond.


  • Help: This module controls online help documentation.


  • Menu: With this enabled, administrators can add links to and edit all of the menus on the site.


  • Image: Provides a few basic tools for manipulating images on the site.


  • OpenID: You can allow users to log in to your site with accounts from other service providers. They don't have to create new accounts on your site. For more information, visit Openid.


  • Path: The Path module lets you create simpler and shorter URLs for pages on your site.


  • PHP Filter: This allows PHP code to be included in content created for your site.


    This module can cause security risks unless used by an expert.


  • Poll: Creates a question and a set of responses for your users to choose.


  • Search: This module allows visitors to search through content posted on your site.


  • Statistics: If you want to know more information about visitors to your site, this module can provide it. You can find out where your visitors are coming from and which pages they visit the most.


  • Tracker: This creates a block displaying the newest content.


  • Update Manager: It's always a good idea to keep your Drupal software, modules, and themes up to date. This module checks for available updates and lets you install them via Drupal’s web interface.


dummies

Source:http://www.dummies.com/how-to/content/drupal-optional-modules-overview.html

Indexed Funds and ETFs vs. Actively Managed Funds

Indexed funds (such as Exchange-Traded Funds and mutual funds) are safer and easier than actively managed funds. They also make more money over the long-run.


One study, done in 2010 by Wharton finance professor Robert F. Stambaugh and University of Chicago finance professor Lubos Pastor, looked back over 23 years of data. The conclusion: Actively managed funds have trailed, and will likely continue to trail, their indexed counterparts (whether mutual funds or ETFs) by nearly 1 percent a year.


That may not seem like a big deal, but compounded over time, 1 percent a year can be HUGE.


Let’s plug in a few numbers. An initial investment of $100,000 earning, say, 7 percent a year, would be worth $386,968 after 20 years. An initial investment of $100,000 earning 8 percent for 20 years would be worth $466,096. That’s $79,128 extra in your pocket, all things being equal, if you invest in index funds.


And if that investment were held in a taxable account, the figure would likely be much higher after you account for taxes. (Taxes on actively managed funds can be considerably higher than those on index funds.)


Moving from the world of academia and theory to the real world, let’s look at that very first ETF introduced in the United States, the SPDR S&P 500 (SPY). Since inception in January 1993, that fund has enjoyed an average annual return of 8.26 percent — not bad, considering that it survived two very serious bear markets (2000–2002 and 2008–2009). Very few actively managed funds can match that record.


By the way, SPY, as well as it has performed, has several flaws that make it far from a great first choice of ETF for most portfolios. But despite its flaws, SPY remains by far the largest ETF on the market, with total assets of $90 billion.


The largest fund of any kind is the PIMCO Total Return mutual fund [PTTRX], with total net assets of $136 billion. In terms of number of shares traded daily, nothing even comes close to SPY.


dummies

Source:http://www.dummies.com/how-to/content/indexed-funds-and-etfs-vs-actively-managed-funds.html

Online Communities: A Place to Socialize and Belong

Some people are more outgoing in online communities than in the real world. Thanks to a phenomenon called keyboard courage, a wallflower type can come out of his virtual shell and make some real friends.


In fact, much of the socializing that happens in online communities leads to deeper relationships. Online friends take it private and have more in-depth conversations via e-mail, private messages, phone calls, and instant messages. Some of these relationships blossom into offline friendships and even into romances.


Many shy people are surprised by how much easier they can communicate online than in person. They’re not embarrassed to take part in a conversation because they’re laptop to laptop, not face to face. In fact, many active community members often remark, “I’m actually quite shy offline.”


Also, people who spend a large portion of time confined to their homes no longer feel lonely when they can communicate online. Though communicating online isn’t the same as having friends to talk to every day, an online community helps take the edge off loneliness.


Communities give members a safe, welcoming place to hang out and talk about their interests, even if those interests are “uncool” subjects that cause snickering at school or at the office. Forums and newsgroups are available for almost every topic.


Participants find these communities by accident, usually while they’re looking for information about the topics they enjoy. As they find discussion groups, they may lurk for a while and then eventually become members.


Communities are also safe places to talk about personal issues that many other people may not understand. Expert communities have people who can help sort out problems and refer members to sources of professional help, if necessary.


The beautiful thing about online communities is that people no longer have to feel that they have no one to turn to or anywhere to go. Online, people can be anyone they want to be.


dummies

Source:http://www.dummies.com/how-to/content/online-communities-a-place-to-socialize-and-belong.html

Instantly Import Your Local Files to Spotify

Spotify automatically scans a range of folders in your computer’s hard drive and indexes the music it finds. Click Local Files on the left sidebar in the Spotify window to see them all in the Spotify window’s main pane.


The first time Spotify scans your local files may take a few minutes, depending on how many music files you have, but you can listen to other tracks within Spotify while the files are indexing. Spotify frequently looks for any changes to the index, such as newly added albums imported from a CD by using iTunes or Windows Media Player.


In most cases, you don’t need to worry about manually adding these files. Spotify lists all the tracks in these folders that are in a recognizable file format. To find out the type of file format a track has, open Windows Explorer (or the Finder on the Mac), browse to the track in question, and take a look at its file extension (the part after the dot).


Like digital photos, digital music doesn’t come in just one musical form. The file formats that Spotify is happy to index include


  • MP3: After all these years, MP3 is still the most common digital music file standard out there, even if enthusiasts like to, well, enthuse about other, superior-quality formats. Spotify is confident enough to use MP3s (which have a .mp3 file extension) in its relatively new download store which, in 95 percent of cases, you can get at the maximum quality format of 320 kilobits per second (Kbps).


  • Next-generation AAC (Advanced Audio Coding) files: These types of files come in many flavors and include .mp4, .m4a, and .m4r, as well as.m4p files (apart from rights-protected ones).


  • Some video file formats: These formats include .m4v, .3gp, .3g2, and .mov. Spotify doesn’t play video; but sometimes these files have only audio on them, and Spotify can support that audio format.


Spotify, perhaps surprisingly, doesn’t yet support some file formats. These unsupported file formats include


  • OGG files: Ironically, although Spotify streams its music in Ogg Vorbis format, it can’t yet support importing files in this format.


  • FLAC (Free Lossless Audio Codec) format: Audio fans love this format because it’s lossless, meaning the music loses none of a CD’s original quality when it gets saved as a digital file.


dummies

Source:http://www.dummies.com/how-to/content/instantly-import-your-local-files-to-spotify.html

Preparing for a Vet Visit to Treat a Goat

Before you call a vet to come to your farm or bring a goat in for a non-routine care visit — unless it is a serious emergency — take a few steps to make sure that your goat gets the most appropriate care.


Make notes of the goat’s symptoms, how long it has been sick, and the medications or other care you’ve given so far. Sometimes remembering everything is hard when you’re under stress, and having this kind of information to share helps the vet make a correct diagnosis.


If you have time, do the following before your vet visit:


  • Take the goat’s temperature.


  • Check its gums for color.


  • Listen for heart rate and ruminations.


  • Note whether the goat has


    • Injuries


    • Crusty eyes


    • Breathing problems or coughing


    • Diarrhea


  • Check for dehydration by pinching the skin on the neck in front of the shoulder, using your thumb and forefinger. Note whether the skin snaps back to its normal position quickly or stays in a tent before it slowly goes back to normal. A slow return to normal indicates that the goat is dehydrated.


Record all of your observations for the vet’s reference. Also be ready to share the goat’s history of prior illness, vaccinations, and other health care information.


If the vet will be making a farm call, ask whether you can do anything before he arrives. For example, he might want a urine or fecal sample. You also need to catch the goat and put him in a confined, lighted area while waiting for the vet to arrive.


dummies

Source:http://www.dummies.com/how-to/content/preparing-for-a-vet-visit-to-treat-a-goat.html

Find a Financial Advisor in Canada: Web Resources for Canadians

A good financial advisor can talk you through your panic, walk you through the holdings in your portfolio, and reaffirm your investment strategy. In Canada, both Registered Financial Planners and Certified Financial Planner Professionals have minimum education requirements and adhere to a code of ethics. The following Web sites can help you in your search for a trustworthy Canadian financial advisor:


  • Investment Industry Regulatory Organization of Canada (IIROC): Click on “investors” and go to the section called “Member/Firm Registrant Info” to get the low-down on the registration and disciplinary history of member firms. Don’t stop there, though. Your provincial securities commission may have information that isn’t available on the IIROC site. Doing due diligence is worth your while!


  • Financial Planners Standards Council: Visit this Web site to locate a Certified Financial Planner (CFP) in your area. The CFP designation is the most widely recognized educational credential for financial advisors and planners. A professional designation indicates that an advisor has completed certain educational and examination requirements.


    However, professional designations don’t guarantee that you’ll get competent or objective advice that best meets your needs. Quality personal financial planning education is critical, but it’s only part of the criteria to consider when choosing a financial advisor.


  • Institute of Advanced Financial Planners (IAFP): The IAFP offers the Registered Financial Planner (RFP) designation, which is considered the gold standard for financial planning in Canada. Like CFPs, RFPs adhere to educational and ethical standards. But they must also have a minimum five years of specific planning experience.


dummies

Source:http://www.dummies.com/how-to/content/find-a-financial-advisor-in-canada-web-resources-f.html

How to Wash Your Hands Thoroughly

Thoroughly washing hands is one of the most effective ways to prevent contamination. Although most people know that they should wash their hands well before handling food, many people don’t follow that safety guideline. Most germs and bacteria are passed from one person to another by hand contact. You shake hands with someone, or someone touches something you eat and — bingo — you wind up getting contaminated.


Wash your hands well for at least 20 seconds with warm water and soap before touching and preparing food and after using the bathroom, changing diapers, and handling pets. As logical as this may seem, not everyone takes the time to do so. Sure, people may wash their hands, but is it as thorough as it should be? Probably not. Take the test yourself. Set a kitchen timer for 20 seconds and begin washing your hands immediately. Doesn’t it feel like the longest 20 seconds of your life?


If you don’t have a watch or clock close by, try this technique to ensure you wash your hands for a minimum of 20 seconds: Sing one slow round of “Twinkle, Twinkle, Little Star,” which is about 20 seconds long. When you try this for the first few times, watch the clock as you sing so you can recognize the pace that it takes for a full 20 seconds to pass.


Even though you wash your hands before preparing food, you must also wash them well after touching food and before moving on to another food. For example, if you handle raw chicken that has salmonella and then handle salad makings without washing your hands well, you most likely will contaminate the salad and ingest salmonella when you eat it, even though it will be killed off in the chicken when it is done cooking.


dummies

Source:http://www.dummies.com/how-to/content/how-to-wash-your-hands-thoroughly.html

Move Function in Digital Music Editing

Nearly all digital recording systems have a Move function. In most cases, you can just choose the audio section that you want to move and choose a destination for it. If you don’t have a Move function key, your system probably has the Cut, Copy, and Paste options that you can use the same way. Cut and Paste can move your music just as effectively as the Move function.


Moving audio data can be performed several ways depending on the system, but you probably move data by using a Move menu or by clicking and dragging. On the Move menu, you designate the section to be moved and where you want to move it to.


This can be within a particular track or from one track to another. Within this menu, you may have the choice between overwriting the material at the destination point with your selection and moving the existing material to make space for the stuff that you moved. The latter is sometimes called a Move/Insert procedure.


If you have a system that uses a large video monitor, a mouse, and a keyboard, you may have the option to just click and drag the selection where you want it. In most cases, your moved selection overwrites the existing material in its new place, effectively erasing it (although it may still be hidden underneath — but you can’t hear it when you play back the track).


In other systems, the moved material is inserted in its new place, moving existing material in the process. Your system’s owner’s manual should spell out how this procedure is treated.


dummies

Source:http://www.dummies.com/how-to/content/move-function-in-digital-music-editing.html

Digital Audio on Spotify

Digital audio comes in many flavors — there’s no standard format. Although .mp3 is the most popular format, some audio files may have extensions such as .mp4, .aac, .m4a, .ogg, .wma,.wav — the list goes on. None of these file extensions matter if you’re listening to streaming music that’s stored on Spotify’s servers. The music just comes to you when you request it.


(Spotify’s also capable of playing music files you’ve already stored on your local hard drive, but they need to be compatible with the software.)


A bit about bitrates and Spotify digital audio


Digital audio quality is measured in bitrates. A bitrate is the amount of data transferred per second from one place to another. With music, bitrates are usually measured in kilobits per second (Kbps). (A bit is the smallest measure of digital information; a kilobit is 1,000 bits.)


A standard Spotify track streams at around 160 Kbps, which provides excellent quality (well above what you’d find in a typical MP3 file), but Premium subscribers can listen to a large proportion of tracks with even better clarity — approximately 320 Kbps.


Hook up speakers for Spotify digital audio


If you can happily listen to music through your laptop speakers, standard earphones, or plug-and-play computer speakers, then you’ll be satisfied with hearing music at 160 Kbps — after all, most MP3 files barely reach this level of clarity.


But if you have a top-quality home stereo setup and want to connect this sound system to your computer, then you may want to consider getting a Premium subscription, which offers the higher 320 Kbps bitrate for truly excellent sound, particularly at relatively loud volumes.


Spotify also has agreements with the hi-fi manufacturers Logitech, Sonos, and Onkyo that let Premium subscribers stream music through those manufacturers’ systems.


dummies

Source:http://www.dummies.com/how-to/content/digital-audio-on-spotify.html

The LIFO Method for Cost of Goods Sold

The main feature of the LIFO (last-in, first-out) method for cost of goods sold is that it selects the last item you purchased first, and then works backward until you have the total cost for the total number of units sold during the period.


What about the ending inventory — the products you haven’t sold by the end of the year? Using the LIFO method, the earliest cost remains in the inventory asset account (unless all products are sold and the business has nothing in inventory).


How LIFO works


Suppose that you acquire four units of a product during a period, one unit at a time, with unit costs as follows (in the order in which you acquire the items): $100, $102, $104, and $106. If you sell three units during the period, the LIFO method calculates the cost of goods sold expense as follows:


$106 + $104 + $102 = $312

With LIFO, you use the last three units to calculate cost of goods sold expense. The ending inventory cost of the one unit not sold is $100, which is the oldest cost.


The $412 total cost of the four units acquired less the $312 cost of goods sold expense leaves $100 in the inventory asset account. Determining which units you actually delivered to customers is irrelevant; when you use the LIFO method, you always count backward from the last unit you acquired.


Why LIFO works


The two main arguments in favor of the LIFO method are these:


  • Assigning the most recent costs of products purchased to the cost of goods sold expense makes sense because you have to replace your products to stay in business, and the most recent costs are closest to the amount you will have to pay to replace your products.


    Ideally, you should base your sales prices not on original cost but on the cost of replacing the units sold.


  • During times of rising costs, the most recent purchase cost maximizes the cost of goods sold expense deduction for determining taxable income, and thus minimizes income tax.


    In fact, LIFO was invented for income tax purposes. True, the cost of inventory on the ending balance sheet is lower than recent acquisition costs, but the taxable income effect is more important than the balance sheet effect.


The problems with LIFO


Here are the reasons why LIFO is problematic:


  • Unless you are able to base sales prices on the most recent purchase costs or you raise sales prices as soon as replacement costs increase — and most businesses would have trouble doing this — using LIFO depresses your gross margin and, therefore, your bottom-line net income.


  • The LIFO method can result in an ending inventory cost value that’s seriously out of date, especially if the business sells products that have very long lives.


  • Unscrupulous managers can use the LIFO method to manipulate their profit figures if business isn’t going well. They let their inventory drop to abnormally low levels, with the result that old, lower product costs are taken out of inventory to record cost of goods sold expense.


    This gives a one-time boost to gross margin. These “LIFO liquidation gains” — if sizable in amount compared with the normal gross profit margin that would have been recorded using current costs — have to be disclosed in the footnotes to the company’s financial statements.


If you sell products that have long lives and for which your product costs rise steadily over the years, using the LIFO method has a serious impact on the ending inventory cost value reported on the balance sheet and can cause the balance sheet to look misleading. Over time, the current cost of replacing products becomes further and further removed from the LIFO-based inventory costs.


dummies

Source:http://www.dummies.com/how-to/content/the-lifo-method-for-cost-of-goods-sold.html

Who Is Likely to Develop an Eating Disorder?

The one thing that all those who suffer from eating disorders have in common is a history of dieting. Generally speaking, bright, energetic, attractive, conscientious, hard-working people of all races and economic classes get eating disorders.


Ninety to 95 percent of those who develop an eating disorder are female. They are most often between the ages of 12 and 25, although some cases have been reported in people much younger and much older. People who are vulnerable to eating disorders also may have relationship problems, biological predispositions, and psychological disturbances that change their thinking.


Eating disorders may develop when a person is young, but can recur in middle age. Often the person has suffered silently for many years. By midlife, the disease is more about easing tension, anxiety, and anger than appearance. Worry about passing the disease to their children is what brings many sufferers to seek treatment.


Tragically, a person with an eating disorder strives for control and self-esteem. But the disease produces the opposite effect. A person with an eating disorder may find that she must struggle with any of the following psychological problems in addition to the physical symptoms:


  • Feels hopeless. May give up and sink into fatalism or denial.


  • Feels out of control and helpless to do anything about her problems.


  • Suffers from anxiety and self-doubt.


  • Feels guilt and shame.


  • Fears being discovered.


  • Has obsessive thoughts and preoccupation with food and eating.


  • Struggles with anger and suppressed anger.


dummies

Source:http://www.dummies.com/how-to/content/who-is-likely-to-develop-an-eating-disorder.html

How to Mix Your Own Soil for Container Plantings

To make your own planting mix for container gardening, buy a wholesale mixture of a general peat-based growing mix and then customize it to meet your needs.


For example, you can save money by purchasing a large bale of compressed seed-starting mix at the beginning of the season. Use as much as you need to start seeds; then, when it’s time to grow plants in larger pots, mix in some sterilized compost (or composted manure or composted bark mulch) to add nutrients and lighten the mix. If you’re growing trees and shrubs in containers, mix in some builder’s sand or purchased topsoil for added weight.


You can also add fertilizers to a mix. Slow-release formulas, such as Osmocote, that break down and release nutrients when they’re exposed to water are a common choice. Organic options include kelp, alfalfa, and fish meals, which break down slowly, releasing their nutrients to plant roots.


If you add garden soil to your potting mixture, you run the risk of introducing disease-causing organisms to your container mixture. For best results, use only bagged, commercial topsoil, not the backyard garden fare.


With a little knowledge of what to look for, you can’t really go wrong with buying a commercial mix. If you can’t find a growing mix that suits your needs, however, and you really want to get down and dirty, you can mix your own blend. If you decide to take this route, be aware that you may need to experiment to achieve just the right mix.


Here’s a recipe that creates one cubic yard of mix. A cubic yard is a pile measuring 3 feet x 3 feet x 3 feet. That’s a lot of mix! You can make a smaller amount as long as you maintain the proportions.


First combine the following:


  • 1/2 cubic yard of sphagnum peat moss


  • 1/2 cubic yard of vermiculite


Dump the ingredients in a pile on a smooth, clean surface like a concrete patio or driveway, or on a plastic tarp where you won’t contaminate the mix (for smaller proportions, use a wheelbarrow or garden cart). Break up the peat moss as needed so it isn’t clumped. Mix, adding warm water as necessary to lightly moisten the material, and continue mixing until thoroughly combined.


Now add:


  • 10 pounds bone meal


  • 5 pounds dolomitic limestone


  • 5 pounds blood meal


Mix thoroughly. If you don’t plan to use the mix immediately, store it tightly closed in plastic garbage bags or in a clean plastic garbage can.


dummies

Source:http://www.dummies.com/how-to/content/how-to-mix-your-own-soil-for-container-plantings.html

How to Fix Small Drywall Cracks


Apply a thin bead of caulk into the crack.


>

Be sure to get the caulk actually inside the crack.


>
dummies

Source:http://www.dummies.com/how-to/content/how-to-fix-small-drywall-cracks.pageCd-storyboard,pageNum-2.html

Photoshop CS5 All-in-One For Dummies

Just when you think the industry leader in digital imaging software had every feature, tool, bell and whistle you could possibly need, Photoshop manages to give more once again. Photoshop CS5 retains all it had in previous versions, and then provides some new features to help you with your tasks, such as Puppet Warp, improved HDR functionality, better Lens Correction, Mini Bridge, Content-Aware Fill, new brush tips, and more. None of it is hard to learn, and all of it will help enhance both your productivity and creativity.


>


>


The Basic Photoshop CS5 Commands


Getting familiar with the Photoshop CS5 application window is a great way to get your bearings before diving into Photoshop's tools and commands. Here are a few basic pointers:


  • Launch Photoshop by clicking the Start menu or an icon on the taskbar (Windows) or clicking the Photoshop icon on the Dock (Mac).


    You can also double-click a Photoshop shortcut or alias on your desktop.


  • Open an image by choosing File→Open. If you have several images open at a time, cycle through them by pressing Ctrl+Tab (Windows) or Control+Tab (Mac).


  • Sometimes you need to see more detail in a photo. Zoom in by pressing Ctrl (Command on the Mac) + the plus sign key. When you’re done editing, zoom out by pressing Ctrl + the minus sign key (Command + the minus sign key on the Mac).


  • Scroll an image by pressing the spacebar and then dragging.


  • Set your preferences by choosing Edit→Preferences (Windows) or Photoshop→Preferences (Mac).


  • Arrange and combine panels, customize the Options bar, and modify menu and keyboard shortcuts to how you work best. Then save your workspace to use again by choosing Window→Workspace→New Workspace.


    image0.jpg


>


>


>


Accessing the Photoshop CS5 Tools through Keyboard Shortcuts


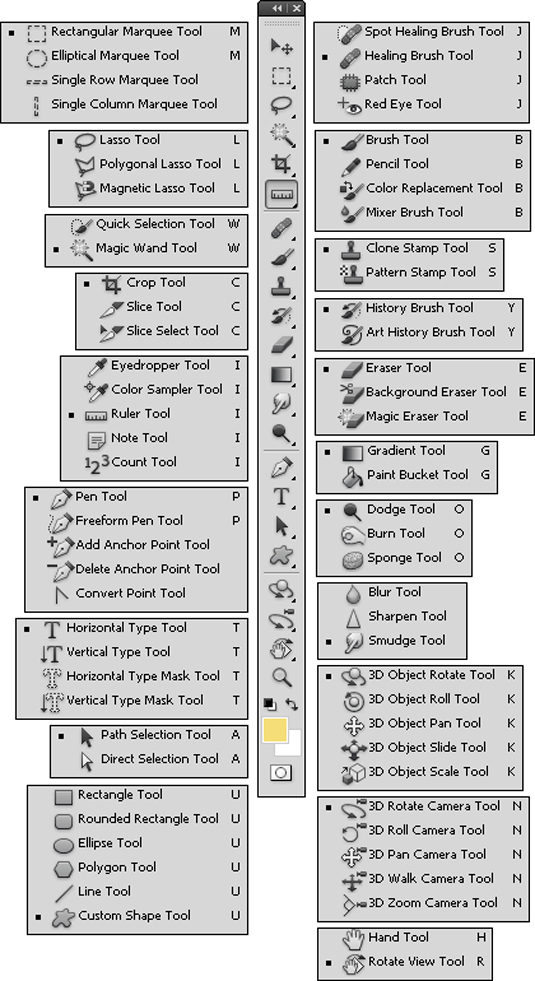
Photoshop CS5 sports a hefty tool count of 71 in the Extended version (a few less in the Standard version). Not to fear. This figure shows you Photoshop's tool icon, the name of each tool and its keyboard shortcut, even if it is tucked away, hidden in a flyout menu.


Note: 3D tools are available in the Photoshop CS5 Extended version only.


image0.jpg


>


>


>


Making and Adjusting Selections in Photoshop CS5


Mastering selections is a key skill to becoming a Photoshop CS5 master. The following table holds a few basic Photoshop keyboard shortcuts to get you started on digital photography projects of all sorts.


TaskShortcut (Windows)Shortcut (Mac)
Draw straight lines.Alt-click with Lasso toolOption-click with Lasso tool
Add to the selection outline.Shift-dragShift-drag
Deselect from the selection area.Alt-dragOption-drag
Deselect all but the intersected area.Hold down Shift+Alt and dragHold down Shift+Option and drag
Deselect the entire image.Ctrl+DCommand+D
Reselect the last selection.Ctrl+Shift+DCommand+Shift+D
Hide extras.Ctrl+HCommand+H
Fill the selection with foreground color.Alt+BackspaceOption+Delete
Fill the selection with background color.Ctrl+BackspaceCommand+Delete
Reapply the last filter.Ctrl+FCommand+F
Adjust levels.Ctrl+LCommand+L
Use Free Transform.Ctrl+TCommand+T


>


>
dummies


Source:http://www.dummies.com/how-to/content/photoshop-cs5-allinone-for-dummies-cheat-sheet.html

How to Find a Wireless Network Using Windows XP

The first problem you encounter when trying to make the wireless network connection is finding the network. Not all wireless networks show up at first blush.


Remember that physical objects around you affect the signal: walls, bookcases, large partitions made from lead, and superheroes. Those things readily block the wireless signal. Move around. Sometimes, moving the laptop just a few feet in one direction improves signal reception. Remember that if you cannot see the wireless hub directly, odds are good that you won’t get a solid signal.


Some wireless networks don’t send out their SSIDs. Although the wireless NIC still picks up the signal, no name is given for the access point. You have to supply the name.


In Windows XP, supply the SSID by following these steps:


  1. Open the Network Connections icon in the Control Panel.


  2. Right-click the Wireless Network Connection icon.


  3. Choose Properties from the shortcut menu.


  4. Click the Wireless Networks tab in the Wireless Network Connection Properties dialog box.


  5. Click the Add button.


    It’s found near the bottom of the dialog box.


  6. Type the SSID into the Network Name (SSID) text box in the Wireless Network Properties dialog box.


  7. If required, type the Network Key — twice.


  8. Click OK.


    You’re not connected at this point, but the network should now show up in the list of available networks. Connect to the network as you normally would.


Another cause of a dropped connection may be a timeout. For example, some for-pay wireless services give you only a limited amount of access time. After that time expires, you’re no longer connected or you may see the Pay Up home page rather than the Internet.


Finally, the connection problem may simply be that the password is incorrect. A dialog box warns you about it, but keep in mind that any wireless network passwords you stored in your PC might be changed by the various networks you access.


  • You can check the connection strength by pointing the mouse at the wee connection icon in the notification area.


  • In Windows Vista, the wireless connection strength is also displayed beneath the network’s information area in the Network and Connection Sharing window.


  • If you’re using Windows 7 or Windows Vista, you can install various wireless networking gadgets for the Sidebar. Most display the wireless network’s name, signal strength, and IP address.


  • Third-party utilities can also be used to gauge signal strength, such as the wireless networking tool shown earlier. Various war driver utilities, used to find wireless signals, can also be used to discover signal strength. The NetStumbler is a popular choice and can be downloaded from the web.


dummies

Source:http://www.dummies.com/how-to/content/how-to-find-a-wireless-network-using-windows-xp.html

Recognizing Hepatitis C Symptoms

Soon after you first become infected with the hepatitis C virus, you may have flu-like symptoms or even jaundice (abnormally yellow skin or eyes) during the acute phase (within the first six months) of infection. Most people in the acute phase are asymptomatic, meaning that they don't notice any symptoms, or they have symptoms that are mild or initially confused with other illnesses.


When your disease becomes chronic (after six months), you may develop some of the following symptoms in the months or even decades after infection.


You probably won't have all of these symptoms, but being aware of possible symptoms is good, so if one of them does occur, you'll recognize it. Keep in mind that some symptoms happen as a function of aging, stress, or menopause. Each person with hepatitis C is an individual, and your symptoms depend on many factors.


  • Fatigue: In a class of its own, the most commonly reported symptom is a feeling of weariness. The sense of sluggishness can be physical or mental or both.

  • Digestive problems: Nausea, vomiting, diarrhea, bloating, gas, indigestion, abdominal pain, or loss of appetite in any combination or experienced separately is a signal that something's wrong.

  • Emotional problems: Depression, anxiety, and mood swings are among the indicators of a condition or illness that warrants attention.

  • Flu-like symptoms: Headache, low-grade fever, night sweats, chills, joint and muscle pain, and weakness are not only signs of the flu, but also symptoms of other medical concerns.

  • Hormonal problems: More intense premenstrual tension or menopausal symptoms, irregular periods, loss of sex drive, or erectile dysfunction can accompany the aging process, as well as progressive diseases.

  • Jaundice: Yellowing of skin or eyes, dark urine, pale or clay-colored stools often relate to liver problems.

  • Skin issues: Dry skin, itchy skin, bruising, reddened palms, red spidery spots, swelling of your hands, feet, or face call for monitoring, especially if symptoms intensify over time.

  • Sleep problems: Insomnia and night sweats may occur sporadically or frequently.

  • Thinking problems: Brain fog, encephalopathy, associates with cirrhosis.

Your hepatitis C may directly cause some symptoms; others may be side effects of medications or the result of worrying about your illness. Like the chicken and the egg, it doesn't matter what came first. If you have any symptoms, tell your physician. Working with your doctor, you can deal with your symptoms.


dummies

Source:http://www.dummies.com/how-to/content/recognizing-hepatitis-c-symptoms.html

Explaining What Happens in a Hypnotherapy Session

Briefly, here are the steps involved in a typical hypnotherapy session. However, bear in mind that a ‘typical’ session varies widely depending on both the hypnotherapist and the patient.


  1. You get acquainted with your hypnotherapist.


  2. Your hypnotherapist gathers information about you (mainly completed in the initial session).


  3. Trance is induced.


  4. Trance is deepened.


  5. The actual therapy takes place.


  6. You’re given post-hypnotic suggestions.


  7. You’re given feel-good suggestions.


  8. You emerge from hypnosis.


  9. You’re given homework to help reinforce the therapy in between sessions.


dummies

Source:http://www.dummies.com/how-to/content/explaining-what-happens-in-a-hypnotherapy-session.html

Glossary of Knitting Techniques

Knitting is both simple and complicated at the same time — it's all in the technique. Knowing a variety of knitting techniques helps you create professional-looking items. Following is a handy list that explains many common knitting techniques. Practice can make you a master of all of them.


Bind off: Remove stitches from the needle to create a
finished edge. Knit 2 stitches, * with tip of LH needle bring the
stitch on the right (the first one knit) over the second stitch and
off the needle. One stitch bound off. Knit 1 stitch. Rep from * to
the end of the row.
Place marker: Place a round marker (a purchased ring or
strand of contrast yarn) on your needle to remind you of the
beginning of a round, to indicate a pattern repeat, or for some
other purpose your pattern tells you.
Cast on: Make a foundation row of stitches. Row 1 is
worked from these stitches.
Purl into the back of the stitch: Instead of entering
the stitch with the RH needle in the usual way to purl, go into the
back of the stitch, twisting it.
Decrease: Remove stitches using k2tog or ssk or
psso.
Purl into the stitch below: Insert the RH needle as if
to purl into the stitch directly below the first stitch on the LH
needle and purl it (wrap yarn and draw a loop through) as you
normally would.
Increase: Add stitches to a row, often abbreviated as m1
(make 1).
Purl 2 together: Insert the needle into 2 stitches
instead of 1 and purl them together as 1 stitch. It decreases 1
stitch and slants to the right.
Knit into the back of the stitch: Instead of entering
the stitch with the RH needle in the usual way to knit, go into the
back of the stitch, twisting it.
Purlwise: Insert the RH needle into the next stitch as
if you're going to purl it.
Knit into the stitch below: Insert the RH needle as if
to knit into the stitch directly below the first stitch on the LH
needle and knit it (wrap yarn and draw a loop through) as you
normally would.
Slip stitch: With the RH needle, go into the first
stitch on the LH needle as if to purl it and transfer it to the RH
needle without working it.
Knit 2 together: Insert the RH needle through the first
2 stitches and knit them together as 1 stitch. It decreases 1
stitch and slants to the right.
Slip 1, knit 1, pass slipped stitch over: Slip 1 stitch,
knit the next stitch, and then bring the slipped stitch over the
knitted stitch and off the needle. It decreases 1 stitch and slants
to the left.
Knit 3 together: Insert the RH needle into the first 3
stitches and knit them together as 1 stitch. It decreases 2
stitches and slants to the right.
Slip 1, knit 2 together, pass the slipped stitch over:
Slip 1 stitch, knit the next 2 stitches together as 1 stitch, and
then bring the slipped stitch over the knitted stitch and off the
needle. It decreases 2 stitches and slants to the left.
Knitwise: Insert the RH needle into the next stitch as
if you're going to knit it.
Slip, slip, knit: Slip 2 stitches one at a time as if to
knit, and then knit them together as 1 stitch through the back of
the loops. It decreases 1 stitch and slants to the left.
No stitch: A chart symbol indicating that there's no
stitch on your needle to match the square in the chart. When you
get to a no-stitch square, skip it and work the next stitch as
indicated in the next square of the chart.
Work even: Continue in whatever pattern you're working
without increasing or decreasing.
Pick up and knit (or purl): With a knitting needle and
yarn, draw through a series of new loops to work from along the
edge of a knitted piece. It's usually used for neck and cardigan
bands.
Yarn over: Make a new stitch by wrapping the yarn around
the RH needle. The way to do this depends on the kind of stitches
(knit or purl) on either side of the yarn over.


dummies

Source:http://www.dummies.com/how-to/content/glossary-of-knitting-techniques.html

Canon EOS Rebel T3/1100D For Dummies

Your T3/1100D is packed with so many features that it can be difficult to remember what each control does, especially if you're new to digital SLR photography. To help you sort everything out, this Cheat Sheet provides a quick-reference guide to the external controls and exposure modes on your camera. Print it out, tuck it in your camera bag, and get a head start on taking great shots!


>


>


The Canon EOS Rebel T3/1100D Digital Camera Layout


Here's a guide to the buttons, dials, and other external controls on your Digital Rebel T3/1100D. The lens shown in the digital camera below is the Canon EF-S 18-55 IS (Image Stabilization) model sold with the Rebel; other lenses may vary.


image0.jpg
image1.jpg
image2.jpg
image3.jpg


>


>


>


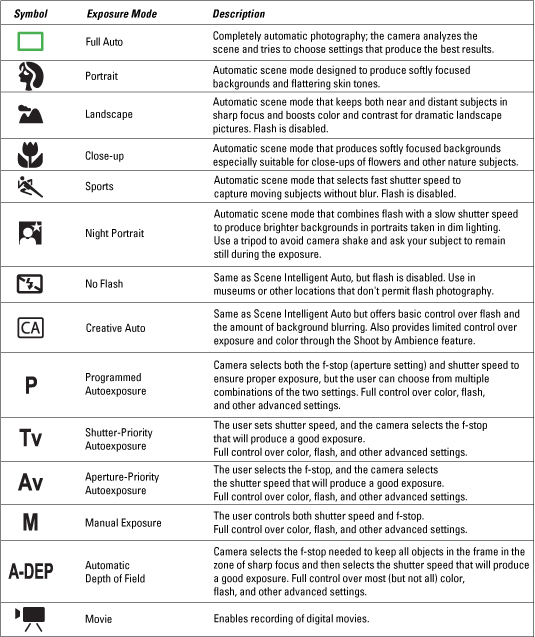
Exposure Mode Quick Guide for Your Canon EOS Rebel T3/1100D Digital Camera


Your T3/1100D offers the following exposure modes, which you select via the Mode dial on top of the camera. Your choice is important because it determines how much control you have over picture-taking settings. Note: Modes described as automatic scene modes in this table offer fully automatic photography but enable you to alter color and exposure slightly through the Shoot by Ambience and Shoot by Lighting or Scene Type features.


image0.jpg


>


>
dummies


Source:http://www.dummies.com/how-to/content/canon-eos-rebel-t31100d-for-dummies-cheat-sheet.html

OSI Model for Cisco Networking

While you may not use the OSI model every day, you should be familiar with it, specifically when working with Cisco switches and routers (which operate at Layer 2 and Layer 3, respectively). Here are some of the items that operate at each level of the OSI model:


LayerDescriptionExamples
7. ApplicationResponsible for initiating or services the request.SMTP, DNS, HTTP, and Telnet
6. PresentationFormats the information so that it is understood by the
receiving system.
Compression and encryption depending on the implementation
5. SessionResponsible for establishing, managing, and terminating the
session.
NetBIOS
4. TransportBreaks information into segments and is responsible for
connection and connectionless communication.
TCP and UDP
3. NetworkResponsible for logical addressing and routingIP, ICMP, ARP, RIP, IGRP, and routers
2. Data LinkResponsible for physical addressing, error correction, and
preparing the information for the media
MAC address, CSMA/CD, switches, and bridges
1. PhysicalDeals with the electrical signal.Cables, connectors, hubs, and repeaters


dummies

Source:http://www.dummies.com/how-to/content/osi-model-for-cisco-networking.html