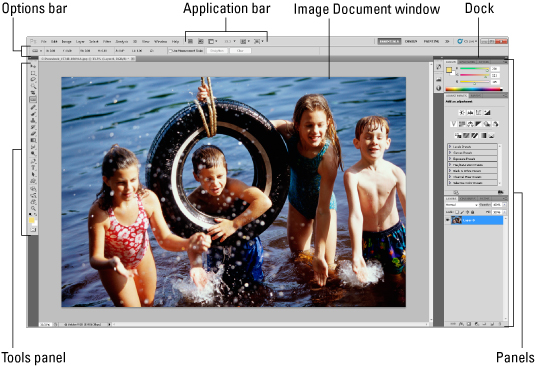
Just when you think the industry leader in digital imaging software had every feature, tool, bell and whistle you could possibly need, Photoshop manages to give more once again. Photoshop CS5 retains all it had in previous versions, and then provides some new features to help you with your tasks, such as Puppet Warp, improved HDR functionality, better Lens Correction, Mini Bridge, Content-Aware Fill, new brush tips, and more. None of it is hard to learn, and all of it will help enhance both your productivity and creativity.
>
>
The Basic Photoshop CS5 Commands
Getting familiar with the Photoshop CS5 application window is a great way to get your bearings before diving into Photoshop's tools and commands. Here are a few basic pointers:
Launch Photoshop by clicking the Start menu or an icon on the taskbar (Windows) or clicking the Photoshop icon on the Dock (Mac).
You can also double-click a Photoshop shortcut or alias on your desktop.
Open an image by choosing File→Open. If you have several images open at a time, cycle through them by pressing Ctrl+Tab (Windows) or Control+Tab (Mac).
Sometimes you need to see more detail in a photo. Zoom in by pressing Ctrl (Command on the Mac) + the plus sign key. When you’re done editing, zoom out by pressing Ctrl + the minus sign key (Command + the minus sign key on the Mac).
Scroll an image by pressing the spacebar and then dragging.
Set your preferences by choosing Edit→Preferences (Windows) or Photoshop→Preferences (Mac).
Arrange and combine panels, customize the Options bar, and modify menu and keyboard shortcuts to how you work best. Then save your workspace to use again by choosing Window→Workspace→New Workspace.

>
>
>
Accessing the Photoshop CS5 Tools through Keyboard Shortcuts
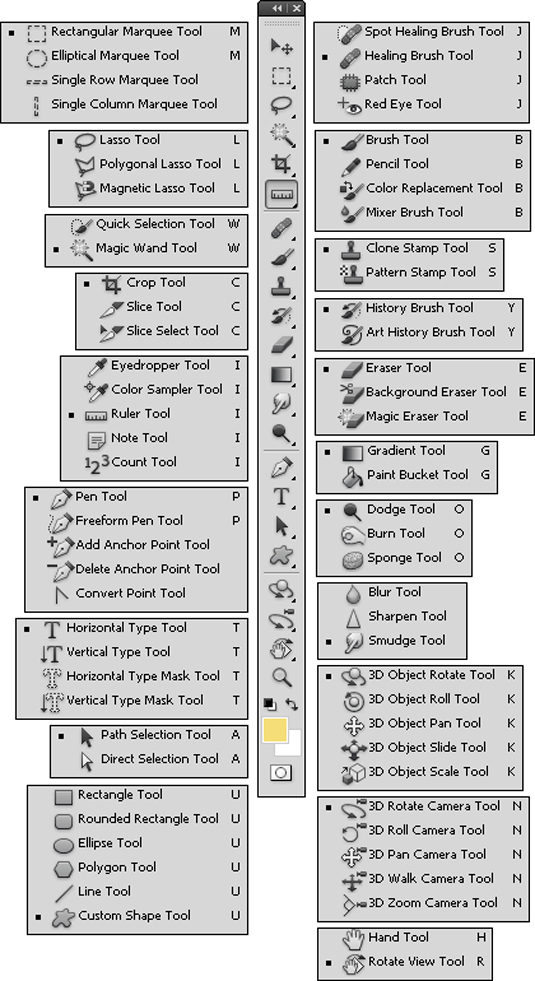
Photoshop CS5 sports a hefty tool count of 71 in the Extended version (a few less in the Standard version). Not to fear. This figure shows you Photoshop's tool icon, the name of each tool and its keyboard shortcut, even if it is tucked away, hidden in a flyout menu.
Note: 3D tools are available in the Photoshop CS5 Extended version only.

>
>
>
Making and Adjusting Selections in Photoshop CS5
Mastering selections is a key skill to becoming a Photoshop CS5 master. The following table holds a few basic Photoshop keyboard shortcuts to get you started on digital photography projects of all sorts.
| Task | Shortcut (Windows) | Shortcut (Mac) |
|---|---|---|
| Draw straight lines. | Alt-click with Lasso tool | Option-click with Lasso tool |
| Add to the selection outline. | Shift-drag | Shift-drag |
| Deselect from the selection area. | Alt-drag | Option-drag |
| Deselect all but the intersected area. | Hold down Shift+Alt and drag | Hold down Shift+Option and drag |
| Deselect the entire image. | Ctrl+D | Command+D |
| Reselect the last selection. | Ctrl+Shift+D | Command+Shift+D |
| Hide extras. | Ctrl+H | Command+H |
| Fill the selection with foreground color. | Alt+Backspace | Option+Delete |
| Fill the selection with background color. | Ctrl+Backspace | Command+Delete |
| Reapply the last filter. | Ctrl+F | Command+F |
| Adjust levels. | Ctrl+L | Command+L |
| Use Free Transform. | Ctrl+T | Command+T |
>
>
dummies
Source:http://www.dummies.com/how-to/content/photoshop-cs5-allinone-for-dummies-cheat-sheet.html
No comments:
Post a Comment