How to Create a Second Bee Colony From Your Existing Beehive


9 of 11 in Series:
The Essentials of Setting Up a Backyard Beehive


You can create a second colony from your existing colony. You don’t even have to order another package of bees! Free bees! Ah, but here’s the dilemma! You’ll need a new queen for your new colony. Strictly speaking, you don’t have to order a new queen. You can let the bees make their own; however, ordering a new queen is simply faster and more foolproof. Or if you want to get really adventurous, you can raise your own queen.


To make two hives from one, you first need a strong, healthy hive. That’s just what you hope your hive will be like at the start of its second season — boiling with lots and lots of busy bees. The procedure is known as dividing or making a divide.


Dividing not only enables you to start a new colony, it’s also considered good bee management; dividing thins out a strong colony and prevents that colony from swarming.


The best time to make a divide is in the early spring about a month before the first major nectar flow. Follow these steps in the order they are given:


  1. Check your existing colony (colonies) to determine whether you have one that’s strong enough to divide.


    Look for lots of bees, and lots of capped brood (six frames of capped brood and/or larvae are ideal). The situation should look crowded.


  2. Order a new hive setup from your bee supplier.


    You’ll want hive bodies, frames, foundation — the works. You need the elements to build a new home for your new family.


  3. Order a new queen from your bee supplier.


    Alternatively, you can allow the new colony to raise its own queen.


    Your new queen doesn’t have to be marked, but having a marked queen is a plus, particularly when you’re looking for her because the mark makes her easier to identify.


  4. Put your new hive equipment where you plan to locate your new family of bees.


    You’ll need only to put out one deep hive body at this point. Remove four of the ten foundation frames and set them aside. You’ll need them later.


  5. When your new marked queen arrives, it’s time to divide!


    Smoke and open your existing colony as usual.


  6. Find the frame with the queen and set it aside in a safe place.


    An extra empty hive body and cover will do just fine. Better yet, use a small “nuc” hive (available from your supplier). These mini-hives contain only five frames.


  7. Now remove three frames of capped brood (frames with cells of developing pupae) plus all the bees that are on each of them.


    Place these three brood frames and bees in the center of the new hive. That still leaves one slot open because your removed four frames of foundation. The extra slot, however, provides the space that you’ll need to hang the new queen cage.


  8. Using two frame nails, fashion a hanging bracket for the new queen cage (candy side up) and hang the cage between brood frames in the middle of the new hive.


    Make sure you have removed the cork stopper or metal disc, revealing the candy plug.


  9. Put a hive-top feeder on your new colony and fill it with sugar syrup.


  10. Turn your attention back to the original hive.


    Carefully put the frame containing the queen back into the colony. Add three of the new foundation frames (to replace the three brood frames that you removed earlier). Place these frames closest to the outer walls of the hive.


  11. Add a hive-top feeder to your original hive and fill it with sugar syrup.


Congratulations, you’re the proud parent of a new colony! But wait, you say, “I’ve got one new frame of foundation left over.” Good. That’s what you’ll use next week to replace what will then be an empty queen cage. If you used the bottom board installation technique, this step is eliminated.


dummies

Source:http://www.dummies.com/how-to/content/how-to-create-a-second-bee-colony-from-your-existi.html
Interpreting the Book of Revelation

The real meaning of the Bible's Book of Revelation is a popular, ongoing debate. You'll find four major interpretive approaches to the Book of Revelation that can help you read, understand, and figure out the apocalyptic letter of John. Key to understanding commentaries on Revelations is knowing the position of the commentator.


Here are brief definitions of the four major interpretive approaches:


  • Preterist: Revelation speaks of things that are already history. The book isn't prophecy about the end of time; it's directed at Christians trying to live their faith in the Roman Empire. This is the prevailing view among modern scholars who aren't aligned with orthodox Christianity. Strength: The observation that the book was intended for a first-century audience. Weakness: Fails to take seriously the idea that the Holy Spirit can reveal what's going to happen, as the book purports to do.


  • Historicist: Revelation gives a bird's eye view of the entire sweep of Christian church history, from the post-Pentecost church (Acts 2) until Jesus returns. This view has few adherents today. Strength: The conviction that God controls the course of history. Weakness: Revelation then has little relevance for its original audience; also, historicists have wildly divergent views concerning the particulars.


  • Idealist: There's no correlation between the visions and any historical reality; they're simply symbols of the ongoing struggle between good and evil. Strength: The recognition that the book clearly communicates enduring ideals. Weakness: Divorces ideas from history, thereby calling into question Jesus's historical death, resurrection, and ascension.


  • Futurist: By the sixth seal (6:12–17), the book describes events leading up to Jesus's return. Glances at earlier stages of redemptive history (as in Rev. 12) illuminate End Time events. The focus is on a historical struggle that unfolds at the end of the age and climaxes with Jesus's Second Coming. Strength: Incorporates the insights of the other views without sacrificing the essential point of their position: namely, that the book prophesies a literal return of Jesus and a new creation. Weakness: The weakness of the futuristic view is that it interprets 1:9–3:22 just like preterists and historicists, that is, as referring to the first century. Then it declares that at 4:1, or at least by 6:12, the sixth seal, everything else is about the final period of earth history before Christ returns. Critics find this arbitrary and therefore unconvincing.


dummies

Source:http://www.dummies.com/how-to/content/interpreting-the-book-of-revelation.html

Web Marketing Case Study: Effective Video

Selling to both consumers and businesses, Blendtec was an early adopter of online videos, launching on YouTube in 2006. Blendtec is a manufacturer of commercial and consumer blenders and other small electrics and has been in business for nearly 30 years.


The company uses videos to “show the crazy side of extreme testing.” Featuring the Blendtec CEO, Tom Dickson, the videos demonstrate its blending insane products, from vuvuzelas to glowsticks, all with the disclaimer, “Don’t try this at home.”


“We were a hit!” exclaims Julie Owens, Blendtec’s global marketing manager. “YouTube created brand awareness for us,” which was their goal. They not only accomplished that in stars, but also drew large amounts of traffic to their website. Still, their number one aim is “to be real,” she insists.


According to Owens, the audience on YouTube is typically male, ages 14–35, while target buyers of blenders are typically educated females from 30 to 65 years old. “The unique piece to this puzzle is that our YouTube views support or influence our buying demographic,” she observes.


When she analyzed how the viral fans influence buyers, she found that “We have kids point out our blenders to their parents. We have heard kids say, ‘Mom, this is the one on Will It Blend?’ The magic is when we hear the parent say, ‘We love the blender that our kids told us we had to buy!’”


With more than 100 videos posted, Blendtec has made a serious commitment to video. It has a full-production facility onsite, with a full-time producer/director and a part-time assistant who plan and edit videos, though actual shooting time may be only one to two days a month.


Blendtec tracks its video results through analytics, watching both conversion rates and the size of its fan base. “Of course we love views,” she says. “That lets us know we hit the mark.” The number of visitors to the website indicates to her that the videos have successfully showcased the features of their blenders.”


Although Owens is big on social media, she faces a marketing challenge. “We have [both] commercial and consumer products; we use all techniques because our markets are so different. We know we need to be in a trade show to share our wares with commercial accounts, and we know that raw foodies and vegans will be found on Twitter more often than Smoothie CEOs.”


“Be real. Be you. Show what you do, don’t tell,” advises Owens. “Have fun and enjoy the journey so that your story is something others will share. . . . We like the house that Will It Blend built on our YouTube real estate. . . . We are happy . . . trying to make life smoother.”


dummies

Source:http://www.dummies.com/how-to/content/web-marketing-case-study-effective-video.navId-811455.html

Adding the Key Performance Indicators Portlet to NetSuite

Netsuite portlets show key business metrics on the home dashboard and you can add portlets of many types. Key performance indicators (KPIs) are quantifiable, measurable metrics that tell companies how well they’re achieving their goals. If it’s not already there, add the Key Performance Indicators portlet to your dashboard:


  1. Click the Customize this Page link on the upper-right side.


  2. Click the Key Performance Indicators link in the Add Content pane.


  3. Click the X in the upper-right corner of Add Content window.


dummies

Source:http://www.dummies.com/how-to/content/adding-the-key-performance-indicators-portlet.html

Avoiding Six Sigma Pitfalls

Navigating your business through the Six Sigma methodology can be treacherous. Identifying — and avoiding — common Six Sigma mistakes and perceptions can keep your business from running aground.


Not allowing enough time


An organization breaking through to a new level of performance requires an engine of project activity. That's why a small portion of an organization is asked to dedicate all their time and efforts toward completing Six Sigma projects. They set aside their usual job duties and concentrate full time on completing assigned project(s).


A common mistake is to assume that an organization can get the same magnitude and speed of change by having these individuals work on projects on the side, as a part-time assignment, between the tasks and duties of their regular work. This approach simply doesn't generate the force necessary to sustain organizational change. Project completion drags out and resulting savings languish. Ultimately, momentum and interest wane.


Who's the leader?


Some organizations have tried to deploy Six Sigma without a designated, empowered deployment leader. They train people, they assign projects, they infuse tools, they track results. They believe breakthrough change will occur by the sum of the individual, independent efforts. But a Six Sigma deployment without a leader is like a ship without a captain — individual crewmembers may know what to do in their own areas, but there is no direction or overall progress.


Taking too big a bite


Almost invariably, the failure of any Six Sigma project can be traced to a scope that was too broad. Trying to minimize variation in an entire product, for example, is so defocused that little improvement can happen on any part of the product. Concentrating on minimizing the variation in a single critical characteristic of a product, however, allows you to dig deep enough to discover the real source of improvement.


Always err on the side of scoping your projects too small.


Focusing on isolated areas


A mistake companies can make with Six Sigma is to implement it in isolated pockets, rather than as a uniform and pervasive campaign. Organizations are living, connected organisms. When you make an improvement in one area or in one process, you have to make other improvements in other areas to receive the full benefits. What sense does it make, for example, to improve the design of a product but not improve your ability to manufacture that product?


"But we're different"


It's natural to consider yourself or your organization to be unique — so unique that you may even think that what's worked for others couldn't possibly work for you. This is one of the most common myths people have about Six Sigma.


Six Sigma is a general methodology. It has proven itself in every arena where it's been applied — manufacturing, operations, logistics, design, supply chains, services, transactions, processing, legal, human resources, software, sales, marketing, management, healthcare, the public sector, defense contracting — the list literally goes on and on! Don't fall into the trap of thinking you're the lone exception to the rule.


Overtraining


Not every officer of the peace needs to be trained as an elite Special Forces commando. Likewise, not everyone doing Six Sigma needs to know the details of every advanced statistical tool and method.


The amount of information in Six Sigma courses has ratcheted up, as consultants and trainers have competed against each other in their marketing efforts. But the use of the tools tells the real story. Only a handful of the taught Six Sigma tools are used regularly.


Don't get fooled into thinking that more and more knowledge is always better. And don't think you have to use every tool on every project. Expediency in learning and in application is the key! The best system gets the right knowledge to the right person at the right time.


Blindly believing your measurement system


Data and measurements are the foundation of Six Sigma. All too often, however, Six Sigma practitioners neglect to check the validity of their measurements. Unknowingly relying on a faulty measurement system is like building a house with a crooked ruler — you won't get what you thought you were going to get, and you won't know why.


Always take the time to perform a measurement systems analysis at the beginning of your project. Taking this step saves you from many potential headaches.


Exaggerated opportunity counts


The definition of Six Sigma performance is no more than 3.4 defects per million opportunities for defects — counting every single opportunity for defects in a given system. But one way to achieve a high capability is to offset the discovered number of defects with a falsely inflated assessment of the number of opportunities. Some practitioners erroneously inflate the number of opportunities in a system to make their performance look better than it really is. What you want is performance that looks and is great.


Not leveraging technology


Technology and software are inseparable from Six Sigma. Yet many people try to segment technology into its own, isolated corner. Others dismiss its contribution outright, because they don't understand how to leverage its potential.


The right technology can help any person in Six Sigma do his or her work better and faster — and that's a goal everyone desires.


dummies

Source:http://www.dummies.com/how-to/content/avoiding-six-sigma-pitfalls.html

Must-Haves for the Low-Carb Pantry

If you're dieting the low-carb way, stock up on low-carb essentials so that when you have a need to eat, you can find healthy, low-carb ingredients. The following list contains recommended items to keep on hand:


Canned or Bottled Foods:Grains:
Canned tuna, salmon, or sardines (in water)Whole-grain pasta, long-grain rice, wild rice
Canned vegetables (asparagus, carrots, green beans, mushrooms,
and so on)
Whole-grain flours and cornmeal
Canned fruit packed in light syrup or juiceOatmeal
100-percent fruit preservesHigh-fiber, no-sugar cereals
Canned chicken or beef bouillonLow-sugar granola or homemade granola
Canned tomatoes and tomato pasteQuinoa
SalsaRoasted soynuts
KetchupSeasonings:
Canned or dried beans such as pinto, navy, kidney, limas,
garbanzo, peas
Salt-free seasonings
Fat-free refried beansGarlic and onion, minced and powder
Natural or low-sugar peanut butterBouillon cubes or sprinkles
Sun-dried tomatoesReduced-sodium soy sauce or Worcestershire sauce
Artichoke heartsSugar substitutes
OlivesOils and Vinegars:
CapersNonstick vegetable oil spray
Marinated vegetables (okra, beans)Healthy oils (olive oil, canola oil, peanut oil, or light
combination oils)
Roasted peppers
Pickles and pickle relish
Horseradish, Dijon, spicy, or plain mustard
Red and white table wine (for cooking)


dummies

Source:http://www.dummies.com/how-to/content/musthaves-for-the-lowcarb-pantry.html

Connecting Your iPod to a Home Stereo


Figure 1: RCA-type connectors (left) and a stereo mini-plug (right).

The Monster high-performance iCable for iPod (formerly called the Monster Cable) offers high-quality sound for the discerning listener with excellent stereo equipment.


Connect the stereo mini-plug to the iPod dock headphone/line-out connection, or to the headphone/line-out connection on the top of the iPod. Connect the left and right connectors to the stereo system's audio input — whatever connections are available, such as AUX IN (for auxiliary input); TAPE IN (for tape deck input); or CD IN (for CD player input).


Don't use the PHONO IN connection (for phonograph input) on most stereos. These connections are for phonographs (turntables) and aren't properly matched for other kinds of input devices. If you do this, you might get a loud buzzing sound that could damage your speakers.


You can control the volume from the iPod by using the scroll wheel, or from an iPod shuffle by using the volume control. This controls the volume of the signal from the iPod. Stereo systems typically have their own volume control to raise or lower the volume of the amplified speakers. For optimal sound quality when using a home stereo, set the iPod volume at less than half the maximum output and adjust your listening volume by using your stereo controls. By doing this, you prevent over-amplification, which can cause distortion and reduce audio quality.


dummies

Source:http://www.dummies.com/how-to/content/connecting-your-ipod-to-a-home-stereo.html

Laptop Battery-Saving Tips

If you use your laptop on the road or you use it in more than one place (such as at work and home), you need to make sure you’ve got power to do your work. The following list offers some suggestions on the best ways to conserve your laptop battery’s juice:


  • Dim the monitor.


  • Mute the speaker.


  • Remove the disc from the optical drive.


  • Run only necessary programs.


  • Set a solid-color desktop.


  • Enable low-battery warnings.


  • Use a spare battery.


  • Close unused programs.


  • Disable the wireless adapter when it isn’t in use.


  • Customize the power management scheme.


dummies

Source:http://www.dummies.com/how-to/content/laptop-batterysaving-tips.html

Landing Pages in Your Online Community

If the purpose of your online community is to sell or promote something or have members read certain content, you’ll have to help members get to the places where they can accomplish these goals. Many communities use landing pages — pages where members have to achieve a specific goal, such as a subscription or a purchase. Landing pages can be any of the following:


  • A sales pitch


  • A welcome message


  • Community policies and/or guidelines


  • A newsletter or RSS feed subscription form


  • An advertisement


  • An article or blog post


  • A Facebook page


Landing pages aren’t always easy to find, which is where you come in. If community members didn’t land on those action pages via a search engine and don’t know that they exist, you have to use a little gentle guidance to get them there. Before you get out your megaphone and start herding, remember three important things:


  • Community members don’t like obvious sales pitches.


  • Community members don’t like trickery.


  • Community members don’t like bossy community managers who tell them that they have to visit certain pages.


For new members, landing pages should be more about helping them get around the community than asking them to buy something. Eventually, if they have a positive experience, they’ll be more open to subscribing to your newsletter or buying your product. For now, just make them feel comfortable and see to it that they have everything they need.


Your landing page should contain a Welcome folder. If new members are entering your community through a forum, the “Welcome!” folder should contain one section with links to everything they need. For example, all the rules, regulations and FAQS, plus contact info, brand About pages, and fun stuff.


Though you don’t necessarily want to push signups and sales off the bat, it also doesn’t hurt to have a couple of enticing links to newsletter subscription forms or sales pages.


Don’t leave it up to the search engines to bring in new members or guide them to particular information. Take some time each day to answer questions and, if necessary, lead them to the proper pages and portals.


If you host a forum, blog, or e-mail group, your FAQs page in the Welcome folder is a perfect spot for introducing specific areas of your community or website. Simply create leading questions and use the landing pages to provide the answers.


For example, if you ask “How can I learn more about (insert name of brand here’s) products and services?” your response could be, “Please visit the products and services area of our website for a full rundown of the experiences we provide.” You answered a question your members will certainly want to know, and you guided them to a spot where they can take action, if they’re so inclined.


Also, as many community discussions are centered around the brand, you’ll want to take the opportunity to guide members to the most helpful landing pages. For example, if members want to learn more about nutritional information for a food product, let them know where they can go to find what they need.


Also, if they want to sign up for your newsletter or the corporate blog, dropping links into the conversation isn’t spammy because spam is unwanted information. It’s ok to link to specific requests.


dummies

Source:http://www.dummies.com/how-to/content/landing-pages-in-your-online-community.navId-323004.html

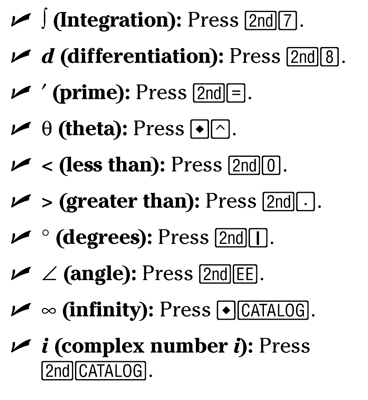
Special Keys on the TI-89 Graphing Calculator

The TI-89 graphing calculator has so many functions, you may have trouble locating them all. But if you’re looking for theta or infinity (and who isn’t, right?), look no further than the following list, which shows you where to find those and some other more common functions:


image0.jpg


dummies

Source:http://www.dummies.com/how-to/content/special-keys-on-the-ti89-graphing-calculator.html

Solutions for Redecorating Problem Ceilings

Ceilings are often overlooked when people are thinking about interior decorating. But all sorts of techniques — from raising and lowering your ceiling to adding beams or creating coffers — can change the look of your room.


  • Constructing a false ceiling: Take the idea of a dropped or lowered ceiling to new heights by asking a carpenter to drop (lower) only the outside perimeter of a too-high ceiling. Then have the carpenter install a light in the center area and cover it with a stained glass (real or faux) or other translucent cover. (An alternative may be to install a prefabricated plastic dome that looks like stained glass. Ask your local lighting dealer for sources.)


  • Raising the ceiling: Liberate your room. Ripping out a too-low ceiling to the rafters creates a dramatic effect and expands the space. Raising a ceiling is definitely a job for professional carpenters or highly skilled do-it-yourselfers.


  • Including classical touches: Traditional interiors used fancy, carved plaster trims on ceilings, especially on ceiling areas above chandeliers. Many people now have a renewed interest in these ceiling-enhancing decorations. They’re available in a lightweight, easy-to-install plastic that looks like the real thing. Ask to see them at your local home center or building supply store.


  • Adding beams: Beams add line, direction, and pattern to ceilings. Different kinds of beams are used traditionally in various styles of architecture. Heavy rough beams are characteristic of rustic Colonial American and certain Old World European interiors. Lighter, more refined box beams show up in fancier Early American homes. In other interiors, beams are whitewashed, bleached, antiqued, or stenciled.


    Painting the space between beams a light color and the beam itself a darker contrasting color heightens the illusion of depth. This trick is a neat space expander in a small- or medium-sized room. Another decorating trick is to paint a low ceiling and beams in a pale color. This trick tends to raise them both, making the ceiling seem higher.


  • Creating coffers: A coffer is a variation on a beamed ceiling. One difference is that, in beamed ceilings, beams run in one direction, creating repeating lines. When using coffers, you use fewer beams or beam-like architectural elements that cross at right angles, creating squares of empty space. Looking up at a coffered ceiling is like looking into the insides of many boxes. Take coffering one step further by decoratively painting or stenciling the wells (areas inside the coffers or beam-like structures).


  • Using planks: Planks — especially redwood and teak — add texture, rich color, and a subtle line to ceilings. If you use real-wood planks in a bathroom, make sure the room is well ventilated and ask your paint dealer about the best coating to protect the wood from moisture. Because planks create lines, make sure they run in the direction you want the eye to travel. Applied lengthwise in a rectangular room, planks make the room look even longer. To make the room seem wider and shorter, apply the planks crosswise. If you’re handy, you can install the planks yourself. If not, contract a carpenter.


dummies

Source:http://www.dummies.com/how-to/content/solutions-for-redecorating-problem-ceilings.html

How to Manage your Holiday Financial Hangover

The holidays are behind us, the presents are unwrapped, toys may already be broken, and now the reality is setting in, “How am I going to pay for all of this?” If you’re like many Americans, you may have decided to charge some or all of your holiday purchases and pay for them at a later date. Your loved ones may be greatly enjoying their gifts, but you are now scrambling to figure out how to pay the inevitable bills.


Managing your holiday financial hangover is not as hard as you think. According to the American Consumer Credit Council the average American spends $935 on gifts each holiday season. This means many of us may face credit card bills topping $1,000 after all holiday expenses are considered. Although this may bring about a panic attack, you can break the cycle with a few simple steps.


Pay off credit cards and save for next season


Until you have a plan in place to break this cycle, January will always be a scary month to receive credit card bills. Start by deciding how much per year you can save toward your holiday spending. Try to be aggressive in the first few months of the year to get your holiday bills knocked off quicker and avoid carrying high interest credit cards.


If you put $200 per month toward your holiday bills, you will pay off $1,000 plus interest in 6 months. Then, each month after the bill is paid save $100 to $200 toward next holiday season. You may not have every dime you need come December 2010, but the financial hangover in 2011 will be dramatically less, thus taking less time to pay off your bills. Within a year or two, you will be paying for your holidays with cash. The January credit card bill nightmares will be a thing of the past.


Start reducing debt now and save consistently


The two most important aspects of your debt reduction plan are to start immediately and be consistent. If you wait until March to begin paying down your holiday debt, you will have wasted two months and that will have a dramatic impact on your cash for next Christmas.


If you are not consistently following your plan, you will not break this cycle. Make your monthly payments on time and once the bills are paid off, save money every month without fail. This consistency will ensure your success.


Many banks still offer Christmas Clubs to their customers. This gives you the ability to save a certain amount of money every month automatically. Then, typically a check is sent to you in October to pay your holiday expenses. Check with your bank for details.


dummies

Source:http://www.dummies.com/how-to/content/how-to-manage-your-holiday-financial-hangover.html

Measuring Stuff with a Multimeter

A multimeter is an electronics testing device that, um, tests multiple things, including resistance, voltage, and current. Using certain multimeter models, you can test to be sure that components — such as diodes, capacitors, and transistors — function properly. You can also troubleshoot your circuit to see where current is failing and pinpoint the problem spots.


You don't have to break into your piggy bank to buy a multimeter. You can find them for about if you want fancy features, you can spend over $100. Find a model whose price you like and then splurge on the next higher-priced model. You will use a multimeter all the time. Trust us: It's worth a few extra bucks for a better model.


How a multimeter works


A multimeter has a set of leads: a black one and a red one. You attach these leads to the component or portion of the circuit that you're testing, and a digital readout provides the results. You adjust a knob to set the test you wish to perform such as resistance, voltage, or current as well as the range to test. Note: Some multimeters have an auto-ranging feature that saves you the trouble of setting the range.


Test leads that typically come with multimeters use simple cone-shaped tips. You can buy test clips that slip onto the cone-shaped tips to make it easier to clip them onto the leads of a component. This makes testing much easier, trust us.


The two things you'll probably test most often with a multimeter are resistance and voltage.


Reading resistance


The problem with resistors is that manufacturers seem to expect you to memorize the color code that identifies the resistance rating. Here is an easier way:


1. Clip your test leads onto the resistor leads.


2. Dial your multimeter to the resistance range you think the resistor fits in.


3. Read the value.


If your multimeter reads 1, you guessed too low of a value. Move the dial to the next range up until you get a valid reading. If your multimeter reads at close to 0 (zero), you guessed too high of a value. Dial to the next range down until you get a valid reading; if you get to the lowest range and the value is still 0, whatever you're testing has zero resistance.


Testing switches or relays is another common use of the resistance-testing feature of your multimeter. You can clip your test leads onto the lugs of an SPST switch to verify that it's working. (Hint: Occasionally, they don't work.) When the switch is open, you should get a value of 1, meaning that the resistance is higher than your meter can measure. When the switch is closed, you should get a low resistance — close to 0 (zero) ohms. You can also test SPDT or DPDT switches or relays to make sure which lugs are connected in which switch position.


Measuring voltage


To run a test to measure voltage, you connect the red multimeter lead to the positive side of the battery or circuit that you're testing and the black lead to the negative or ground side and set the dial to the voltage range you expect.


Consider checking the voltage at the contacts of a battery pack. To do this, touch the red lead to one of the battery pack outputs and the black test lead to the other. With a 4-battery pack loaded with fresh batteries, you should get a reading of about 6 volts. (If you get a reading of -6 volts, don't worry: Just reverse which lead you are touching to which battery pack output.) When batteries get old, the voltage drops. If you get less than 5 volts from a 4-battery pack, it's time to get new batteries.


When a circuit doesn't work, one of the first things to check is the voltage between the +V bus and the ground bus of the breadboard. Here's how:


1. Strip both ends of a 3" piece of 22 gauge wire.


2. Clip one end of each wire to one of your test leads.


3. Slip the free end of the wire attached to your red test lead into any contact on the +V bus.


4. Slip the free end of the wire attached to your black test lead into any contact on the ground bus.


Although you might not get a reading of the full 6 volts because of drain on the battery from the circuit, you should get a reading above 3.5 volts.


If you get a reading close to 0 (zero) volts, check to make sure that your battery pack and the wires from the battery pack terminal block are connected properly.


dummies

Source:http://www.dummies.com/how-to/content/measuring-stuff-with-a-multimeter.html

The Flash CS5 Symmetry Brush

Adobe Flash Creative Suite 5’s Symmetry Brush lets you draw cool symmetrical artwork with symbols for your Flash CS5 project. Follow these steps to use the Symmetry Brush:


  1. Click the New Layer button to insert a new layer on the timeline.


  2. If the Deco tool isn’t active, select it from the Tools panel.


  3. In the Property inspector, select the Symmetry Brush from the Drawing Effect drop-down list.


  4. To the right of Module, click the Edit button.


  5. From the Select Symbol dialog box that appears, select a symbol from your library to use with the Symmetry Brush and then click OK.


  6. On the stage, click and drag to begin drawing with the Symmetry Brush.


    The symbol you chose is duplicated in a rotating pattern around the brush point. Release the mouse button to stop drawing.


    The new pattern displays two handles — one to adjust pattern size and one to adjust the distance between each symbol.


  7. Move the cursor over the top of the vertical handle until you see a black arrow; click and drag to readjust the size of the pattern.


  8. Move the cursor over the end of the horizontal handle until you see a black arrow; click and drag clockwise or counterclockwise to reduce or increase the distance between symbol instances, respectively.


If you look at the advanced options for the Symmetry Brush (at the bottom of the Property inspector), you see quite a few other interesting modes that let you reflect symbols or reconfigure them into a grid. Experiment with them and try different symbols from your library for contrast.


dummies

Source:http://www.dummies.com/how-to/content/the-flash-cs5-symmetry-brush.html

Choosing Unsaturated Fats over Saturated Fats in Your Diet

All fat has the same number of calories, but a diet that contains unsaturated fat instead of foods that contain saturated fats can help reduce your blood cholesterol level.


Unsaturated fat is classified as either monounsaturated or polyunsaturated. Monounsaturated fats reduce the harmful low-density lipoproteins (LDLs) and leave the protective high-density lipoproteins (HDLs) in place. Research shows that polyunsaturated fats reduce both LDLs and HDLs.


Confused about what foods contain significant amounts of saturated, polyunsaturated, or monounsaturated fat? The following table gives you a quick look at what foods contain which types of fat.


Figuring Out the Fats
SaturatedPolyunsaturatedMonounsaturatedTrans fats
Butter, lardCorn oilCanola oilStick margarine
Dairy products (except nonfat)Fish oilsOlive oilSolid vegetable shortening
Meat and poultryCottonseed oilPeanut oil
Palm oil, palm kernel oilSafflower oilOther nut oils
Coconut oilSesame oil


Soybean oil


Sunflower oil


Most varieties of fish contain omega-3, a type of polyunsaturated fatty acid that’s associated with a decreased risk of heart disease in certain people.


Here’s the bottom line when it comes to fat. Choose


  • Mostly monounsaturated fats


  • A little less polyunsaturated fat


  • Very few saturated fats


  • As little as possible trans fats


Your body (specifically, the liver) can make all the cholesterol it needs. This type of cholesterol is referred to as blood cholesterol. But cholesterol also comes from foods that you eat; it’s known as dietary cholesterol. You can get dietary cholesterol only from animal sources, such as egg yolks, meat (especially organ meats like liver), poultry, fish, and higher-fat dairy products. Plant foods don’t contain cholesterol.


Often, foods that are high in cholesterol are also high in saturated fats. Although it was believed that dietary cholesterol was mainly responsible for raising blood cholesterol levels, researchers now know that saturated fat is the main culprit that causes your body’s cholesterol factory to work overtime.


dummies

Source:http://www.dummies.com/how-to/content/choosing-unsaturated-fats-over-saturated-fats-in-y.html

Microsoft Office 2010 For Dummies

Microsoft Office 2010 comes jam-packed with features. See shortcuts and tips for using the keyboard, mouse, and ribbon to get fast access to the most commonly used commands.


>


>


Microsoft Office 2010 Keyboard Shortcuts


Microsoft Office 2010 provides hundreds of commands, but you’ll likely only use a handful of those commands on a regular basis. To save time, use these keyboard shortcuts. With little effort, you can open files, find content, edit that content, and more!


FunctionKeystroke
CopyCtrl+C
CutCtrl+X
FindCtrl+F
Go ToCtrl+G
HelpF1
HyperlinkCtrl+K
NewCtrl+N
OpenCtrl+O
PasteCtrl+V
PrintCtrl+P
ReplaceCtrl+H
SaveCtrl+S
Select AllCtrl+A
Spell CheckF7
UndoCtrl+Z
RedoCtrl+Y


>


>


>


Microsoft Office 2010 Mouse Button Functions


You can control Microsoft Office 2010 with your mouse or your keyboard. The mouse actions in this table work whether you’re using Word, Excel, Access, PowerPoint, or Outlook.


Mouse Button UsedActionPurpose
Left mouse buttonClickMoves the cursor, highlights an object, pulls down a menu, or
chooses a menu command
Left mouse buttonDouble-clickHighlights a word or edits an embedded object
Left mouse buttonTriple-clickHighlights a paragraph
Left mouse buttonDragMoves an object, resizes an object, highlights text, or
highlights multiple objects
Wheel mouse buttonClickAutomatically scrolls a document when you move the mouse up or
down
Wheel mouse buttonRollScrolls a document up or down
Right mouse buttonRight-clickDisplays a shortcut pop-up menu


>


>


>


Microsoft Office 2010 Ribbon Tabs


Microsoft Office 2010 displays commands in a series of icons stored on different tabs. This combination of icons and tabs is known as the Ribbon interface, which appears in Word, PowerPoint, Excel, Outlook, and Access. The following tables show you the commands grouped under each ribbon tab for each of the four programs.


Word 2010 Ribbon Tabs
Ribbon Tab NameCommand GroupsDialog Box Shortcut
HomeClipboard, Font, Paragraph, Styles, and EditingCtrl+D (Font) or Alt+Ctrl+Shift+S (Styles)
InsertPages, Tables, Illustrations, Links, Header and Footer, Text,
and Symbols
*
Page LayoutThemes, Page Setup, Page Background, Paragraph, and
Arrange
*
ReferencesTable of Contents, Footnotes, Citation and Bibliography,
Captions, Index, and Table of Contents
*
MailingsCreate, Start Mail Merge, Write and Insert Fields, Preview
Results, and Finish
*
ReviewProofing, Language, Comments, Tracking, Changes, Compare, and
Project
*
ViewDocument Views, Show, Zoom, Window, and Macros*


Excel 2010 Ribbon Tabs
Ribbon Tab NameCommand GroupsDialog Box Shortcut
HomeClipboard, Font, Alignment, Styles, Cells, and EditingCtrl+Shift+F (Font)
InsertTables, Illustrations, Charts, Sparklines, Filter, Links, Text,
and Symbols
*
Page LayoutThemes, Page Setup, Scale to Fit, Sheet Options, and
Arrange
*
FormulasFunction Library, Defined Names, Formula Editing, and
Calculation
*
DataGet External Data, Connections, Sort and Filter, Data Tools,
and Outline
*
ReviewProofing, Language, Comments, and Changes*
ViewWorkbook Views, Show, Zoom, Window, and Macros*


PowerPoint 2010 Ribbon Tabs
Ribbon Tab NameCommand Groups
HomeClipboard, Slides, Font, Paragraph, Drawing and Editing
InsertTables, Images, Illustrations, Links, Text, Symbols, and
Media
DesignPage Setup, Themes, and Background
TransitionsPreview, Transition to This Slide, and Timing
AnimationsPreview, Animation, Advanced Animation, and Timing
Slide ShowStart Slide Show, Comments, and Compare
ReviewProofing, Language, Comments, and Compare
ViewPresentation Views, Master Views, Show, Zoom, Color/Grayscale,
Window, and Macros


Outlook 2010 Ribbon Tabs
Ribbon Tab NameCommand Groups
Home (Mail)New, Delete, Respond, Quick Steps, Move, Tags, and Find
Send/Receive (Mail)Send and Receive, Download, Server, and Preferences
Folder (Mail)New, Actions, Clean Up, Favorites, and Properties
View (Mail)Current View, Arrangement, Layout, People Pane, and Window
Home (Calendar)New, Go To, Arrange, Manage Calendars, Share, and Find
Send/Receive (Calendar)Send and Receive, Download, Preferences
Folder (Calendar)New, Actions, Share, and Properties
View (Calendar)Current View, Arrangement, Color Layout, People Pane, and
Window
Home (Contacts)New, Delete, Communicate, Current View, Actions, Share, Tags,
and Find
Send/Receive (Contacts)Send and Receive, Download, and Preferences
Folder (Contacts)New, Actions, Share, and Properties
View (Contacts)Current View, Arrangement, Layout, People Pane, and Window
Home (Tasks)New, Delete, Respond, Manage Task, Follow Up, Current View,
Actions, Tags, and Find
Send/Receive (Tasks)Send and Receive, Download, and Preferences
Folder (Tasks)New, Actions, Clean Up, Share, and Properties
View (Tasks)Current View, Arrangement, Layout, People Pane, and Window


Access 2010 Ribbon Tabs
Ribbon Tab NameCommand Groups
HomeViews, Clipboard, Sort and Filter, Records, Find, and Text
Formatting
CreateTemplates, Tables, Forms, Reports, and Macros and Code
External DataImport and Link, Export, and Collect Data
Database ToolsMacro, Relationships, Analyze, Move Data, and Add-Ins


>


>
dummies


Source:http://www.dummies.com/how-to/content/microsoft-office-2010-for-dummies-cheat-sheet.html

Creating a Table in AutoCAD 2007

You don't know the meaning of the word tedious unless you've tried to create a column-and-row data table in older versions of AutoCAD with the Line and DTEXT commands. AutoCAD's table object and the TABLESTYLE (TS) and TABLE (TB) commands for creating it make the job almost fun.


You control the appearance of tables — both the text and the gridlines — with table styles (just as you control the appearance of standalone text with text styles). Use the TABLESTYLE command to create and modify table styles. Follow these steps to create a table:


1. Choose Format --> Table Style.


The Table Style dialog box appears.


2. In the Styles list, select the existing table style whose settings you want to use as the starting point for the settings of your new style.


For example, select the default table style named Standard.


3. Click the New button to create a new table style that's a copy of the existing style.


The Create New Table Style dialog box appears.


4. Enter a New Style Name and click Continue.


The New Table Style dialog box appears.


5. On the Data tab, specify settings for the data text and gridlines (that is, for all cells except the column heads and the table title).


The settings you are likely to want to change are Text Style, Text Height, and perhaps either Text Color or Grid Color. (If you leave colors set to ByBlock, then the text and grid lines will inherit the color that's current when you create the table. That color will be the current layer's color.)


6. Repeat Step 5 for the Column Heads tab and the Title tab.


7. Click OK to close the New Table Style dialog box.


The Table Style dialog box reappears.


8. (Optional) Select your new table style from the Styles list, and then click Set Current.


Your new table style becomes the current table style that AutoCAD uses for future tables in this drawing.


9. Click Close.


The Table Style dialog box closes. Now you're ready to create a table.


In AutoCAD 2007, you can access the Table Cell Format dialog box directly from the Title, Column Head, or Data tabs of the New Table Style dialog box. The Table Cell Format dialog provides a number of additional options for formatting cells by data type.


AutoCAD stores table styles in the DWG file, so a style that you create in one drawing isn't immediately available in others. You can copy a table style from one drawing to another with the DesignCenter palette.


dummies

Source:http://www.dummies.com/how-to/content/creating-a-table-in-autocad-2007.html

Improving Your Relationship For Dummies


>


Using Listening Techniques to Improve Your Relationship


Improving communication is a key part of improving your relationship. In fact, it’s the single most significant improvement you can make. To be an effective communicator, you have to be a good listener first. Take these key concepts on board:


  • Attending: This means showing that you’re paying attention. You can do that by ensuring that your body language is open and that you’re facing your partner, and by giving good eye contact. Also nod your head to show you’re listening, and provide minimal verbal cues such as uttering ‘uh, um’ at key points.


  • Restating: If your partner has said something particularly important, demonstrate your understanding by repeating it back – ‘So you’re saying you want me to pick up the kids on the way back from work tomorrow.’


  • Clarifying: If you’re not sure that you’ve understood something, ask for clarification – ‘So are you saying you want me to pick up the kids on the way back from work tomorrow?’


  • Summarising: When you’ve shared a lot of information, you can draw together the main threads to show that you’ve got the full story – ‘So you’re going to have a really stressful day tomorrow and you’re worried about finishing on time, so you want me to pick up the kids on the way back from work.’


  • Encouraging: To demonstrate that you want to listen and you want to hear more, use minimal encouragers to keep your partner flowing. For example, say something like ‘And then what happened?’ or ‘In what way?’ or simply ‘Go on.’


  • Being quiet: Make sure that you don’t do all the talking. Give plenty of space for your partner to speak, and allow quiet times when she can think about what she wants to say next. While this is happening, make sure that you don’t get distracted and start fidgeting or writing tomorrow’s shopping list, but continue to attend physically.


>


>


>


Identifying Facets of Relationship Intimacy


When thinking about intimacy and the areas of your relationship that you want to improve, considering exactly what kind of intimacy you want more of can be helpful. The five facets of relationship intimacy are:


  • Emotional intimacy: Being similar in your emotional expression. That may mean crying or shouting at the same sorts of things or that both of you are equally sensitive or robust to emotion.


  • Intellectual intimacy: Being on the same wavelength. You share thoughts and ideas and feel able to understand each other’s thought processes.


  • Physical intimacy: Being close physically and sharing a meaningful connection through mutual touch, sensuality and sexual pleasure.


  • Recreational intimacy: Being able to laugh, relax and have fun together through similar needs and interests in non-essential pursuits.


  • Spiritual intimacy: Being able to share the big stuff with similar levels of passion and fervour. That may be religion, politics, environmental issues, human rights, animal rights or even sharing a passionate belief in nothing at all.


>


>


>


Dealing with Anger in a Relationship


We all get angry with our partners from time to time. Try the following tips to help you to minimise the destructive effects of anger on you and your relationship:


  • Address anger immediately. When you first start noticing the signs of anger, ask your partner what’s happening. Leaving an angry person to nurse her hurt makes things worse, not better.


  • Keep calm. Anger fuels anger, so the calmer you can remain, the quicker your partner’s anger subsides. Shouting at a partner in a rage escalates her anger, and joining a passive aggressive partner in sulking can make the situation continue for ever.


  • Acknowledge your partner’s feelings. Openly saying ‘I can see you’re angry’ and, if appropriate, ‘I understand you’re angry about . . . ’ prevents your partner from feeling that she has to prove how she feels either by throwing her weight around or retreating into silence.


  • Show that you’re listening. People often continue to be angry because they don’t think they’re being listened to or taken seriously. Use active listening techniques to be sure that your partner feels heard.


  • Share your feelings. If you’re feeling angry too, then say so. If you’re feeling nervous, upset or frustrated by your partner’s anger, then share that also. This is especially important with passive aggression, when a partner may want to deny that her behaviour has any impact on you.


  • Be conciliatory. Behave in a way that demonstrates that you want to make peace. That may mean saying you’re sorry or acknowledging your role in a problem, or reaching out physically.


  • Use the broken record technique. Someone in the middle of a rage often jumps from one point to another without taking time to listen to what you’re saying, and someone who’s passive aggressive may continue to make the same jibe over and over again.


    The broken record technique can help you to stick to your guns, and to the point. Simply repeat, calmly but assertively, what you want to say. For example, ‘This was a misunderstanding, I didn’t mean what I said the way you heard it’ or ‘I know you’re angry, but I can’t change my work commitments.’


  • Try fogging. This is a helpful technique to fend off unreasonable criticism, whether that’s through the nagging of passive aggression or in the midst of an angry outburst. Rather than arguing with your partner, you take the wind out of her sails by agreeing in part, or fogging.


    For example, if your partner’s accusing you of being selfish all the time, say, ‘I agree that sometimes I don’t think about the impact things have on you and I should try harder.’ Or if she’s angry with you for being late, you can say, ‘I’m sorry I was unavoidably late, and I should have rung you earlier to let you know.’


  • Make a negative assertion: When criticism’s deserved, however it’s expressed, you may often be tempted to become defensive or try to justify yourself. Negative assertion stops an argument in its tracks by calmly and seriously agreeing with what’s been said. You say, ‘You’re right, I was wrong, I shouldn’t have . . . ’


>


>


>


Rules for Effective Communication


Communicating effectively is the keystone to any relationship. Use the tips in this list to make sure your message gets across – and to help you listen to what you’re being told.


  • Be clear on the objective of the conversation: Before you open your mouth, make sure that you know why you’re doing so. No communication is effective unless you know what you’re hoping to achieve by it.


  • Choose your timing: Make sure that you’re both as relaxed as possible, have plenty of time and can’t be interrupted.


  • Stick to the matter in hand: Don’t try to get everything of your chest at once. Keep focused on the issue you need to deal with.


  • Avoid starting sentences with ‘You . . . ’: Don’t start out with an accusation – or by sounding as though you’re making one.


  • Never say never or always: Categorical statements are provocative and unlikely to be true. Cut them out.


  • Watch your shoulds and shouldn’ts: Unless you honestly believe that you have the right to take the moral high ground and preach to your partner, don’t do it


  • Don’t interrupt: Even if you’re 100 per cent sure that your partner’s got nothing else worth saying, keep shtum and let him finish. If you want your partner to become a better talker, then first you must become a better listener.


  • Stay calm or postpone the conversation: When people get angry, reason tends to disappear. Relax or take a time out.


  • Avoid sarcasm, monologues or mind reading: Don’t try to manipulate the situation to your advantage. If you speak to your partner or act in a way that you’d never dream of doing with your boss, then ask yourself why.


  • Express your feelings as well as your opinions: Saying that you feel unvalued when he’s late explains not just what the problem is, but the effect that the problem is having on you.


>


>
dummies


Source:http://www.dummies.com/how-to/content/improving-your-relationship-cheat-sheet.html

Simple Ideas for Thanksgiving Decorating

Even though Thanksgiving conjures up images of pilgrims and Indians, you can choose from a variety of colors and styles aside from this traditional theme for decorating. Choose from the many colors, items, and accent pieces in the following table to get ideas or inspiration for your Thanksgiving decorating.


Because Thanksgiving is centered around celebrating a bountiful harvest, preserved flowers and displays of fruit fit into the decorating scheme. Although you may not like the idea of decorating with potatoes or rhubarb, you can refer to their colors when choosing accessories or accent pieces. Of course, if you want to decorate with sweet potatoes, don’t let anyone stop you!


Inspiration Pieces for Thanksgiving
ColorsFabricsBotanicalsAccent Items
Deep tones of reds or winesVelvetsPumpkins and gourdsWoven baskets
BrownsChenilleAutumn LeavesWreaths made of natural materials such as vines, wheat, leaves,
twigs, or berries
Purples in eggplant or grapeHeavy cottonsTwigsMetals in antiqued gold, bronze, or rust finishes (pewter is
pretty for this holiday as well)
Greens: from deep sage to light pearFleeceSheaves of wheatEarthenware
Golds: from bright yellows to antiqued goldTweedsNutsCandles in pillars, tapers, or votives
Creams: from ivory to whiteFlannelsChrysanthemumsPilgrims
Oranges: from pumpkin to sweet potatoWoolsRosesNative American Indians

TapestriesFruit: pomegranates, cranberries, grapes, blackberries,
kumquats, apples pears
Cornucopias


Vegetables: corn, rhubarb, sweet potatoes, beets, squashes


dummies

Source:http://www.dummies.com/how-to/content/simple-ideas-for-thanksgiving-decorating.html

Capital Gains Tax in Australia

If you sell things like shares, real estate, works of art, or other assets that you acquired after 19 September 1985, you may be liable to pay capital gains tax. Here’s what you may have to pay as part of your Australian taxes:


  • Assets held less than 12 months: 100 per cent of gain assessable


  • Assets held more than 12 months: 50 per cent of gain assessable


  • Main residence and car: Exempt from capital gains tax


dummies

Source:http://www.dummies.com/how-to/content/capital-gains-tax-in-australia.html

Contemporary Furniture Styles

The Modern or Contemporary design age in furniture begins roughly with the start of the 20th century. Following are the most popular Contemporary furniture styles created after 1800 — sleek designs that prompted the move from the more ornate Historic style.


  • Shaker (1830-1850): Shaker furniture designs are plain in appearance, stripped to bare essentials (few turnings, no decorations), featuring natural materials; no ornamentation; strong emphasis on function.


  • Gothic Revival (1851-1914): Gothic Revival furniture emphasized natural materials. Designs based on nature. Handcrafting versus machine-made. Arched-top chair crests, rails and knobs, and lots of turnings show up today in side chairs for the dining room and kitchen.


  • Adirondack (1890s-present): Rustic, natural, often made of bark-covered logs or simple planks. Look for junk shop finds when in the country (for authenticity), or purchase hand-made new versions of these comfy furnishings, which translate into today’s Lodge Look that also contains Western motifs and icons.


  • Art Nouveau (circa 1900): The first new style not using any historical reference was based on flowing lines of leaves and vines and influenced by Japanese art.


  • Arts and Crafts/Mission in America (circa 1900): Simple designs executed in natural wood. Emphasized hand craftsmanship, quality materials, and strong, clean lines. Also called Golden Oak. Widely seen in today’s Stickley chairs and other furniture that uses the same designs as earlier origins.


  • Art Deco (1918-1939): Fashion-oriented. Influenced by primitive art and cubism. More color, pattern, and grand ornamentation, including motifs such as zigzags, electricity bolts, and skyscrapers. Often seen today in headboards and accent chairs.


  • Bauhaus (1919-1933): Design based on unifying art and technology. Little ornamentation. Function, form, and materials (metal tubing, glass, and other technological, machine-made materials) most important. Emphasis placed on machine-made, efficient production.


  • International Modern (1925-1947): No regional influences, historic references, ornamentation, or unnecessary elements is what made Modern furniture so radical in its time. Details come from the interesting use of modern materials. Emphasis is on machine-age technology — the house as a machine for living.


  • High Tech (1980-1990s): Emphasis on exploitation and exposure of elements of science and technology for home use. Shows the construction of the interior. Uses industrial materials for the home. Electronic and space age details important. Celebrates and makes room for the machine.


  • Contemporary: Contemporary combines influences, trends, and new technologies without strict adherence to any one design philosophy. Current trends include designs that blend styles and periods but are streamlined for today’s taste.


    >

    Contemporary furnishings blend traditional styles with modern lines. [Credit: www.officeinstallatio>

    Credit: www.officeinstallationservices.com>

    Contemporary furnishings blend traditional styles with modern lines.


>
dummies

Source:http://www.dummies.com/how-to/content/contemporary-furniture-styles.html

Building Rapport with Your Job Interviewers

When it comes to interviews, it’s not only what you say but how you say it. Use these quick reminders to work on how you come across as a whole, helping you to make a positive and lasting impression.


  • Remember to focus on both what you say and how you say it.


  • Keep in mind that first impressions really do count.


  • Demonstrate that you are listening to the interviewers.


  • Be ready to make small talk.


  • Use your body language to good effect.


  • Never underestimate the power of smiling.


dummies

Source:http://www.dummies.com/how-to/content/building-rapport-with-your-job-interviewers.html

Five Easy Pieces for the iPad, iPod touch, or iPhone

The iPad, iPod touch, or iPhone function similarly. To master using your iPad, iPod, or iPhone, become a pro at the following tricks and techniques.


  • “Hey! Ba-Ba-Reset!”: To reset the iPad, iPod touch, or iPhone system, press and hold the sleep/wake button and the home button at the same time for at least ten seconds, ignoring the “Slide to Power Off” message, until the Apple logo appears.


  • *“Room to Zoom”: To zoom into a web page, photo, or map, spread two fingers apart on the screen (unpinch). To zoom into a column of text, double-tap. To zoom out, bring your fingers together on the screen (pinch), or double-tap.


  • *“(I Been) Searchin’”: Press the home button on the first Home screen, or tap the search icon, or flick the first Home screen with your finger to the right, to show the Spotlight Search screen.


  • *“Copying, Pasting, Hoping”: To copy a section of text (such as from a web page), touch and hold inside the section so that it is highlighted with handles on either end and the Copy bubble appears, and then tap Copy. To paste, touch and hold the insertion point to magnify the view so that the Paste bubble appears, and then tap Paste.


  • “It’s Only Flick and Scroll (But I Like It)”: To scroll a list or screen, drag the screen with your finger or, for faster scrolling, flick the screen up or down. To switch from one screen to another, swipe the screen with your finger from left or right.


dummies

Source:http://www.dummies.com/how-to/content/five-easy-pieces-for-the-ipad-ipod-touch-or-iphone.html

Common Editing Command Shortcuts in Excel 2007

As an alternative to using the ribbon in Excel 2007, these shortcut keystrokes (Alt + hot key) get you moving quickly through basic spreadsheet editing functions.


Hot KeysExcel Ribbon CommandFunction
Alt+HVPHome | Paste | PastePastes the currently cut or copied cell selection or graphic
objects in the worksheet
Alt+HXHome | CutCuts the cell selection or selected graphic objects out of the
workbook and places them on the Windows Clipboard
Alt+HCHome | CopyCopies the cell selection or selected graphic objects to the
Windows Clipboard
Alt+FPHome | Format PainterActivates the Format Painter
Alt+FOHome | Clipboard Dialog Box LauncherDisplays and hides the Clipboard task pane
Alt+HIIHome | Insert | Insert CellsOpens Insert dialog box so you can indicate the direction in
which to shift existing cells to make room for the ones being
inserted
Alt+HIRHome | Insert | Insert Sheet RowsInserts blank rows equal to the number of rows in the cell
selection
Alt+HICHome | Insert | Insert Sheet ColumnsInserts blank columns equal to the number of columns in the
cell selection
Alt+HISHome | Insert | Insert SheetInserts a new worksheet in the workbook
Alt+HDDHome | Delete | Delete CellsOpens Delete dialog box so you can indicate the direction in
which to shift existing cells to replace the ones being
deleted
Alt+HDRHome | Delete | Sheet RowsDeletes rows equal to the number of rows in the cell
selection
Alt+HDCHome | Delete | Sheet ColumnsDeletes columns equal to the number of columns in the cell
selection
Alt+HDSHome | Delete | SheetDeletes the current worksheet after warning you of data loss if
the sheet contains cell entries
Alt+HEAHome | Clear | Clear AllClears the contents, formatting, and comments from the cell
selection
Alt+HEFHome | Clear | Clear FormatsClears the formatting of the cell selection without removing
the contents and comments
Alt+HECHome | Clear | Clear ContentsClears the contents of the cell selection without removing the
formatting and comments
Alt+HEMHome | Clear | Clear CommentsClears all comments in the cell selection without removing the
formatting and contents


dummies

Source:http://www.dummies.com/how-to/content/common-editing-command-shortcuts-in-excel-2007.html

Prerequisites for Lion Server’s iChat Service

Before you set up iChat service, you need to take care of several network items. Quite likely, your network already has some of these things.


Open Directory configuration


To authenticate users, iChat uses Open Directory (or another Lightweight Directory Access Protocol [LDAP] server) bound to iChat Server. iChat Server doesn’t directly access the LDAP server. iChat users must have directory accounts in a directory domain.


You also need an Open Directory master if you want to enable authentication with Kerberos or to use a Kerberos domain controller on another server. If you use the latter, the Kerberos realms of the controller and iChat Server must match.


Firewall ports


If your iChat users are crossing a firewall to get to the server, you have to open some firewall ports. This is true for any service, but iChat requires a relatively large number of firewall ports to be open.


Internet routers


If you want Internet users to access iChat service on your server and you have a DSL, cable router, or other Internet router, you need to configure it for port forwarding.


DNS configuration for some situations


You may not need to do anything to your DNS server to support iChat service. But you could optionally add DNS records in two cases:


  • You’re enabling server-to-server communications so that your server talks to other chat servers. DNS can help users on different servers discover each other.


  • You want to provide your users with a shorter iChat address.


In either case, you’d add a service locator (SRV) record for iChat to your DNS server.


To have DNS control connections between your iChat Server and other XMPP servers, you’d add an SRV record that maps the XMPP’s TCP port 5269 to your server hostname. The SRV record takes the form


_xmpp-server._tcp 86400 IN SRV 0 1 5269 server.mycompany.com

where server.mycompany.com is your server’s full domain name.


The other SRV records enable users to have a shorter iChat address (such as bobsmith@mycompany.com) instead of using the server’s full hostname (such as bobsmith@server.mycompany.com). The DNS record would look like this, specifying port 5222:


_xmpp-client._tcp 86400 IN SRV 0 1 5222 server.mycompany.com

If you’re using Lion Server for your DNS service, when you create a new SRV record with Server Admin, type xmpp-client._tcp in the Service Type field. 0 and 1 are the Priority and Weight entries.


dummies

Source:http://www.dummies.com/how-to/content/prerequisites-for-lion-servers-ichat-service.html

Understanding Turtles and Tortoises

When you think of turtles, do you think of the tiny quarter or half-dollar-sized turtles that used to be sold in pet stores (and in some places still are)? If so, you're not alone. That image is the one that comes to mind when many people think of turtles. However, those tiny little turtles (most of whom died shortly after their purchase) are only one of many different types of turtles and tortoises, many of which can be long-lived, healthy, hearty pets.


So what's the difference?


Turtles and tortoises are known as chelonians, from the Greek word for "tortoise," chelona. Chelonian refers to all turtles and tortoises, no matter whether they live in the ocean, in fresh water, or on land.


  • The term turtles applies to chelonians that live in or around water. Sea turtles, for example, never leave the ocean except to lay their eggs. Other turtles are more or less aquatic, depending on their species. The sliders, mud, bog, and leaf turtles are all found close to fresh water. Terrapins are aquatic turtles that people frequently eat. Many terrapins live in and close to brackish salt water. Box turtles are primarily terrestrial (land roving) but are almost always found within walking distance of water. See Figure 1 for an example of a turtle.

  • The term tortoise refers to chelonians that live on land and rarely venture into water except to drink or bathe. Tortoises range in size from tiny little guys weighing less than 1 pound to gigantic, weighing over 600 (or more) pounds. Size aside, tortoises have many things in common. They are primarily herbivores (plant eaters), although many will scavenge, given the chance. Tortoises also usually have hard shells, often with high domes, to help protect against predators. Take a look at Figure 2.

Although more than 250 different species of chelonians exist, many are impossible to keep as pets. Think of the size aquarium and the filtration system you would need to keep a 200-pound green sea turtle! However, many species of turtles and tortoises do quite well in captivity and make good pets.


>


Figure 1: A turtle.

>


Figure 1-2: A tortoise.

Life in the original mobile home


Turtles and tortoises are in the reptile family, which means that they are ectothermic, or cold-blooded. Cold-blooded animals rely on external heat sources, such as warm ground, hot rocks, or sunshine, to warm their bodies. Turtles are the original sun worshippers and can often be found sleeping on rocks or logs, soaking up the sun's rays.


Premium shell-ter


All turtles and tortoises share a similar characteristic: their shell. No other animal on Earth has a shell quite like this. A turtle's shell is a boxlike exoskeleton (a word that refers to a part of an external skeleton) with the spine and ribs fused to the top shell. These bones are, in fact, a part of the carapace, or top shell. The shell itself is made of bone, and the outer covering of the shell is made of keratin, much like human fingernails.


Each shell is made up of sections called scutes. As the turtle grows, new layers of keratin are formed around the outer edges of each scute, looking much like the growth rings of a tree. Some people count each of these rings in an effort to tell how old a turtle may be. This can give only a rough idea, however, because just like a tree, if food is plentiful a turtle may have two growth spurts per year, or in a bad year may grow very little. Also, as a turtle gets older, the shell becomes worn and smooth, and the rings may be difficult to see.


Got protection?


The type of shell and the degree of protection offered by the shell are based on the turtle's lifestyle and habitat. Sea turtles, for example, have a light, streamlined shell covered by a leathery skin. Freshwater turtles usually have a hard shell, but in some species, it's too small to protect the entire body. Land turtles and tortoises that rely on the shell for protection have a hard, domed shell.


Many turtles and tortoises can pull in all four legs and their head so that the shell protects them from predators. When a turtle pulls its head into its shell for protection, its neck either folds to the side or into a vertical S shape, and the skin of its neck bunches up — hence the name turtleneck for shirts and sweaters with bunched-up necks.


With many species, the outer skin of the legs is hard, rough, and, in some tortoises, armored, giving the turtle even more protection. The skin on the legs of tortoises is hard, with scales made of keratin protecting it. Some of the keratin scales are quite large and pronounced; on some species, the scales create spurs or spikes that help protect the tortoise from predators and also help desert tortoises retain water. Because aquatic turtles usually dive into water when threatened, their skin is much softer with fewer protective scales. Most turtles and tortoises have five toes (although they sometimes have four or as few as three) with hard nails on the toes. Aquatic turtles have webbing between their toes.


Some turtles and tortoises can even close their shell, giving additional protection. Box turtles (hence their name) have a hinge across the bottom shell (the plastron). This hinge can close both front and rear, hiding the turtle completely inside. The muscles holding the shell closed are incredibly tough, and after the hinge is shut, you can't open it without harming the turtle. A type of tortoise can close its shell, too, although not as completely as the box turtle. Hinge-back tortoises have a hinge across the top of their top shell (the carapace) and can close in their back legs, protecting them.


Although the shell, made of bone, seems to be the ultimate protection, it is vulnerable. Predators can chew and break the shell. A larger bird of prey can pick up a small turtle and, flying high, drop the turtle on rocks below, breaking the turtle's shell like an egg. The shell can protect a tortoise from a small, fast-moving wildfire, but larger, hotter fires will kill a turtle or tortoise caught in it. Domestic dog, Fido and Fluffy, have been known to treat turtles like chew toys, with disastrous results!


>
dummies

Source:http://www.dummies.com/how-to/content/understanding-turtles-and-tortoises.html

What Is Spyware, Anyway?

Spyware is software or a software configuration that gathers information about a person or organization without permission or knowledge. Spyware does this often by just peeking, but other times, it spies by changing the configuration of the victim's computer.


An information collector


Spyware can collect information from a user's computer and periodically transmit it to a specific location — usually a server someplace. The method used to collect information may be a built-in feature of the Web browser, a downloaded ActiveX control, a Web browser plug-in, or a standalone executable program.


The type of information collected by spyware may include the following:


  • Tracking Web sites: You may have heard the term adware, which many consider as a subset of spyware. Marketing companies and banner ad providers (many of which are totally legitimate companies) use adware solely to track which Web sites a user visits and whether the user patronizes banner ads. Such information is generally used by marketing companies, which are always trying to separate folks from their money. Some spyware may do more than just track Web site visits, however.

  • Logging keystrokes: Among the diabolical types of spyware are key loggers, vile beasts that actually record every keystroke on a user's computer and transmit them to a hacker's lair. Users who perform online banking and other electronic commerce on computers with key loggers are bound to have their highly sensitive user IDs, passwords, credit cards, and bank account numbers recorded and sent to unsavory individuals.

An information transgressor


Spyware can alter information on a user's computer, such as the browser's default home page, search page, and the HOSTS file (a text file that contains the IP addresses corresponding to specific host names).


Among the types of spyware that change information on your computer is scumware, which is a term describing browser plug-ins that alter the appearance of Web sites, often substituting the Web site's banner ads with its own ads. A Web site might include a banner ad that takes viewers to the Web site owner's Amazon.com affiliate pages, for instance, but the scumware inserts its own banner ads (and those of its advertisers) in place of those that the Web site intended the viewer to see.


Scumware also creates hyperlinks within the text of Web pages that take users to advertisers' pages. For instance, a user may be viewing a Web site for a local merchant. The scumware inserts hyperlinks on certain keywords on the merchant's page (as viewed by the user whose PC has the scumware installed) that lead the viewer away from the merchant's site, perhaps leading to competing Web sites. Usually an ActiveX control, scumware alters the content of a Web page, and it does so by changing (in real time) how the user's browser displays the page.


If you search for instructions for removing spyware, make sure you are following accurate instructions on a trusted Web site.


dummies

Source:http://www.dummies.com/how-to/content/what-is-spyware-anyway.html