Singing: Overcome Performance Anxiety through Preparation

For singers, the biggest key to overcoming alleviating anxiety is preparation. Preparing isn’t the same as overpracticing or aiming for perfection. Overpracticing is practicing so much that you lose sight of the joy of singing and focus only on singing perfectly. Aiming for perfection takes the fun out of singing because everything becomes a contest, if only with yourself.


The following pointers can help get you prepared for performing.


  • Stay positive and motivated as you practice. Figure out a way to motivate yourself. What kind of reward do you need to get yourself to practice regularly? People who don’t like being alone often don’t like to practice. You must recognize that and then be disciplined to do your work. Your positive thinking during your practice sessions carries over into your performance.


  • Set goals for each practice session. The first practice session goal may be to successfully sing through the song without words to find consistent breath flow. The second practice session goal may be to keep that same easy flow of breath as you sing the words. Trying to tackle too many goals at once causes frustration.


  • Practice at the level you intend to perform. You have to practice all the details of your song separately, and then gradually put them all together until you consistently create the sounds that you want to create in your performance.


  • Set a deadline for memorizing the song. Your long-term memory needs to have locked in the melody and words of the song. If you attempt to memorize the song the night before the performance, you may be overwhelmed trying to deal with the excitement of performing and the details of remembering the words at the same time.


    You should have the song memorized at least one week before a performance. You then have seven days to work on the song without looking at the music. If you’re singing a group of songs, you may want to have them memorized earlier so you have time to work with the accompanist and work on your acting objectives as you use your singing technique.


  • Speak quickly through your text to help you remember the words. Forgetting the words of a song that you’ve memorized usually happens because your concentration momentarily slips. For example, you may start thinking about being happy that the high note sounded good and, suddenly, as you’re getting back to business, you have no idea where you are in the song.


    Practicing your concentration and speaking quickly through the text on a regular basis helps you commit the text to your long-term memory, not just your short-term thoughts. After you memorize the text of your song, speak the words aloud quickly without pausing for punctuation.


dummies

Source:http://www.dummies.com/how-to/content/singing-overcome-performance-anxiety-through-prepa.html

ETF Portfolio: “Today and Tomorrow” — A Long Term View

Times change; circumstances change. Your investment portfolio with its ETFs, mutual funds, and individual stocks and bonds needs to keep up with the times.


Suppose you are 45 years old and saving for retirement. Using the 20x rule, you decide that your goal is someday to have a portfolio worth $1.0 million. Your current portfolio has $300,000, so you have a good ways to go.


To get where you want, you realize you need to take some risk, but when you start to approach your goal, you want to lower your risk. After all, at that point, you’ll have more to lose than gain with any market swings. You should model your portfolio today but also have a picture of what your portfolio may look like when you reach, say, $700,000 . . . whenever that is.


Your picture may look something like this:


Today’s $300,000 portfolio


Vanguard Large Cap ETF (VV)20 percent
Vanguard Small Cap ETF (VB)20 percent
iShares MSCI EAFE Index Fund (EFA)30 percent
Vanguard Total Bond Market Fund (BND)20 percent
iShares Barclays TIPS Bond Fund (TIP)10 percent

Tomorrow’s $700,000 portfolio


Vanguard Large Cap ETF (VV)15 percent
Vanguard Small Cap ETF (VB)15 percent
iShares MSCI EAFE Index Fund (EFA)25 percent
Vanguard Total Bond Market (BND)30 percent
iShares Barclays TIPS Bond Fund (TIP)15 percent

By having your portfolio model for today and your picture of what it may look like tomorrow, you’ll always know where you’re heading. Trust Yogi Berra, who said, “If you don’t know where you’re going, you may wind up someplace else.”


dummies

Source:http://www.dummies.com/how-to/content/etf-portfolio-147today-and-tomorrow148-a-long-term.html

HTML References and Resources

You can't go on the Internet without seeing HTML in action, but the Internet is a great place for finding out about HTML, too. The following table lists some valuable online resources for more information about HTML.


NameDescription
HTML TutorialThis W3Schools site provides a complete tutorial and references
on how to use all HTML tags.
W3C Markup Validation
Service
Use this site to check the validity of your HTML. The validator
also checks tags against doctype.
Index
of Elements
Index of all HTML elements with links describing how to use
them.
HTML 4.0
Guidelines for Mobile Access
W3C guidelines for creating HTML4 websites.
href="http://dev.w3.org/html5/spec/Overview.html">HTML5Overview of HTML5 guidelines.
HTML5 Demos and
Examples
Several good examples of how to use HTML5 for specific
applications, complete with browser compatibility.
href="http://www.w3schools.com/html5/html5_reference.asp">HTML5 Tag
Reference
A complete reference of HTML5 tags and how to use them.
The Great
WebKit Comparison Table
A chart of WebKit HTML tags and which devices support
them.


dummies

Source:http://www.dummies.com/how-to/content/html-references-and-resources.html

Helping Your Dog Battle Fleas, Ticks, and Worms

Parasites are the ultimate opportunists, living on the skin, in the intestine and just about anywhere they can gain a foothold. Luckily, with the excellent veterinary preventive medicine programs available today, our dogs don't have to suffer parasitic infections any more.


Fleas


Fleas are the bane of a dog's existence. They make him itch, itch, itch. And the more a dog scratches, the itchier he seems to get. These irritating insects can cause itching in two different ways. First, they bite on a big chunk of skin and start sucking blood. They stay at one spot until they are full, or hop around, drinking at many different sites. Worse, they often bite in thin-skinned, sensitive areas such as near the ears, at the base of the tail, and in the groin area. Flea bites are irritating enough, but many dogs actually develop an allergic reaction to the saliva of the fleas, and they become extremely itchy all over, even with the bite of only one flea. Sometimes the allergy is so severe that a dog will chew at himself until he loses big patches of hair, bleeds, and ultimately develops thick, crusty skin, especially on his feet, at the base of his tail, and around his back legs.


If you see your dog scratching vigorously or biting aggressively at himself, it's time for a bug check. Start by looking around your dog's ears, at the base of his tail, and on his tummy. Part the hair and look for brown, flat, oval bugs about 1/8 inch long. Keep your eyes peeled because a startled flea can jump quickly into the air and land several inches away. Frequently you won't actually see a flea, but you can see flea dirt stuck in the dog's hairs. This "dirt" is flea excrement, a crumbly black material that consists mainly of digested blood. You can identify flea dirt by placing a drop of water over the dirt, letting it soak up the water for a minute or two, and then smearing the dirt on a piece of white paper towel. A reddish smear confirms that it is, in fact, flea dirt.


If you identify a flea or flea dirt, leap into action. The only thing that will give your dog relief is ridding his body and your house of those pesky pests. With the many safe anti-flea products that are available today, there is no longer any reason for your dog to suffer.


Fleas are especially fond of cats, so if you share your digs with an animal of the feline persuasion, be sure to include her in your flea prevention and treatment protocol.


Ticks


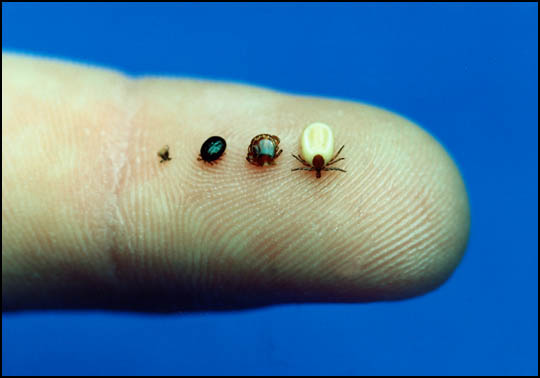
Ticks are major pests not only because they can bite your dog and cause local skin irritation, but because they carry a host of other pesky germs that can make both you and your dog sick. Ticks live on long grasses and shrubs, and they have a sticky substance on their bodies that enables them to easily cling to the fur of passing animals such as your dog. They then crawl down the hair to the skin and latch on, taking a big bite. They suck blood for hours and even days until they are full to bursting, as shown in Figure 1. During this time, they can transmit whatever infectious organisms they happen to be carrying.


Figure 1: From right to left: An engorged adult deer tick, an adult before attaching to the skin, an engorged nymph (young tick), a nymph before it has attached. Both adults and nymphs can transmit Lyme disease.

>

Photograph courtesy of Fred Dubbs

If you live in an area where ticks are prevalent (most of the United States except the Southwest and Alaska), it is important that you check your dog for ticks every day, at least during tick season (which is during the spring and summer months). Carefully remove every tick you find.


If your dog enjoys the outdoors (and most dogs do), apply a product that prevents ticks from attaching to the skin. Be sure to get advice from your veterinarian on which product is best, because new products enter the market all the time. Also, continue to check your dog from head to toe every time he comes in from outside. The places you're most likely to find ticks are around your dog's face, eyes, and ears, although they really can be anywhere. Be sure to look inside the ears, too!


Worms


Dozens of kinds of worms can set up shop in your dog's body, often in the intestine. Puppies are especially susceptible to infections with worms, because some species of worms are transmitted from the mother before the puppy is even born. This is why deworming puppies is so important.


The general level of care for our dogs these days is so high, however, that adult dogs rarely have problems with worms. Nonetheless, it is a good idea to bring a fecal sample to your annual veterinary visit for the first few years of your dog's life, just to be sure.


If you adopt a dog from a shelter or find a stray, be sure to have him checked for worms, because you won't know whether he has had adequate veterinary care from puppyhood.


>
dummies

Source:http://www.dummies.com/how-to/content/helping-your-dog-battle-fleas-ticks-and-worms.html

Estimating How Much Yarn to Buy

You need to know how much yarn to buy whenever you start a new knitting or crocheting project. You can figure out the yardage by using yarn calculations, whether you’re substituting one yarn for another in a pattern or whether you just have a general sense of what you’d like to knit.


If you’re using the yarn called for in a pattern, the pattern usually tells you how many balls to buy for each size.


However, if you choose to use a yarn different from the pattern’s suggestion, you may need to do a little calculating:


  • Number of skeins called for in the pattern × yards per skein = total yards needed for the pattern


  • Total yards needed for the pattern ÷ yards per skein of your chosen yarn = number of skeins you need (round up to the nearest whole number, if necessary)


If you aren’t working directly from a pattern or are working at a different gauge than a pattern recommends, you don’t have a tidy way to determine how much yarn to buy. Estimate how much you need. This table gives yardage approximations for various projects in a variety of gauges.


Estimated Yardage of Yarn for Projects
Yarn Weight CategoryStitches per InchYards Needed for a HatYards Needed for a ScarfYards Needed for an Adult Sweater
1 Superfine7 to 8300 to 3753501,500 to 3,200
2 Fine6 to 7250 to 3503001,200 to 2,500
3 Light5 to 6200 to 3002501,000 to 2,000
4 Medium4 to 5150 to 250200800 to 1,500
5 Bulky3 to 4125 to 200150600 to 1,200
6 Super bulky1.5 to 375 to 125125400 to 800

Patterns usually call for a little more yarn than you’ll actually use, but because you want to swatch and account for the unknown (you actually hate three-quarter sleeves, or you've had some terrible yarn accident), buy a little extra yarn, particularly if it’s being discontinued. A ribbed or cabled pattern takes more yarn than stockinette stitch, and your knitting may vary.


dummies

Source:http://www.dummies.com/how-to/content/estimating-how-much-yarn-to-buy.html

Before Your Dog Photo Shoot Session

A photo shoot starts before you even take your camera out of the bag! Thinking through your session and mentally preparing for what’s ahead helps ensure that everything runs as smoothly as possible. When working with dogs, don’t underestimate the importance of the pregame!


The first thing you want to do is make a game plan. Doing so is especially important if you’re photographing someone else’s pooch, but thinking through your plan even when you’re working with your own dog can help make your experience a successful one.


Figure out ahead of time how things are going to work. Think about your dog specifically and what sort of flow makes the most sense. You can even draw up an outline, noting specific shots you don’t want to miss. Keeping some structure helps and adds a level of calmness to the shoot.


You may not have total control over your dog, but you do have control over your own actions. Don’t forget to think through contingency and alternative plans (for example, what happens if the park you thought was going to be empty isn’t, or your dog suddenly doesn’t like the treats that you’ve stuffed in your pockets?).


After you have a plan, familiarize yourself with the photo shoot’s location. You’ll probably use a location you already know, like your own house or yard, but if you want to use a public place, make a trip there ahead of time without your dog.


Pay attention to the quality of light, available backgrounds, and amount of traffic. Spend some time scouting out different angles (don’t forget to get low, because that’s where the dog is). Know where things are and what’s allowed. If you can’t make a special trip, spend a few minutes before you start photographing to get oriented to the lay of the land.


Even if you’re in your own home, looking around the house through the eyes of a photographer (sounds fancy, doesn’t it?) is a good idea. You’ll probably be surprised at the ideas that come to you or the things you notice that you hadn’t noticed before.


(And if anyone starts asking why you’re crawling around from room to room on all fours, tell them to “stop interrupting your creative process” and keep going.)


dummies

Source:http://www.dummies.com/how-to/content/before-your-dog-photo-shoot-session.navId-323785.html

Network Administration: NTCP/IP Standards and RFCs

The TCP/IP protocol standards that define how the Internet works are managed by the Internet Engineering Task Force (IETF). However, the IETF doesn’t impose standards. Instead, it simply oversees the process by which ideas are developed into agreed-upon standards.


An Internet standard is published in the Request for Comments (RFC) document. When a document is accepted for publication, it is assigned an RFC number by the IETF. The RFC is then published. After it’s published, an RFC is never changed. If a standard is enhanced, the enhancement is covered in a separate RFC.


At the time of this writing, more than 3,500 RFCs were available from the IETF website (www.ietf.org). The oldest RFC is RFC 0001, published in April, 1969. It describes how the host computers communicated with each other in the original ARPANET. The most recent RFC (as of February, 2010) is RFC 5777, a proposed standard entitled “Traffic Classification and Quality of Service (QoS) Attributes for Diameter.”


Not all RFCs represent Internet standards. The following paragraphs summarize the various types of RFC documents:


  • Internet Standards Track: This type of RFC represents an Internet standard. Standards Track RFCs have one of three maturity levels, as described in the following table. An RFC enters circulation with Proposed Standard status but may be elevated to Draft Standard status - and, ultimately, to Internet Standard status.


Maturity Levels for Internet Standards Track RFCs
Maturity LevelDescription
Proposed StandardProposed standards are generally stable, have resolved known
design choices, are believed to be well understood, have received
significant community review, and appear to enjoy enough community
interest to be considered valuable.
Draft StandardDraft standards are well understood and known to be quite
stable. At least two interoperable implementations must exist,
developed independently from separate code bases. The specification
is believed to be mature and useful.
Internet StandardInternet Standards have been fully accepted by the Internet
community as highly mature and useful standards.


  • Experimental specifications: These are a result of research or development efforts. They’re not intended to be standards, but the information they contain may be of use to the Internet community.


  • Informational specifications: These simply provide general information for the Internet community.


  • Historic specifications: These RFCs have been superceded by a more recent RFC and are thus considered obsolete.


  • Best Current Practice (BCP): RFCs are documents that summarize the consensus of the Internet community’s opinion on the best way to perform an operation or procedure. BCPs are guidelines, not standards.


RFCs for Key Internet Standards
RFCDateDescription
768August 1980User Datagram Protocol (UDP)
791September 1981Internet Protocol (IP)
792September 1981Internet Control Message Protocol (ICMP)
793September 1981Transmission Control Protocol (TCP)
826November 1982Ethernet Address Resolution Protocol (ARP)
950August 1985Internet Standard Subnetting Procedure
959October 1985File Transfer Protocol (FTP)
1034November 1987Domain Names — Concepts and Facilities (DNS)
1035November 1987Domain Names — Implementation and Specification
(DNS)
1939May 1996Post Office Protocol Version 3 (POP3)
2131March 1997Dynamic Host Configuration Protocol (DHCP)
2236November 1997Internet Group Management Protocol (IGMP) (Updates RFC
1112)
2616June 1999Hypertext Transfer Protocol — HTTP/1.1
2821April 2001Simple Mail Transfer Protocol (SMTP)


dummies

Source:http://www.dummies.com/how-to/content/network-administration-ntcpip-standards-and-rfcs.html

Reading and Replying to Outlook E-Mail

Outlook has several of ways of telling you when you have an email message that you haven't read:


  • The Status Bar in the bottom left corner of the Outlook screen tells you how many email messages you have overall and how many of those you haven't read.

  • The word Inbox in the Folder List changes to boldface type when you have unread email.

  • When you look in the Inbox, you see titles of unread messages in bold.

  • When you log on to Windows XP, you see a little notice about unread messages.

Reading a message


To open and read an email message, follow these steps:


1. Click the Mail button in the Navigation Pane (or press Ctrl+1).


The Inbox screen opens, showing your incoming mail.


2. Double-click the title of the message that you want to read.


The message opens, and you can see the text of the message. If the message is really long, press the down-arrow key or the PgDn key to scroll through the text.


3. To close the Message screen, choose File --> Close (or press Alt+F4).


The Message screen closes, and you see the list of messages in your Inbox.


Sending a reply


With email, you can send a reply really easily. You don't even need to know the person's address when you're sending a reply; just click the Reply button and Outlook takes care of it for you.


Here's how you reply to a message:


1. Click the Mail button in the Navigation Pane (or press Ctrl+1).


The Inbox screen opens, showing your incoming mail.


2. Double-click the title of the message to which you want to reply.


The message that you double-click opens, and you can see the contents of the message. (If you already have the message open, you can skip the first two steps and go directly to Step 3.)


3. To reply to the people who appear in the From: line, click the Reply button.


4. To reply to the people who appear in the Cc: line, as well as the From: line, click the Reply to All button.


The Reply screen appears.


You may get (or send) email that's addressed to a whole bunch of people all at one time. You have to name at least one person in the To: line; you can name more than one person in the Cc: line, which is for people to whom you're sending only a copy. Little difference exists between what happens to mail that goes to people in the To: line and mail that goes to the people in the Cc: line — all of them can reply to, forward, or ignore the message. You don't always need to reply to the people on the Cc: line, or you may want to reply to only some of them. If you want to pick and choose whom you reply to from the Cc: line, you have to click the Reply button (not Reply to All) and add them again to the Cc: line.


5. Type your reply in the Message box.


Don't be alarmed when you discover some text already in the text box — it's part of the message to which you're replying. Your blinking cursor appears at the top of the screen, so anything you type precedes the other person's message. (This arrangement means the person who gets your message can review the original message as a memory-jogger when your reply comes back.)


6. Click the Send button.


On your office network, clicking Send speeds the message to its intended recipient.


If you're a standalone user who's sending mail on an online service, such as The Microsoft Network or CompuServe, you have to also choose Tools --> Send/Receive --> Send/Receive All or press F9 to send your message out over the Internet.


7. Choose File --> Close (or press Esc) to close the Message screen.


The Message form disappears and your Inbox reappears.


dummies

Source:http://www.dummies.com/how-to/content/reading-and-replying-to-outlook-email.html

Basic Questions in German

If you travel to a German-speaking country and need to know the time or where something is located, or you just want to get some basic information, a few common questions can come in very handy.


EnglishGermanPronunciation
Do you speak English?Sprechen Sie Englisch?shprêH-en zee êng-lish?
How are you?Wie geht es Ihnen?vee geyt ês een-en?
Would you help me please?Würden Sie mir bitte helfen?vuer-den zee meer bi-te
hêl-fen?
What’s your name?Wie heißen Sie?vee hays-en zee?
What time is it?Wie viel Uhr ist es?vee feel oohr ist ês?
What’s the weather like?Wie ist das Wetter?ee ist dâs vêt-er?
How much does . . . cost?Wie viel kostet . . .?vee feel kos-tet…?
Where do I find . . .?Wo finde ich . . .?voh fin-de iH…?
Where are the bathrooms?Wo sind die Toiletten?voh zint dee toy-lêt-en?
Do you have…?Haben Sie…?hah-ben zee…?
Where is…?Wo ist…?voh ist…?
Could you please talk more slowly?Können Sie bitte langsamer sprechen?kern-en zee bi-te lâng-zâm-er
shprêH-en?
Could you repeat that, please?Können Sie das bitte wiederholen?kern-en zee dâs bi-te
vee-der-hoh-len?


dummies

Source:http://www.dummies.com/how-to/content/basic-questions-in-german.html

Adding Categories to a To-Do List on Your Palm

People who use Palm devices are often busy people with scads of things to do. If you're usually juggling too many tasks to fit on one little screen, you'll find assigning categories to your tasks useful. You can look through them all with a few clicks of the To Do List button. Sooner or later, you'll want to create categories of your own.


Follow these steps to create a new category:


1. With the To Do List open, tap the name of the category in the upper-right corner of the screen.


The list of available categories appears.


2. Tap Edit Categories.


The Edit Categories screen appears.


3. Tap New.


The Edit Categories dialog box opens.


4. Enter the name of the category that you want to add by using either the on-screen keyboard or Graffiti.


5. Tap OK.


The name that you entered appears in the Edit Categories dialog box, and the dialog box closes.


6. Tap OK again.


The Edit Categories screen disappears.


icon

Remember that you're better off if you stick to a few well-used categories rather than dozens of categories that you never look at. A To Do List should focus on the things that you really plan to do; otherwise, you could just call it a "Round Tuit" list — things that you'll do if you ever get around to it.


dummies

Source:http://www.dummies.com/how-to/content/adding-categories-to-a-todo-list-on-your-palm.html

How to Repair Laminate Countertops

Laminate countertops are pretty durable, but they can get nicked and scratched. They can even bubble. But you can fix these minor imperfections and even remove stains. If you have a countertop with a lot of damage in one area, you can repair it by cutting out a bad section and replacing it with a cutting board or glass insert, glue down lifted edges and corners, and take care of small stains and scratches.


A sharp knife is great for preparing food, but if it slips, you end up with small cuts or chips in the countertop. You can fill small holes with a product called SeamFit, available in about 20 colors. If you or someone you know is good at blending colors, you can come up with the shade you need by mixing your own. The product has a satin finish when it dries, but there’s a gloss additive for surfaces with more shine.


A laminated counter is similar to furniture veneer. Thin sheets of vinyl laminate are glued onto a wood surface. And like veneer, sometimes the bond breaks and the laminate forms bubbles or the edges pop loose. You can reactivate the adhesive easily.


When a laminated edge lifts, it’s still the glue you should concentrate on. If reactivating the glue doesn’t work, then get a liquid adhesive, a small sheet of wax paper, and a syringe or a knife with a slender blade. Here’s what to do:


  1. Put some glue in the syringe.


    Laminate glue also comes in an aerosol can, which works well for getting under loose countertops but is hard to clean up if the area is oversprayed and not protected with paper and tape. Use it only as a last resort.


  2. Gently lift the loose edge; then with the syringe, push glue under the laminate.


    Another option is to put glue on the knife and insert the knife under the laminate. Spread the glue onto underside of the laminate, and then put more glue on the knife and work it onto as much of the wood as possible.


  3. Immediately put pressure on the edge.


    Be sure you quickly wipe off excess glue, and then wash the side and top of counter and anywhere else the glue might have oozed.


  4. Put the wax paper on the counter; then weight it with books.


    When you’re finished, excess glue can be removed with lacquer thinner on a rag.


dummies

Source:http://www.dummies.com/how-to/content/how-to-repair-laminate-countertops.html

Operators in C# 2008

In order to perform operations in C# 2008, you need, well…operators. The following chart shows you these operators. These symbols determine which operations to carry out in an expression:


PrecedenceOperatorsCardinalityAssociativity
High() [] . new typeofUnaryLeft to right
*! ~ + - ++ -- (cast)UnaryLeft to right
** / %BinaryLeft to right
*+ -BinaryLeft to right
*< <= > >= is asBinaryLeft to right
*== !=BinaryLeft to right
*&BinaryLeft to right
*^BinaryLeft to right
*|BinaryLeft to right
*&&BinaryLeft to right
*||BinaryLeft to right
*?:TernaryRight to left
Low= *= /= %= += -= &= ^= |= <<= >>=BinaryRight to left


dummies

Source:http://www.dummies.com/how-to/content/operators-in-c-2008.html

Tune Your Ukulele to an Audio Clip

The wonders of modern technology provide an opportunity to tune your ukulele to an audio clip on the Internet. For the basic and popular gCEA ukulele tuning, play this track of the ukulele tuning notes and use it to get your ukulele in tune.


Listen to the first note played (g) and play your open g-string (the first one) at the same time. You’re aiming to get the two sounds exactly the same. Twist your uke’s tuner to change the pitch of the string until the note in the clip and the note on your ukulele sound exactly the same. The notes are in gCEA order and each is repeated four times. Repeat the process for each string.


This process takes a bit of practice. Don’t worry if you have to listen to the clip a few times before you feel satisfied with your tuning.


Tune up to a note rather than down to it. Tightening the string makes it less likely to slip. So if you find that your string sounds too high, tune it down so that it sounds lower than the note you’re aiming for. Then tune up until the string is in tune.


dummies

Source:http://www.dummies.com/how-to/content/tune-your-ukulele-to-an-audio-clip.html

Selecting the Correct SAS Product

SAS Institute offers hundreds of SAS products, and sometimes it's difficult to decide which tool you should use for your work. Here is a partial list of SAS products you might encounter and who uses them for what purpose. As a SAS customer, you might use just one of these products or a few of them; if you're really lucky, you might use them all.


SAS, or the SAS System


The SAS System is the original SAS product that customers have used in one form or another for more than 30 years, on systems ranging from big mainframes to laptops. It's also known as Display Manager (the name of the windowing interface), or Base SAS, or just plain old SAS. The SAS System is primarily a tool for people comfortable with writing SAS programs. It contains the data processing and analytics engine that is at the core of most SAS products.


SAS Enterprise Guide


SAS Enterprise Guide provides a modern, easy-to-use interface to much of the power of SAS. SAS Enterprise Guide is used by SAS programmers, business analysts (who might or might not have programming skills), and statisticians. It’s a Microsoft Windows application that can connect to SAS; you can use it to drive the SAS analytics engine running on a mainframe, UNIX, or other remote machines as a server application. SAS Enterprise Guide is like a general store for SAS, where you can get a little bit of everything that SAS has to offer.


SAS Data Integration Studio


SAS Data Integration Studio is used to create and maintain data warehouses and data marts, which are specialized stores of data that have been prepared for effective reporting and analytics. Data experts, such as database administrators and IT specialists — people who support other folks who have to create reports — use SAS Data Integration Studio. Like SAS Enterprise Guide, this is a client application that runs on your desktop and provides an intuitive user interface, but it can connect to SAS and databases that run on machines all over your organization.


SAS Enterprise Miner


SAS Enterprise Miner is used for data mining, or investigating patterns in large amounts of data. Statisticians and professional modelers use SAS Enterprise Miner to segment data and create descriptive or predictive models. For example, a bank might use such a model to predict how likely you are to respond to a certain credit card offering. If your data profile is similar enough to others who have responded to similar offers, SAS Enterprise Miner would produce a model that indicates you're worth sending the offer to. Hello, Platinum card!


SAS Add-In for Microsoft Office


Some people spend most of their working days working with a Microsoft Office application such as Excel or PowerPoint. SAS Add-In for Microsoft Office lets you open SAS data sources and run SAS analyses without ever having to leave the comfy world of your spreadsheet or slideshow. SAS Add-In for Microsoft Office is used by business analysts who don't really need to know anything about SAS programming but need the answers that SAS can provide.


SAS Web Report Studio


All business intelligence software vendors must have a Web-based reporting product, and SAS Web Report Studio fits that bill. SAS Web Report Studio allows you to create and distribute reports to anyone who needs them, all without leaving your Web browser.


SAS Forecast Studio


SAS Forecast Studio analyzes time-based data and forecasting future trends and events. It's like a crystal ball, only better! SAS Forecast Studio is used by professional modelers or statisticians who understand concepts such as seasonality and intermittent demand models. However, no SAS programming is required!


JMP


JMP is a standalone, highly visual analytics product. It runs on Microsoft Windows, Apple Macintosh, or Linux-based computers. JMP is sometimes packaged with SAS and can work with other SAS products, but most often it's used by researchers, engineers, and quality-control experts who want advanced analytics without a big software footprint.


dummies

Source:http://www.dummies.com/how-to/content/selecting-the-correct-sas-product.html

Freemason Lodge Officers

Officers are elected by the members of the lodge, although a few are appointed by the Worshipful Master. In most lodges, the officers serve in their positions for one year. The names and duties of the officers are mostly taken from very old customs practiced by the medieval stonemasons' guilds, where Freemasonry originated.


In England in the 1400s, under the reign of King Edward III, local (or what we now call municipal) governments grew out of the merchant and craft industries of the towns. The guilds had lots of money and property, as well as organizational and administrative experience. Heads of the guilds became heads of town councils, mayors, sheriffs, and more.


One of the ways a local official proclaimed his rank was by wearing a badge of office, or jewel, on a chain around his neck. This practice survives today. Masonic lodges do the same thing to identify their officers, carrying over this old guild tradition. Masonic jewels of office are symbolic (naturally).


Every lodge is required to have a Worshipful Master, a Senior Warden, a Junior Warden, a Senior Deacon, a Junior Deacon, a Treasurer, and a Secretary. However, Freemasons do not march in lockstep with one another. There are subtle and not-so-subtle differences in the names of officers and their duties, from country to country, as well as from state to state. And yet, a Mason from Iowa on vacation in Belgium will recognize the same basic framework of the Masonic officer's line that he had at home in Dubuque, governing the lodge he's visiting in Brussels.


Masonic officers are generally part of what is called a progressive line, also known as "going through the chairs." It is a line of succession that moves up one position at a time from one year to the next. When a man is appointed to the Junior Steward's position, in a perfect set of circumstances, seven years later he will be Worshipful Master. Although this curious plan for leadership has its drawbacks, it was designed based on the philosophy of equality among Masons. The progressive line is most common in the United States, but it exists in many other jurisdictions, as well.


There is supposed to be no politicking or campaigning for an officer's position. In the ideal lodge situation, each man simply advances each year, learning each position's duties and a portion of the Masonic ceremonies. By the time he becomes Worshipful Master of the lodge, he has sat in every chair except, perhaps, the Secretary and Treasurer. He has learned public speaking, management of a volunteer organization, decorum, and responsibility. And eliminating the annual popularity contest for election that many groups suffer results in a smoother, friendlier line of succession. Any man, regardless of his social, business, or economic position outside the lodge room, may aspire to be Master of his lodge.


There are lots of differences from one jurisdiction to another, and many local lodges observe different customs that may slightly alter these duties. In the following sections, you'll find an outline of the most common officers' positions in the United States.


Worshipful Master


The Worshipful Master sits in the east, symbolic of the rising sun, and presides over the lodge, like a president or chairman. Even if the building faces the wrong direction, the Master is said to be "in the east." While serving his term as Master, his word is final over the actions of the lodge. He is also responsible, as the ritual instructs, for "setting the Craft to work and giving them good and wholesome instruction for their labor." He presides over business meetings and the conferral of degrees.


The Master's jewel of office is the right angle of a square, a stonemason's tool used for checking the angles of cut and smoothed stones. It is not a measuring square, like carpenters use. It's used to make certain an angle is "true." It symbolizes virtue.


Masons call the man in charge of the lodge "Worshipful Master," but that does not mean they "worship" him. In parts of England, mayors and judges are also called "Worshipful" or "Your Worship." This is a term of honor, from the original intent of the word, meaning, "to give respect." French Masons use the word Venerable for their Masters.


Senior Warden


The Senior Warden sits in the west, symbolic of the setting sun, and assists the Worshipful Master in opening and closing the lodge. He is the second in command, like the vice president, and if the Master is unable to attend the meeting, he may open and conduct business. His ancient duties were to pay the Craft their wages and to handle disputes among the workers. These days, he's just a heartbeat away from the east, so his task is to support the Master and to prepare himself for that office for the following year.


The Senior Warden and the Junior Warden often have small wooden columns on the pedestals in front of their positions. When the lodge is at work (during a meeting), the Senior Warden's column stands upright, and the Junior Warden's column is laid on its side, showing that the Senior Warden is now in charge of the Craftsmen. When the work is concluded and the lodge retires to refreshment, the Junior Warden's column is raised, and the Senior Warden's is laid down, showing that the Craftsmen are now under the supervision of the Junior Warden.


The Senior Warden's jewel of office is the level, a stonemason's instrument used to check the level of horizontal surfaces. It symbolizes that all Masons meet on the level, without regard to social, political, or religious status.


Junior Warden


The Junior Warden sits in the south, symbolic of the position of the sun at midday. Because he represents the sun at lunchtime, he metaphorically supervises the Craftsmen when they're at recess, or refreshment. He is the number-three officer in the lodge hierarchy, and he also may open the lodge, if the Master is unable to attend the meeting. The Master and the two elected Wardens (the Senior Warden and the Junior Warden) are the only officers who may open a meeting. Only a Grand Lodge officer may override this requirement.


The Junior Warden is often in charge of arranging meals for the lodge, and the Stewards traditionally act as his assistants. One of the Junior Warden's symbolic jobs described in the ritual is to make certain that the members "do not convert (their) refreshment into intemperance or excess." In most U.S. jurisdictions, alcohol is barred from the lodge, but the ceremonial reference to earlier days remains part of the Junior Warden's job description.


The Junior Warden's jewel of office is the plumb, a stonemason's instrument used for checking the alignment of a vertical surface. It symbolizes upright behavior among Masons.


Senior Deacon


The Senior Deacon sits to the right of the Worshipful Master. He is the Master's messenger and does lots of walking. He welcomes and escorts both visitors and new candidates into the lodge and usually introduces distinguished visitors. During degree rituals, he is the guide for the new candidate, conducting him around the lodge room. In the opening and closing ceremonies of the lodge, the Senior Deacon opens and closes the Bible, and lights or extinguishes the candles at the altar. In many lodges, he also carries the ballot box around the room when new members are voted on.


Both the Senior and Junior Deacon carry long staffs, or rods. Because they are messengers of the lodge, the rods they carry are symbolic of the caduceus, or wand, that the Roman winged god and messenger Mercury carried. The rods are topped by their jewels of office, to match the ones on their collars.


The Senior Deacon's jewel is a square and compass, with a sun in the middle. The sun signifies that his position is in the east, with the Master. (In other parts of the world, the jewel worn on the collar of the Deacons may be a dove, while their rods are topped by a figure of Mercury or a dove with an olive branch.)


Junior Deacon


The Junior Deacon sits to the right of the Senior Warden, guarding the door to the lodge. He is the messenger of the Senior Warden, as well as the lodge "doorman." It is his job to be certain the Tyler is guarding the door on the outside, and he allows visitors to enter, after they've been properly vouched for. He and the Tyler communicate with each other by knocking back and forth on either side of the closed door.


Some jurisdictions split up this position into the Junior Deacon and an Inner Guard.


The Junior Deacon's jewel of office is the square and compass, like his senior counterpart. The difference is that the Junior Deacon's jewel has a moon in the center, signifying that he is in the west.


Senior Steward and Junior Steward


Because the Stewards are the low guys on the totem pole of the officers' line, they do much of the grunt work. They're the Junior Warden's assistants, and they help to set up the lodge room. They prepare all new candidates before entering the lodge for their degree rituals, and escort them to the lodge room, where the Senior Deacon takes over. They may also be the kitchen and wait staff of the lodge, which means they're champing at the bit to move up to the Junior Warden's job.


The Stewards, like the Deacons, also carry rods, in imitation of England's Lord High Steward's rod in the House of Lords. The rods are also topped with the jewels of their offices.


The Stewards' officers jewels are the same: a cornucopia, or "horn of plenty," symbolizing — what else? — lots of food. Masons love to eat and will find any excuse they can to have a breakfast, luncheon, or dinner to commemorate just about anything.


dummies

Source:http://www.dummies.com/how-to/content/freemason-lodge-officers.html
Tips for eBay Sellers

To easily sell your merchandise on your eBay business and for the most amount of money possible use these successful selling tips for your eBay auction items:


  • Answer all e-mail questions from prospective bidders and buyers within 24 hours and check your e-mail hourly before the close of your auctions: Good customer service goes a long way in promoting and building your eBay business.


  • When listing a new item for sale, research your item and be sure that you know its current value and the going price on eBay.


  • Before listing, weigh your item and estimate the shipping cost. Be sure to list shipping (and handling) costs in your ad whether you use a flat rate or the shipping calculator.


  • See how many other sellers are selling your item and try not to have your auction close within a few hours of theirs.


  • To encourage bidding, set the lowest possible starting bid for your item.


  • Check the eBay guidelines to be sure that your item is permitted and that your listing doesn't violate any listing policies.


  • Get to know the listing patterns of sellers who sell similar merchandise to yours and try to close your auctions at different times or on different days.


dummies

Source:http://www.dummies.com/how-to/content/tips-for-ebay-sellers1.html

How to Use Frameworks in Your iPad App

A framework offers common code that provides generic functionality. The iPhone OS for the iPad provides a set of frameworks for incorporating technologies, services, and features into your apps. For example, the UIKit framework gives you event-handling support, drawing support, windows, views, and controls you can use in your app.


A framework is designed to easily integrate your code that runs your game or delivers the information that your user wants. Frameworks are similar to software libraries, but with an added twist: They also implement a program's flow of control (unlike a software library whose components are arranged by the programmer into a flow of control). So, instead of the programmer deciding the order that things should happen — such as which messages are sent to which objects and in what order when an application launches, or when a user touches a button on the screen — the order is a part of the framework and doesn't need to be specified by the programmer.


When you use a framework, you provide your app with a ready-made set of basic functions; you've told it, "Here's how to act." With the framework in place, all you need to do is add the specific functionality that you want in the app — the content, as well as the controls and views that enable the user to access and use that content — to the frameworks.


The frameworks and the iPhone OS for the iPad provide some pretty complex functionality, such as


  • Launching the app and displaying a view


  • Displaying controls and responding to a user action — such as tapping a toggle switch or flicking to scroll a list.


  • Accessing sites on the Internet — not just through a browser, but from within your own app


  • Managing user preferences


  • Playing sounds and movies


Some developers talk in terms of "using a framework" — but your app doesn't use frameworks so much as the frameworks use your app. Your app provides the functions that the framework accesses; the framework needs your code in order to become an app that does something other than start up, display a blank view, and then end. This perspective makes figuring out how to work with a framework much easier. (For one thing, it lets the programmer know where he or she is essential.)


dummies

Source:http://www.dummies.com/how-to/content/how-to-use-frameworks-in-your-ipad-app.html

Create a Project Budget Using the Top-Down Approach

There are two ways to create a budget for you project: bottom-up and top-down. You develop a top-down budget estimate by deciding how much you want the total project to cost and then dividing that total cost in the appropriate ratios among the lower-level WBS components until you’ve allocated amounts to all the work packages.


Suppose you plan to develop a new piece of equipment. You develop a bottom-up cost estimate that suggests the budget for each Level 2 component in your WBS should be as follows, with the total budget being determined by adding together the amounts to be $100,000:


  • Design: $60,000 (60 percent of the resulting total budget)


  • Development: $15,000 (15 percent of the resulting total budget)


  • Testing: $5,000 (5 percent of the resulting total budget)


  • Production: $20,000 (20 percent of the resulting total budget)


However, experience with similar projects suggests that approximately 40 percent of the total budget is typically devoted to design, not 60 percent, as you’ve developed using your bottom-up approach. In other words, the relative allocations of your total budget among the four major project phases aren’t in agreement with the amounts recommended from prior experience. Your numbers indicate that you’ve planned a design phase for a $150,000 project rather than a $100,000 project.


To fix this discrepancy, you have two options:


  • Try to scale down your design approach so that it can be implemented for $40,000.


  • Request an additional $50,000 for your project.


But whichever approach you choose, you can’t just arbitrarily change the numbers without specifying how you will perform the necessary work!


dummies

Source:http://www.dummies.com/how-to/content/create-a-project-budget-using-the-topdown-approach.html

How to Meet Other Online Community Managers

Thanks to a variety of communities for online community managers, as well as blogs and social networks, it’s easy to hook up with other community managers for a little conversation and commiseration. The best part is that other community managers want to meet you, too. They want to talk about issues facing community managers and discuss methods for bringing in new members or launching promotions.


Many terrific resources are available to enable you to meet up with others who manage online communities. Most community managers join these groups and chats or attend conferences for the same reason as you, so collaboration with them won’t be a hard sell.


Here are a few ideas for collaborating with other community managers:


  • Follow the #cmgrchat hashtag on Twitter for weekly discussions among community managers.


  • The Community Roundtable is a prestigious community for community managers. Also follow @TheCR on Twitter.


  • e-mint is a community-manager Yahoo! Group based in the United Kingdom but accepting members globally.


  • Community Manager, Advocate, and Evangelist is a popular Facebook discussion group for community managers.


  • The Community Manager is a resource and community for community managers.


  • Conferences — especially those geared to social media, blogging, technology, and online communities — are terrific ways to meet other community managers. Some conferences to attend are South by Southwest (SXSW) Interactive, BlogWorld & New Media Expo, the Online Community Unconference, and the Community Leadership Summit. As the dates of these conferences change each year, do an online search to find out when they’ll be coming around next.


dummies

Source:http://www.dummies.com/how-to/content/how-to-meet-other-online-community-managers.navId-323004.html

How to Cook Grains on the Stovetop

You cook all grains on the stovetop by following the same three basic steps. The only thing that varies from grain to grain is the length of cooking time. Cooking grains on your stovetop is simple:


  1. Bring 2 or more quarts of water to a boil.


    For most grains, you need about 2 cups of water per cup of uncooked grain.


  2. Add the grain to the water.


    A cup of uncooked grain expands to approximately 3 cups when cooked.


  3. Reduce the heat and let the grain simmer, keeping the pot covered with a tight-fitting lid.


    If you have problems with the water boiling over, turn the heat down further or tip the lid slightly to the side, letting just a crack of steam escape (and leave the lid in that position). Simmer until all the water has been absorbed.


If you find that a little extra water remains in the pan after you take the pot off the stove, you can either drain off the water or let the grains sit for ten minutes to allow them to absorb more water. Either way, use a fork to fluff the cooked grains after a few minutes.


dummies

Source:http://www.dummies.com/how-to/content/how-to-cook-grains-on-the-stovetop.html

How to Change the Oil in Your Vehicle


Changing oil is usually easy. Unless it’s impossible to reach your oil filter and/or oil drain plug, it’s cheaper to change the oil yourself. All you have to do is unscrew a plug and a filter, let the oil drain out, replace the filter and plug, and pour in some new oil.


Before you begin work, be sure your gearshift is in Park or Neutral with the parking brake on, and set out all your tools and equipment.


Follow these easy steps to change your oil and oil filter:


>


>


>

1

Either park on level ground or in such a way that the oil drain plug is at the lower end of the oil pan.


>

You can jack up the vehicle so that the oil drain plug is at the lower end of the oil pan.


>


>


>


>

2

Warm up your engine for two or three minutes.


>

You don’t want the engine so hot that you burn yourself. When it’s slightly warm, shut off the engine.


>


>


>


>

3

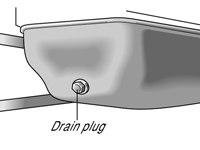
Look under your car and find the large nut or plug located under the oil pan at the bottom of the engine.


>

It unscrews with the aid of an adjustable wrench. If the plug is too hot to touch comfortably, let the engine cool off for a while longer.


>


>


>


>

4

Push a basin lined with a plastic bag under the oil drain plug.


>

The oil may come out sideways from the direction the drain plug is facing. Allow room for that when you place the drain pan.


>


>


>

>

Enlarge
>


>

5

Unscrew the oil drain plug until it’s almost ready to come out.


>

Use an adjustable wrench for this step. Be sure protect your hand with a dirty rag or a disposable plastic glove, and give the plug a last quick turn by hand to release it. Pull your hand away quickly so that you don’t get oil all over yourself. The oil should drain out of your engine into the container.


>


>


>


>

6

Remove the cap from the oil filler hole at the top of your engine.


>

This large cap lifts or screws right off, revealing a largish hole.


>


>


>

>

Enlarge
>


>

7

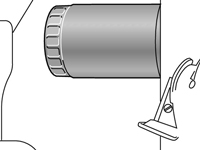
Unscrew the oil filter using an oil filter wrench if you can’t do it by hand.


>

The oil filter looks like a tin can that’s screwed onto the engine. The oil filter unscrews if you twist it counterclockwise. It'll have oil in it, so be careful not to dump it on anything when you remove it. If any remnants of the rubber seal from the old filter remain on your engine, scrape them off carefully, making sure they don’t fall into the hole.


>


>


>


>

8

Empty the oil from the filter into the drain pan.


>

Use a screwdriver to punch a hole in the dome of the can and invert it in the drain pan to allow the oil to flow out. When the filter has drained completely (this can take as long as 12 hours), wrap it in newspaper and set it aside to take to a recycling center with your old oil.


>


>


>


>

9

Open a new bottle of oil.


>

Consult your owner's manual for the right grade and viscosity of your motor oil.


>


>


>


>

10

Dip a finger in the new oil and moisten the gasket on the top of the new oil filter. Then screw the new filter into the engine where the old one was.


>

Follow directions on the filter, or turn it gently until it settles into place, and then turn it another three-quarter turn. Unless the filter manufacturer specifically recommends it or there isn’t enough space to get your hand into the area, don’t use an oil filter wrench to tighten the filter. It should fit tightly, but you don’t want to crush the gasket or the filter will leak.


>


>


>


>

11

Wipe around the place where the oil drain plug goes and replace the oil drain plug.


>

Use an adjustable wrench to tighten it.


If your vehicle uses an oil drain plug gasket, make sure that the old one has been removed, and lay a new gasket on the pan before you replace the plug.


>


>


>


>

12

Pour all but one quart of fresh oil into the oil filler hole.


>

This means that if your car holds five quarts of oil, pour in only four quarts. A funnel will help you get the oil in without spilling it.


>


>


>


>

13

Replace the oil filler cap.


>

Run the engine for 30 to 60 seconds while you check for leaks from the oil drain plug and around the filter.


The oil pressure light on your dashboard should go out in 10 or 15 seconds (or if your vehicle has an oil pressure gauge, the needle should move off of “Low”). Don’t rev up your engine during this period. Your oil pressure ranges from zero to low while the light is on and won’t reach the proper pressure until your oil filter fills up. If the light doesn’t go out, check under the vehicle and around the engine for leaks. Running the engine circulates oil into the new oil filter, and because filters hold from a half to a full quart of oil, you want to be sure that your filter is full to get an accurate reading on the oil dipstick.


>


>


>


>

14

Shut off the engine and wait five to ten minutes.


>

You're letting the oil settle into the oil pan.


>


>


>


>

15

Use the dipstick to bring your oil up to the correct level.


>

Remove the oil dipstick, wipe it with a clean, lint-free rag, and shove it back in. Pull it out again and check it. Keep adding oil a little at a time and checking the stick until you reach the “Full” line on the dipstick.


>


>


>


>

16

Remove the drain pan from under the vehicle.


>

Drive around the block a couple of times, let the oil settle down again, and recheck the dipstick and the dashboard indicator.


>


>

Many auto parts stores and some service stations accept old oil and oil filters for recycling. If you don’t have one close by, look in your local yellow pages for the nearest oil recycling center or toxic waste disposal center, or visit Earth911 or the Filter Council Web sites and enter your zip code.


>
dummies

Source:http://www.dummies.com/how-to/content/how-to-change-the-oil-in-your-vehicle.html

Treating Prostate Conditions


5 of 14 in Series:
The Essentials of Men’s Sexual Health


If you suffer from a prostate condition, you should be seeking a doctor’s help. Doctors have various treatments for prostate conditions, both medicinal and surgical. In some cases, such as prostate cancer, treatment is absolutely necessary for recovery. Other conditions, such as benign prostatic hypertrophy, are not dangerous, but patients will appreciate the relief that professional treatment can provide. That said, prostate condition treatments may come with side effects, such as erectile dysfunction.


Because the prostate gland is part of a man’s sexual organs, it’s not surprising that some treatments have side effects that impair sexual functioning. Some medications used to treat either an enlarged or a cancerous prostate can reduce sexual desire. Surgical removal of part or all of the prostate is another measure that can be taken, which also has potential side effects.


The most common form of surgery for an enlarged prostate is called a transurethral resection of the prostate (TURP). Approximately 5 to 10 percent of men who are operated on experience erectile dysfunction after the surgery, and 80 to 100 percent experience something called retrograde ejaculation. This means that, during ejaculation, the semen flows backwards into the bladder instead of out of the penis. This condition doesn’t affect a man’s ability to have an orgasm, so some men find that retrograde ejaculation — doesn’t bother them; others report sex to be less pleasant because of the lack of fluid. Retrograde ejaculation definitely poses a problem if the man is trying to impregnate a woman; in that case, artificial insemination may be necessary.


Because the various treatments for prostate problems, particularly surgery, can leave a man with erectile dysfunction (inability to have an erection), many men avoid going to the doctor when they first sense that something may be wrong. Of course, the condition will only worsen, and by the time they do go for treatment, it may be too late. Luckily, thanks to erectile dysfunction (ED) drugs, such as Viagra, men who have prostate problems may be able to regain their ability to have erections even after surgery.


In fact, going to see your doctor at the first sign of any erectile difficulties could be important because common reasons for ED include high blood pressure and diabetes, medical conditions that need to be treated as soon as any symptoms appear.


dummies

Source:http://www.dummies.com/how-to/content/treating-prostate-conditions.navId-323518.html

Droid X Tricks to Remember

Here is an assortment of handy time-saving tricks to keep in mind to boost your productivity (or your hopeless addiction to your new Droid X phone).


  • Dictation! You can speak into the phone as an effective and quick alternative to using the onscreen keyboard.


  • Use the Swype keyboard for rapid text entry.


  • Press and hold a key on the Multi-Touch Keyboard to confirm that your stubby fingers have selected the correct character.


  • Quickly put the Droid X into Vibration mode by pressing the down volume button until the phone jiggles.


  • When you’re on the phone, press the Power button to lock the phone and turn off the touchscreen.


  • After initially touching your finger on the screen, use the magnifier to precisely move and locate the cursor.


  • When downloading updates or new apps, or for faster Web browsing, activate the Droid’s Wi-Fi.


  • Use the Search soft button to look for items on the phone, on the Internet, or in a specific app.


dummies

Source:http://www.dummies.com/how-to/content/droid-x-tricks-to-remember.html

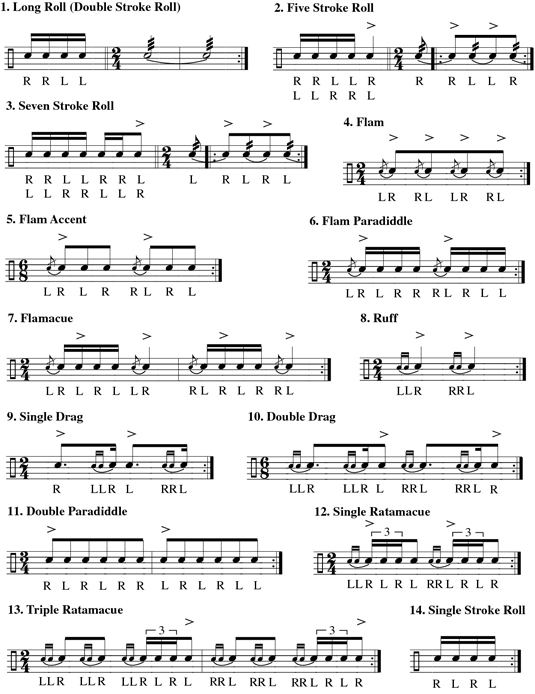
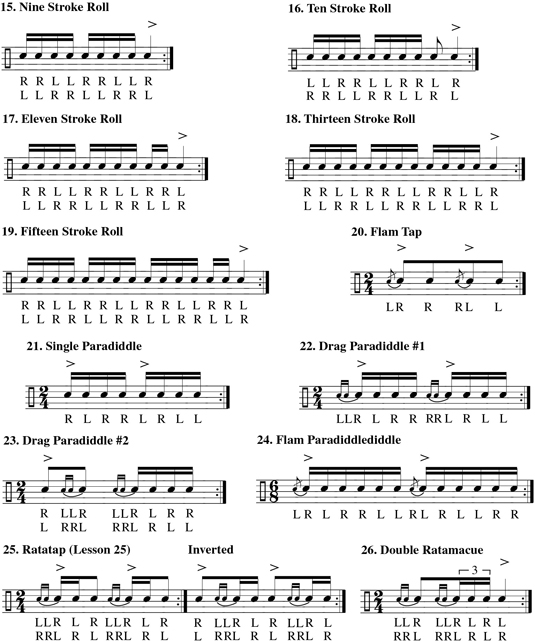
Drumming the 26 Standard American Rudiments

Rudiments are drumming exercises to help you develop fluency in a number of sticking patterns. Practicing these exercises builds hand-to-hand coordination and develops a relaxed sound. The following rudiments can be practiced in two ways:


  • Set your metronome (or play along to some music) at a comfortable tempo and play steadily for a few minutes or longer.


  • Start out slowly, gradually building up speed until you hit the maximum speed that you can play them and still be in control. Hold that tempo for a few minutes and then slowly reduce your speed until you’re back where you started.


    image0.jpg
    image1.jpg


Click here to download and print a PDF of these exercises.


dummies

Source:http://www.dummies.com/how-to/content/drumming-the-26-standard-american-rudiments.html

Finding the Correct Function in Excel 2007

The first step to using a function in Excel 2007 is finding the one you need! Even when you know the one you need, you may not remember all the arguments it takes. To find a function, open the Insert Function dialog box (in the Function Library group of the Formulas tab) and try one of these:


  • Search: Type one or more keywords or a phrase into the Search for a Function box. Then click the Go button.


    • If a match is made, the Or Select a Category drop-down list displays Recommended, and the Select a Function box displays a list of the functions that match your search.


    • If no match is made, the Or Select a Category drop-down list displays Most Recently Used Functions, and the most recently used functions appears in the Select a Function dialog box.


  • Browse: Click the Or Select a Category arrow and, from the drop-down list, select All, or select an actual function category. When an actual category is selected, the Select a Function box updates to just the relevant functions. You can look through the list to find the function you want. Alternatively, if you know the category, you can select it on the Formulas tab of the Ribbon.


The following table lists the categories in the Or Select a Category drop-down list. Finding the function you need is different from knowing which function you need. Excel is great at giving you the functions, but you do need to know what to ask for.


Function Categories in the Insert Function Dialog Box
CategoryType of Functions
Most Recently UsedThe last several functions you used.
AllThe entire function list, sorted alphabetically.
FinancialFunctions for managing loans, analyzing investments, and so
forth.
Date & TimeFunctions for calculating days of the week, elapsed time, and
so on.
Math & TrigA considerable number of mathematical functions.
StatisticalFunctions for using descriptive and inferential
statistics.
Lookup & ReferenceFunctions for obtaining facts about and data on
worksheets.
DatabaseFunctions for selecting data in structured rows and
columns.
TextFunctions for manipulating and searching text values.
LogicalBoolean functions (AND, OR, and so forth) that return values of
TRUE or FALSE.
InformationFunctions for getting facts about worksheet cells and the data
therein.
EngineeringEngineering and some conversion functions. These functions are
also provided in the Analysis ToolPak.
CubeFunctions used with online analytical processing (OLAP)
cubes.
User DefinedAny available custom functions created in VBA code or from
add-ins; this category might not be listed if you don't have any
user-defined functions.

Both the Insert Function and Function Arguments dialog boxes have a link to the Help system. At any time, you can click the Help on This Function link at the bottom of the dialog box and get help on the function you’re using. The Help system has many examples; often, reviewing how a function works leads you to other, similar functions that may be better suited to your situation.


dummies

Source:http://www.dummies.com/how-to/content/finding-the-correct-function-in-excel-2007.html

How to Get Your Credit Report and Score

Three main sources of credit information dominate the credit industry today: Equifax, Experian, and TransUnion. These credit bureaus are basically huge databases of information from lenders, bill collectors, courts, public utilities, and others who provide goods and services to you today and get paid down the road. Credit-reporting bureaus don’t put data in your file; they simply maintain the files that others put the data into


  • Your credit report. Check each of your credit reports at least annually. The information changes fairly frequently, and the different reports contain slightly different information. Fortunately, every American is entitled to one free credit report from each of the three bureaus per year. To get your reports, go to these Web sites:


    Alternatively, you can go to AnnualCreditReport.com to get all three reports.


  • Your credit score. A credit score is an additional component used in most credit reviews. A credit score summarizes your risk of default in a three-digit score that ranges from 300 to 850.


    You have to request and pay for a copy of your credit score. You want your FICO score, which is the credit score lenders use. You can get your FICO credit score from only two places:


    The other credit-reporting bureaus — Experian and TransUnion — offer credit scores but not the FICO credit score.


dummies

Source:http://www.dummies.com/how-to/content/how-to-get-your-credit-report-and-score.html

Special Characters to Use in PHP Expression Test Patterns

Regular PHP expressions use patterns to test whether the input users submit when using online forms are in the correct format. This table shows characters you can use in patterns.


CharacterMeaningExampleMatchNot a Match
^Beginning of line^ccatmy cat
$End of linec$ticstick
.Any single character..me, goa
?Preceding item is optionalmea?nmean, menmoan
( )Groups literal charactersm(ea)nmeanmen,mn
[ ]Any character in setabc[1-3]abc1,abc2abc4
[! ]Any character not in setm[!ea]nmin, monmen, man
+One or moredoor[1-3]+door111, door131door, door55
*Zero or moredoor[1-3]*door, door311door4, door445
{ , }Range of repetitionsa{2,5}aa,aaaaaa, xx3
\Escapes characterm\*nm*nmen, mean
( | | )Alternate strings(Tom|Tommy)Tom, TommyThomas, To


dummies

Source:http://www.dummies.com/how-to/content/special-characters-to-use-in-php-expression-test-p.html

Work with the Slide Master and Edit Master Tabs in PowerPoint 2007


3 of 9 in Series:
The Essentials of Creating and Using Masters in PowerPoint 2007


When you are in PowerPoint’s Slide Master View, the Slide Master tab appears on the PowerPoint Ribbon, offering controls you can use to edit your PowerPoint slides. To switch to Slide Master View click the View tab on the Ribbon and then click the Slide Master button, found in the Presentation Views group.


>

The Slide Master tab.>

The Slide Master tab.

Here’s a quick overview of each group on this tab and the controls found in them:


  • Edit Master: The controls in this group let you edit the Slide Master. Use the Insert Slide Master button to create a new Slide Master, or the Insert Layout button to add a new layout to an existing Master. You can also use the Delete and Rename buttons to delete or rename Masters or layouts.


  • Master Layout: The controls in this group let you edit a layout by adding or removing placeholders, the title, and footer elements.


  • Edit Theme: The controls in this group let you apply a theme to a Master or a layout.


  • Background: The controls in this group let you set the background for a Master or a layout.


  • Page Setup: The control in this group lets you change the orientation for a page. (Unfortunately, PowerPoint doesn’t allow you to have Masters with different orientations in a single presentation. When you change the orientation of a Slide Master or a layout, the orientation of all Masters and layouts in the presentation is changed.)


  • Close: This group contains a Close button that returns you to Normal View.


>
dummies

Source:http://www.dummies.com/how-to/content/work-with-the-slide-master-and-edit-master-tabs-in.html

Microsoft SharePoint 2007 For Dummies

Microsoft SharePoint lets you share information across platforms and users and it helps to know what all the pieces of Sharepoint can do. You may want to look at SharePoint’s administration model or its site hierarchy, as well.


>


>


SharePoint’s Feature Areas by Product Type: WSS/MOSS


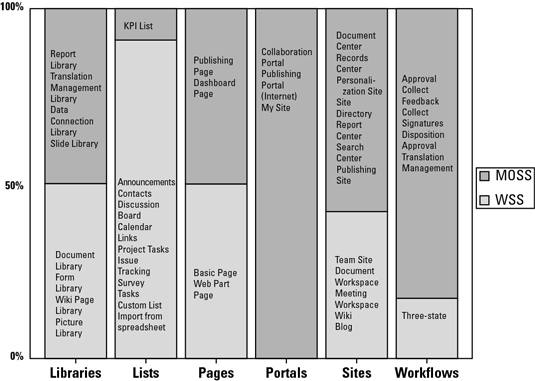
Microsoft Office SharePoint Server (MOSS) 2007 is officially part of the Microsoft Office suite of products, which gives you access to Windows SharePoint Services (WSS). The first table lays out the WSS and MOSS templates.


image0.jpg

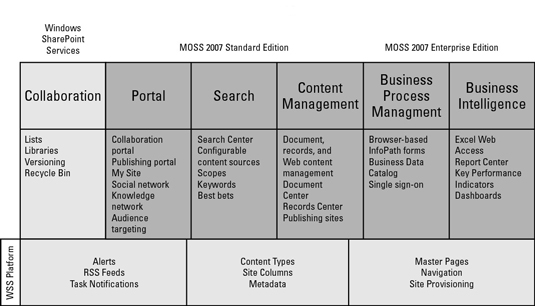
The table here shows SharePoint’s major features.


image1.jpg


>


>


>


How to Access SharePoint from a Client


When you’re working for a client using Microsoft SharePoint, you may have to use their browser or other access tool. This table shows you how to get to where you want to go from a variety of points:


Client IntegrationURL Access http://serverUNC Access //server/Custom Applications
Word 2003/2007Browsers — IE, Firefox, SafariWindows ExplorerObject model
Excel 2003/2007Office 2007 clientsMapped drive letter (net use command)Web Services
Outlook 2003/2007Office 2003 clients

Access 2003/2007Other Windows applications

PowerPoint 2007My Network Places

InfoPath 2007


>


>


>


SharePoint 2007’s Administration Model


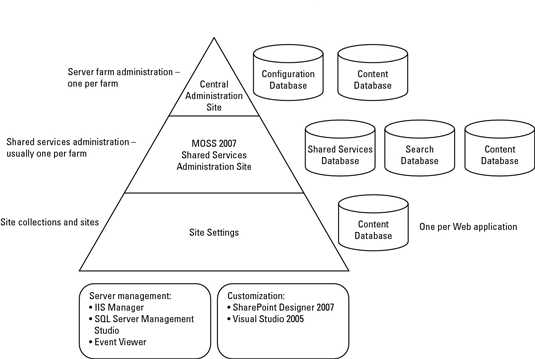
Microsoft SharePoint 2007 uses an administration model — a family of technologies that provides a server infrastructure to support the needs of information workers and their employers. The configuration of the administration model looks like this:


image0.jpg


>


>


>


SharePoint’s Site Hierarchy Model


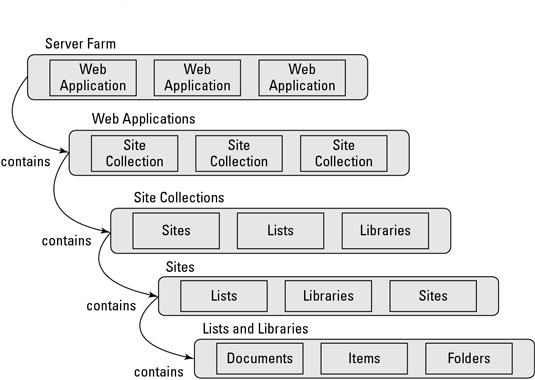
All of Microsoft SharePoint’s features are delivered via a hierarchy of Web sites. This sample SharePoint hierarchy begins at folders and moves up the chain to the server farm.


image0.jpg


>


>
dummies


Source:http://www.dummies.com/how-to/content/microsoft-sharepoint-2007-for-dummies-cheat-sheet.html