Figure 1: Name this computer and the workgroup that all the computers on the network are to use.
The computer name must be unique for the network, but all the computers on the network must use the same workgroup name. You can select the option to give the workgroup a name of your own choosing.
Share and share alike: Setting up file- and printer-sharing services
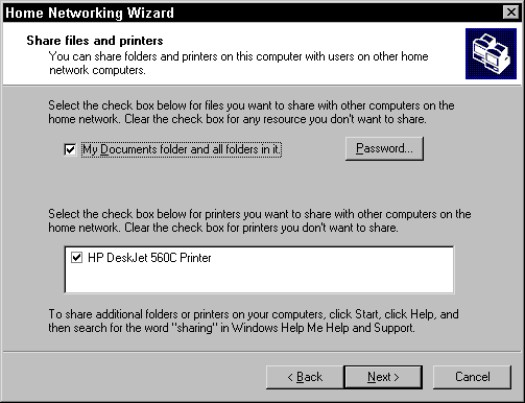
The next wizard window (see Figure 2) sets up file- and printer-sharing services. When you share a folder, network users can get to any file in that folder, using any computer on the network. When you share a printer, everyone can use it, from any computer on the network.
>

Figure 2: The wizard assumes that you want to share your documents folder and any printer that's connected to this computer.
Your wizard window may display an additional folder, named Shared Documents. You don't have to share the folders that the wizard lists if you don't want to, and failing to share them doesn't interfere with the wizard's tasks — your network configuration proceeds just the same.
Use the Password button next to the folder name to create a password for each folder, limiting other users' access to the folders. If you select the option to share the folders, and you can skip the password option if you want; you can password-protect any folder at any time.
Creating a networking setup disk for all the other computers
The next wizard window asks whether you want to create a home networking setup disk for the other computers on your network. The wizard transfers files to a disk that you can take to the other computers on your network to configure them for network services (including the Internet Connection Sharing feature).
Click Next after you select the option to create the disk, and put a blank, formatted disk in the appropriate drive. After you create the disk, remove it and label it as your networking setup disk.
Click Finish in the wizard window — you're done. Windows Me transfers all the files required to run networking services to your hard drive (you may be asked to put the Windows Me CD in the CD-ROM drive if it isn't already inserted). You must restart your computer to put the network settings into effect. When your computer reboots, it's part of a working network!
Windows XP Network Setup Wizard
The Windows XP Network Setup Wizard works a bit differently from the Windows Me Home Networking Wizard, but the results are the same. To launch the Windows XP Network Setup Wizard, choose Start --> Control Panel, click Network and Internet Connections, and then Click Network Setup Wizard. Select the connection method appropriate to your Internet connection.
Identify the computer
The wizard asks you to enter a description of the computer and to give the computer a name. The description is optional but the computer name isn't. The name must be unique on the network and should consist of a single word. Click Next after you've named the computer.
Name your network
In the next window, you must name your network. The network name must be the same on every computer in the network. Click Next to continue.
Confirm the settings
The wizard shows you the network settings it's going to apply to the computer, and when you click Next, it applies the settings.
Make a disk (if you want to)
The wizard offers to make a disk that you can use to run this wizard on all the other computers on your network (except any computers that are running Windows 2000, which must be configured manually). Accept the offer, or politely decline, by choosing the appropriate option.
Windows XP SP2 Wireless Network Setup Wizard
If you're setting up a wireless network, and if you're running Service Pack 2 for Windows XP, you have a network setup wizard specifically designed for you. To launch it, choose Choose Start --> All Programs --> Accessories --> Communications --> Wireless Network Setup Wizard.
The Wireless Network Setup Wizard assumes that you're setting up your network in infrastructure mode. It provides the basic configuration options for security — to set up file and printer sharing, you must run the "regular" network wizard, or set up each adapter manually.
Setting basic configuration options
Walk through the wizard windows, starting with the window that asks you to create an SSID for your wireless network, and select an encryption option.
Transferring settings to the other computers
The network wizards discussed previously offer the option to save the network settings to a disk, which you can use for the other computers on your network. This is the way to make sure that all the computers have the proper settings.
The settings for wireless networks that are using SSIDs and encryption won't fit on a disk. The wizard offers you two ways to save the settings so that you can use them on the other computers: Save the settings to a USB flash drive (a cute little storage device that you plug the device into a USB port) or set up the other computers manually.
>
dummies
Source:http://www.dummies.com/how-to/content/using-the-windows-networking-wizards.html
No comments:
Post a Comment