Moviemakers have had a lot of time, over the last century or so, to come up with creative techniques for making better movies. One of the most common special-effects techniques used today is called compositing. When you composite a scene in your digital video, you actually layer several different clips of video over each other to make a single image.
A common, everyday example of compositing can be seen during the weather forecast on the evening news. When you watch it on TV, it looks like the weatherperson is standing in front of a radar weather map, but in all likelihood, that map is actually a blank wall. Editing software superimposes the image of the weatherperson over the image of the weather map, creating the illusion you see on TV. (The weatherperson discreetly watches all this on a monitor screen so as not to lose track of where to point.)
You can do compositing too, if you have the right software. Unfortunately, it's not something that you can do easily with Apple iMovie or Pinnacle Studio, but slightly more advanced programs (such Adobe Premiere and Pinnacle Edition) can handle compositing just fine. The next couple of sections show you briefly how it works.
Understanding compositing
When a weatherperson makes gestures that push a cold front across the continent on your screen, he is usually in front of a blank wall. When you watch it on TV, a computer is creating the illusion of a graphic weather map behind the weatherperson.
How does the computer know which parts of the video image to make transparent? Usually, that blank wall (or screen) behind the actor or subject is colored a specific, bright shade of blue or green. Computer software picks up on this unusual color and removes all occurrences of it from the video image, making the blue screen or green screen in the background disappear. (Of course, it's important to make sure that the actor's clothing doesn't have the same shade of blue or green, or that spot will disappear as well, and a piece of the background will show through the actor.)
Take a look at Figures 1, 2, and 3 to see how compositing looks. Figure 1 shows a video clip of an actor in front of a blue screen. Figure 2 shows the video clip that you'll use as a background. When the two clips are composited in video-editing software, the blue screen becomes transparent while the actor remains in view, as shown in Figure 3.
>

Figure 1: First, shoot the subject in front of a blue screen.
>

Figure 2: Next, choose a background clip.
>

Figure 3: The composited video image will look like this.
To remove the blue screen but not the subject, the editing software uses a technique called keying. A specific color is chosen as the key color, and the software removes the key color from the video image. Most programs use a tool called a chroma key for bluescreen or greenscreen effects.
Chroma isn't the shiny stuff that covers the massive bumpers on a '59 Cadillac. It's actually just a fancy word for color used by video pros, because someone must have decided that "color key" didn't sound geeky enough.
Shooting video against a blue screen
Moviemakers use blue or green screens because they usually contrast with everything else in the video. Some professional moviemakers now feel that green screens work a little better than blue screens, but for most purposes, blue is probably good enough.
When you shoot video in front of a blue screen, the most important thing is to make sure that the screen is completely and evenly lit. This ensures that the entire screen shows up as a single shade, which allows the software to easily remove it later. In the next two sections, you'll find out how to build your own blue screen and shoot subjects in front of it.
Building a blue screen
Video equipment tends to be pretty expensive, so you'll be happy to learn that an effective blue screen can be built for less than $50. A handy material for the purpose is blue plastic picnic-table covering (available at your local party-supply store) — it's cheap and effective. You can also use linen sheets (or even paint) of the correct color. Whatever material you use, make sure it meets the following requirements:
- The material should have a matte finish. If the finish is glossy, light will probably reflect off it in bright spots, creating uneven shades of blue.
- The material should be available in bulk. You'll want to cover an area much larger than the video scene you intend to shoot. (the picnic-table covering is great because it comes in big, cheap rolls.) Having a plentiful supply of material gives you some flexibility in positioning your subjects, lights, and camera.
Shooting subjects against the screen
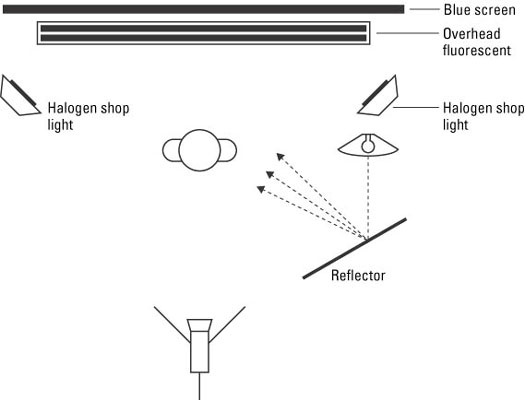
For your composited video to be effective, it's absolutely critical that your blue screen be fully and evenly lit. A good start is to suspend a fluorescent light directly above the blue screen. This light should be between the subject and the blue screen so the subject doesn't create shadows. In addition, position a couple of halogen shop lights on the floor on either side of the scene, pointing at the blue screen. If these lights cause a glare on the blue screen, diffuse the light using a gel.
Lights that illuminate the subject should be diffused so the subject doesn't cast shadows on the blue screen. To diffuse light, bounce the light onto the subject via a reflector, or soften the light using a gel. Your blue screen set will probably look something like Figure 4.
>

Figure 4: Make sure your blue screen is lit fully and evenly.
You will no doubt need to do some fine-tuning of the lighting. View it carefully, with a critical eye, to ensure that the entire screen has a uniform shade of blue. Also, make sure your subject isn't wearing the same shade of blue, unless you want to make it appear that there is a hole through the subject.
Compositing video tracks
Once your video is shot and imported into your editing program, compositing the video takes only a few steps. First, place the clip that will serve as the background in the first video track. Next, place the bluescreen clip in the track directly above it, as shown in Figure 5.
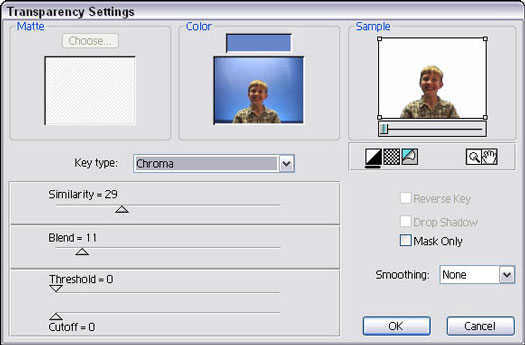
What you do next depends on the editing program you're using. Figure 5 demonstrates using Adobe Premiere. To composite video tracks in Premiere, follow these steps:
1. Select the blue screen clip in the timeline and choose Clip --> Video Options --> Transparency.
The Transparency Settings dialog box appears as shown in Figure 5.
2. Choose Chroma from the Key Type menu.
Although the Key Type menu has a Blue Screen option, the Chroma key is a little easier to work with. With the Chroma key, it's easier to correct for minor flaws in the shading of your blue screen.
3. Click somewhere on the blue screen in the image under Color.
When you move the mouse pointer over the video image in the Color box, you'll notice that the pointer turns to a dropper or color picker icon. The color you click on will appear above the video image, and this is the color that the Chroma key will remove from the video image. The Sample image should show which parts of your image will now be transparent.
4. If some parts of the blue screen still appear in the Sample image, adjust the Similarity and Blend sliders until the whole blue screen is invisible.
5. Click OK when you're done.
The blue screen becomes invisible in the video image, making the composite effect complete!
>

Figure 5: In Adobe Premiere, choose Blue Screen from the Key Type menu in the Transparency Settings dialog box.
In Adobe Premiere and many other video-editing programs, it may be necessary to render the timeline before you can preview your bluescreen effect. Rendering builds a preview file on your hard drive. To render the timeline in Premiere, choose Timeline --> Render Work Area.
>
dummies
Source:http://www.dummies.com/how-to/content/compositing-video.html
No comments:
Post a Comment