Create Named Templates in WordPress

The basic WordPress template files that make up a standard WordPress theme are: index.php, header.php, footer.php, sidebar.php, and style.css. The WordPress theme engine is flexible and gives you several ways of using templates and tags to pull different types of content from your database to display on your website.


After you create a simple theme using the standard templates, there are options available to extend the standard functionality of WordPress so that you have the flexibility to quickly address specific needs for your website.


WordPress recognizes three special areas of a theme: header, footer, and sidebar. The get_header, get_footer, and get_sidebar functions default to loading header.php, footer.php, and sidebar.php, respectively. Each of these functions also supports a name parameter that allows you to load an alternate version of the file. For example, running get_header('main') causes WordPress to load header-main.php.


You may wonder why you’d use the name parameter when you can just create a template file named whatever you like and load it directly. The following are reasons for using the get_header, get_footer, or get_sidebar functions with a name parameter:


  • You use a standard naming convention that users can easily recognize and understand.


  • You can load specialized template files easily and quickly.


  • You offer a fallback that loads the unnamed template file if the named one doesn’t exist. For example, if you use the tag get_header('main'); in your template, but for some reason the header-main.php template file does not exist, WordPress defaults to header.php, which saves the integrity of your website display until you can load the header-main.php file correctly.


In short, use the name parameter feature if you have multiple, specialized Header, Footer, or Sidebar template files.


When you duplicate sections of code in numerous template files, place the code in a separate file and use the get_template_part function to load it where needed.


dummies

Source:http://www.dummies.com/how-to/content/create-named-templates-in-wordpress.html

How to Enable the Firewall in Lion Server

You use Server Admin to configure a firewall on Lion Server. Using Server Admin to configure a firewall is actually easy. You can click to select services to allow through the firewall, as well as add your own services and ports, such as those used by third-party server software. Server Admin also enables you to create new rules for allowing or blocking ports.


Before you can configure the firewall, you have to enable the firewall service. In Server Admin, the procedure is the same as with other services:


  1. Open Server Admin and select the server in the left column.


  2. Click the Settings icon in the toolbar and then click the Services tab.


  3. Select the Firewall check box and then click the Save button.


As with other services, you also need to start it to get it running:


  1. In Server Admin, click the triangle next to your server in the left column to expand the list of services.


  2. Select Firewall from the list.


  3. Click the Start Firewall button in the lower left.


You can now stop the firewall by clicking the same button, which changes to Stop Firewall. With the firewall stopped, all incoming traffic is allowed.


dummies

Source:http://www.dummies.com/how-to/content/how-to-enable-the-firewall-in-lion-server.html

M&A Purchase Agreement: What to Bring to Closing

The purchase agreement defines certain items the Buyer and Seller may need to physically bring to the closing of the M&A deal (or deliver ahead of time, if the closing is virtual).


Seller’s deliveries may include:


  • Stock certificates or other documents providing evidence Seller actually owns what she’s selling


  • Resignations of any or all officers or board members, if Buyer requires that info


  • Stock books, ledgers, minute books, other corporate records, and corporate seals


  • Documentation that Seller has complied with all conditions required by the purchase agreement


  • The company’s articles of incorporation and bylaws


  • Written documentation that all outstanding options, warrants, or other instruments that can claim ownership in Seller have been extinguished or exercised prior to closing


  • Written opinions from Seller’s lawyers that all the necessary legal documents are in order


  • Signatures from both parties for the escrow agreement, confidentiality agreements, noncompetition and non-solicitation agreements, and employment agreements


  • A closing financial statement (generally as of the close of business from the previous day)


Buyer’s deliveries may involve the following:


  • The money! This delivery is the single most important one (at least in the eyes of Seller). Buyer brings the money in the form of a wire transfer, not a check.


  • Some sort of documentation, signed by an authorized officer, that Buyer has performed all necessary due diligence


  • Approvals by Buyer’s board of directors


  • Legal opinion by Buyer’s attorney


  • Signed counterparts to various agreements, including the escrow agreement, noncompetition and non-solicitation agreements, employment agreements, confidentiality agreements, leases, and any other agreement between Buyer and Seller


dummies

Source:http://www.dummies.com/how-to/content/ma-purchase-agreement-what-to-bring-to-closing.html

How to List a Decedent's Household Property


7 of 7 in Series:
The Essentials of Marshalling Estate Assets


The executor of an estate is responsible for the decedent’s household items and personal property. Prepare a detailed inventory of all the personal and household items (excluding any that belong solely to the surviving spouse). This inventory is necessary to value the items for the probate inventory and the tax Form 706. Do not allow anyone to go through or remove any of the decedent’s property before you take inventory.


If the decedent has a surviving spouse, the personal and household items may be staying in place after the decedent’s death, except items the decedent specifically bequeaths (leaves by will) to others. If the decedent has no surviving spouse and the house needs to be dismantled, you still need to list and document everything and set aside anything of real value for later valuation.


Don’t allow relatives and friends to rummage through the house and remove items until you’ve listed and/or valued them. Consider collecting all outstanding house keys or changing the locks as soon as possible.


If you don’t get to the house until after someone has removed some items you’ll need to try your best to retrieve these items. Or you can value what you remember and charge that amount against that friend or relative’s eventual share of the estate.


Household items rarely have a correspondingly large cash value. Clothes, for example, are usually given to a local charity. Household furnishings that family and friends don’t latch onto either follow the same route or are disposed of in a yard sale or on eBay or Craigslist.


Of course, not all the personal and household effects are valueless. It is your job is to separate out the valuable items from the rest. You need to carefully check the furniture, the knickknacks, the dishes, etc., to determine if these objects could be valuable.


If you’re familiar with the contents of the house before taking inventory, you may want to obtain a recent valuation guide to gain some idea of the value of what you’re looking at. If you know that the house contains items of great value, consider bringing an antique dealer or auctioneer with you to help sort out what has value from what doesn’t.


dummies

Source:http://www.dummies.com/how-to/content/how-to-list-a-decedents-household-property.html

Sync Individual Strategic Action Plans with Compensation

A common trend in compensation plans is to pay for performance. No doubt about it; people pay attention when it comes to their own pocketbooks. Linking performance to short-term goals and action items in your strategic plan is a natural connection. Performance-based compensation is a huge way to structure performance plans. Check out Inc. Magazine’s compensation guide for ideas on compensation.


Although linking pay to performance is a good way to ensure that your plan gets implemented, it’s not the only factor.


Here are some best practices to make your incentive plan as successful as possible:


  • Tie incentives to corporate results, team results, and individual performance, where appropriate.


  • Fit the compensation plan in with your core values and culture.


  • Simplify a complicated plan so everyone, regardless of education level, can understand it.


  • Communicate your incentive plan as much as possible.


  • Involve employees in the process by sending an employee survey before you structure your plan to see what they’re looking for.


  • Shell out incentives in the form of control of one’s schedule, cash, time off, company perks, group outings, and so on. Don’t be tightfisted: Outstanding results can come from a history of outstanding rewards.


  • Get your employees energized about the incentive plan by making the plan exciting and motivational.


  • Share financial and business plans with employees and provide education if they don’t understand financial issues.


  • Don’t expect attitudes and behaviors to change overnight: Implementing an incentive program involves a long-term process, not a one-time event.


Remember the purpose of incentive plans is to change behavior and move your whole organization as a team toward your vision. Make sure that your incentive plans clearly link performance to business goals. That link exists to ensure that you reward only those behaviors that lead to accomplishing your business goals.


dummies

Source:http://www.dummies.com/how-to/content/sync-individual-strategic-action-plans-with-compen.html

Choosing a Radio Ad Format


5 of 9 in Series:
The Essentials of Advertising for Your Business


Your business's radio ad's format should get the attention of people you want to become your business's customers. The radio ad format that your customers find appealing (and informative) can influence how listeners react to the message you're conveying:


Dialogue


Most dialogue radio spots aren't effective because nobody talks like that in real life, repeating information over and over again. These spots just cry out to be ignored, if not laughed at, because they’re completely unbelievable.


Don’t offend or insult your listener with a premise and copy that's unbelievable, contrived, confusing, and just plain dumb. If you do, you have no one to blame but yourself when that listener reaches over, punches the radio button, and makes you instantly disappear.


Comedy


Like dialogue spots, a poorly conceived comedy premise and badly written copy do a lot more harm than good — so tread lightly. Setting up an amusing idea, including some copy that actually sells your product in an entertaining manner, and then delivering a good punch line in the span of 60 seconds is difficult.


A straight read


A single voice reading 60 seconds of clear, concise, fact-filled copy that motivates and sells listeners is always a good bet. No frills. No jokes. No unrealistic dialogue. Just the offer — the selling proposition — read by a good, strong voice. You may want to toss in some background music or even some sound effects.


A straight read is the most effective copywriting method you can use to convey a selling message. And it’s the easiest, which, if you’re new to the game, may be the best reason of all to employ it.


dummies

Source:http://www.dummies.com/how-to/content/choosing-a-radio-ad-format.html

eBay Time Chart for Auction Timing

eBay’s clock goes by military time in the Pacific time zone, and eBay sellers use it to schedule auction start and end times. Print this chart and keep it by your computer where you can quickly check on the ending time for an auction you want to bid on. Find your time zone in the table and check the corresponding times on eBay.


eBay Time versus Continental U.S. Time
eBay TimePacificMountainCentralEastern
0:0012:00 a.m.1:00 a.m.2:00 a.m.3:00 a.m.
1:001:00 a.m.2:00 a.m.3:00 a.m.4:00 a.m.
2:002:00 a.m.3:00 a.m.4:00 a.m.5:00 a.m.
3:003:00 a.m.4:00 a.m.5:00 a.m.6:00 a.m.
4:004:00 a.m.5:00 a.m.6:00 a.m.7:00 a.m.
5:005:00 a.m.6:00 a.m.7:00 a.m.8:00 a.m.
6:006:00 a.m.7:00 a.m.8:00 a.m.9:00 a.m.
7:007:00 a.m.8:00 a.m.9:00 a.m.10:00 a.m.
8:008:00 a.m.9:00 a.m.10:00 a.m.11:00 a.m.
9:009:00 a.m.10:00 a.m.11:00 a.m.12:00 p.m.
10:0010:00 a.m.11:00 a.m.12:00 p.m.1:00 p.m.
11:0011:00 a.m.12:00 p.m.1:00 p.m.2:00 p.m.
12:0012:00 p.m.1:00 p.m.2:00 p.m.3:00 p.m.
13:001:00 p.m.2:00 p.m.3:00 p.m.4:00 p.m.
14:002:00 p.m.3:00 p.m.4:00 p.m.5:00 p.m.
15:003:00 p.m.4:00 p.m.5:00 p.m.6:00 p.m.
16:004:00 p.m.5:00 p.m.6:00 p.m.7:00 p.m.
17:005:00 p.m.6:00 p.m.7:00 p.m.8:00 p.m.
18:006:00 p.m.7:00 p.m.8:00 p.m.9:00 p.m.
19:007:00 p.m.8:00 p.m.9:00 p.m.10:00 p.m.


dummies

Source:http://www.dummies.com/how-to/content/ebay-time-chart-for-auction-timing.html

Trigonometry Laws of Sines and Cosines

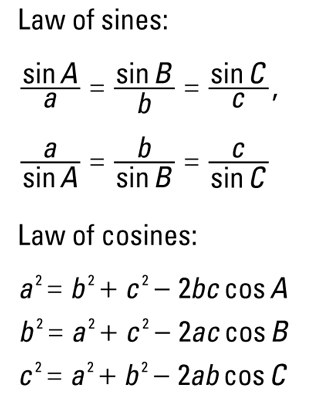
Trigonometry is the happy home of sines and cosines. However, those sines and cosines are ruled by mathematical laws. The laws for both are shown in the following lists:


image0.jpg


dummies

Source:http://www.dummies.com/how-to/content/trigonometry-laws-of-sines-and-cosines.html

Office 2011 for Mac: Removing a Toolbar Command


4 of 7 in Series:
The Essentials of Menus and Toolbars in Office 2011 for Mac


Whether you use Office 2011 for Mac or another Microsoft Office product, your toolbars can get pretty cluttered. Whenever you feel the need to tweak the interface of a Microsoft Office application, you need to summon the Customize Toolbars and Menus dialog. This is a super-powerful dialog in Word, Excel, and PowerPoint that lets you exert total control over all the toolbars and menus.


You also have easy access to all kinds of wonderful hidden features — brilliant jewels in the form of off-the-beaten-path commands kept secret from others, but not from you!


Soon, it might look like your toolbars are infested with more icons than mosquitoes in a jungle! Sometimes, a command that sounds perfect turns out not to be at all what you’d hoped it’d be. You can easily get rid of an unwanted or little-used command. For Mac diehards, it’s akin to removing a Dock icon without the poof!


Follow these steps to clean your toolbars in Office 2011 for Mac:


  1. From the menu bar, choose View→Toolbars→Customize Toolbars and Menus.


    This brings up the Customize Toolbars and Menus dialog.


  2. Click and drag any unwanted commands off toolbars or menus and let go anywhere.


    You can drag it back to the open dialog or just into empty space.


  3. Click OK to close the Customize Toolbars and Menus dialog.


    Now you can get back to your non-infested jungle . . . er, program interface.


dummies

Source:http://www.dummies.com/how-to/content/office-2011-for-mac-removing-a-toolbar-command.html

AutoCAD 2012’s Drawing Scale and Limits Charts: Millimeters

It’s not a bad idea to set limits for your AutoCAD drawing. The limits represent the rectangular working area that you’ll draw in, which usually corresponds to the paper size. Setting AutoCAD's limits correctly lets you display the drawing grid over your working area, use ZOOM All to display that working area, and plot your working area from model space. The following table sets out the dimensions in millimeters of work areas for different paper sizes at different drawing scales.


Drawing Scale210 x 297 mm297 x 420 mm420 x 594 mm594 x 841 mm841 x 1,189 mm
1:20042,000 x 59,400 mm59,400 x 84,000 mm84,000 x 118,800 mm118,800 x 168,200 mm168,200 x 237,800 mm
1:10021,000 x 29,700 mm29,700 x 42,000 mm42,000 x 59,400 mm59,400 x 84,100 mm84,100 x 118,900 mm
1:5010,500 x 14,850 mm14,850 x 21,000 mm21,000 x 29,700 mm29,700 x 42,050 mm42,050 x 59,450 mm
1:204,200 x 5,940 mm5,940 x 8,400 mm8,400 x 11,880 mm11,880 x 16,820 mm16,820 x 23,780 mm
1:102,100 x 2,970 mm2,970 x 4,200 mm4,200 x 5,940 mm5,940 x 8,410 mm8,410 x 11,890 mm
1:51,050 x 1,485 mm1,485 x 2,100 mm2,100 x 2,970 mm2,970 x 4,205 mm4,205 x 5,945 mm


dummies

Source:http://www.dummies.com/how-to/content/autocad-2012s-drawing-scale-and-limits-charts-mill.html

My Internet Connection: Info to Keep Handy

Use these spaces to keep track of key information about your Internet connection, including your Internet Service Provider, your TCP/IP configuration, and information about your router.


Provider:


Company name: ____________________________________


Technical-support contact: ____________________________


Technical-support phone number: ______________________


Web site: __________________________________________


E-mail address: _____________________________________


TCP/IP information:


IP range: ___________________ to _____________________


Subnet mask: _______________________


Default gateway: ____________________


Nameservers: ________________ – _________________ –________________


Router information:


Make and model: ______________________________


Internal IP address (LAN): _______________________


External IP address (WAN): ______________________


Administrator username: ________________________


Password: DON’T WRITE IT HERE! (Memorize it or keep it in a safe place.)


dummies

Source:http://www.dummies.com/how-to/content/my-internet-connection-info-to-keep-handy.html

Keep Confidentiality Even After the M&A Letter of Intent Is Signed

Depending on the terms of the letter of intent (LOI), informing outsiders about the deal may be a breach of confidentiality. If one or both of the companies is public, disclosure of this insider information may be considered illegal, especially if someone uses it to buy or sell stock. But it’s easily avoidable — just keep your mouth shut.


Even if the Buyer and Seller are private companies, improperly disclosing deal discussions may harm one or both of the companies. The Seller is most susceptible to consequences: Employees may jump if they think they’ll lose their jobs post-sale, and competitors can use the information to steal customers from the Seller.


Don’t call the M&A seller’s employees without permission


Unfortunately, Buyers have been known to pick up the phone and call a Seller’s employees prior to the deal closing. Sometimes, Buyer even lets slip that he’s buying the company and that the employees will soon have a new boss.


Although the cause of this behavior is usually not malicious (in their excitement about doing a deal, would-be Buyers jump the gun and start calling employees as if they’ve already closed the deal), this conduct is still wholly unacceptable and really just poor form. Tipping off an unsuspecting employee about a deal can cause untold havoc in Seller’s business, much like breaking confidentiality can.


Buyers should always follow the chain of command and only speak with those people who know about the deal and to whom the Seller explicitly agrees you can contact. Make sure you go through the proper channels.


Don’t contact a seller’s customers or vendors without authorization


Another huge no-no for Buyers! Customers are the most important relationship for a Seller, and a Buyer who carelessly contacts a customer and informs her about the pending deal may cause that customer to find a new vendor. This kind of breach can quickly scuttle the deal, as well as harm the Seller.


In most cases, this breach is caused by an overzealous Buyer trying to conduct due diligence. Although determining the strength of the relationship with customers is important, this situation is delicate, and Buyers should tread carefully.


Buyers should refrain from contacting Seller’s vendors without permission for the same reasons.


dummies

Source:http://www.dummies.com/how-to/content/keep-confidentiality-even-after-the-ma-letter-of-i.html

Bookkeeping: How to Track Sales Discounts

When your business offers discounts to customers, a good bookkeeping tactic is to track the sales discounts in a separate account so you can keep an eye on how much you discount sales in each month.


Most businesses occasionally offer sales discounts to generate more sales. Sales discounts are usually in the form of a “percentage off” discount on purchases. If you find you’re losing more and more money to discounting, look closely at your pricing structure and competition to find out why it’s necessary to frequently lower your prices in order to make sales.


You can track discount information very easily by using the data found on a standard sales register receipt. The following receipt from a bakery includes sales discount details.


Sales Receipt        (Date)
ItemQuantityPriceTotal
White Serving Set1$40.00$40.00
Cheesecake, Marble1$20.00$20.00
Cheesecake, Blueberry1$20.00$20.00


$80.00
Sales Discount @ 10%

($8.00)


$72.00
Sales Tax @ 6%

$4.32


$76.32
Cash Paid

$80.00
Change

$3.68

From this example, you can see clearly that the store takes in less cash when discounts are offered. When recording the sale in the Cash Receipts journal, you record the discount as a debit. This debit increases the Sales Discount account, which is subtracted from the Sales account to calculate the Net Sales.


Here's what the bakery’s entry for this particular sale looks like in the Cash Receipts journal:


DebitCredit
Cash in Checking$76.32
Sales Discounts$8.00
Sales
$80.00
Sales Tax Collected
$4.32
Cash receipts for April 25


If you use a computerized accounting system, add the sales discount as a line item on the sales receipt or invoice, and the system automatically adjusts the sales figures and updates your Sales Discount account.


dummies

Source:http://www.dummies.com/how-to/content/bookkeeping-how-to-track-sales-discounts.html

Nikon D3000 For Dummies

With the D3000, Nikon proves once again that you don't have to give an arm and a leg — or strain your back and neck — to enjoy dSLR photography. This new addition to the Nikon family of dSLRs doesn't skimp on power or performance, offering a great set of features to help you take your photography to the next level. To help you get started using your D3000 camera, we’ve provided a handy reference to your camera’s buttons and dials and automatic and advanced exposure modes.


>


>


Get to Know the Controls on Your Nikon D3000 Digital Camera


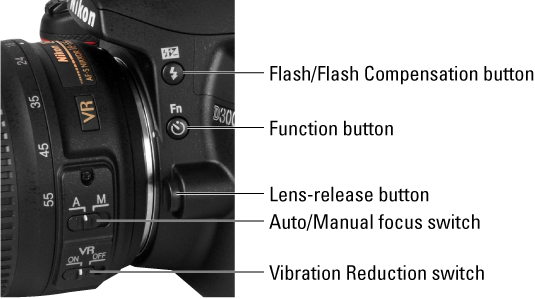
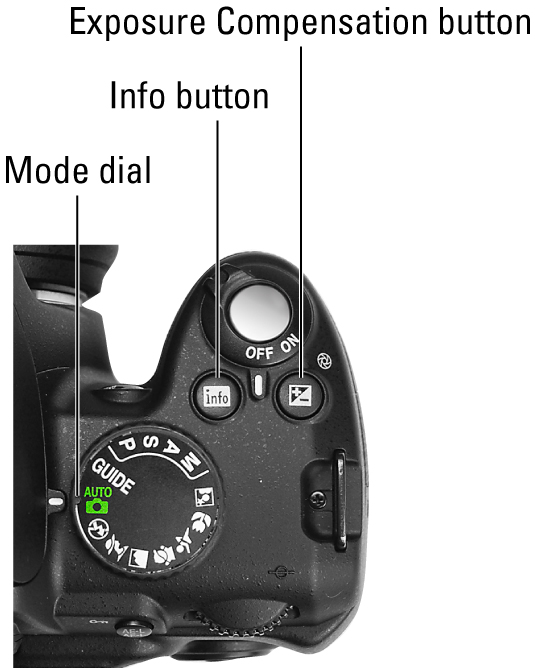
Here’s a quick reference guide to the buttons, dials, and other external controls on your D3000. Note that the lens shown is the Nikkor 18–55mm AF-S DX (Vibration Reduction) model sold with the D3000 kit; other lenses may not have the same controls. Camera controls marked with an asterisk have multiple functions and thus multiple names.


image0.jpg
image1.jpg
image2.jpg


>


>


>


A Quick Guide to Automatic Exposure Modes on Your Nikon D3000


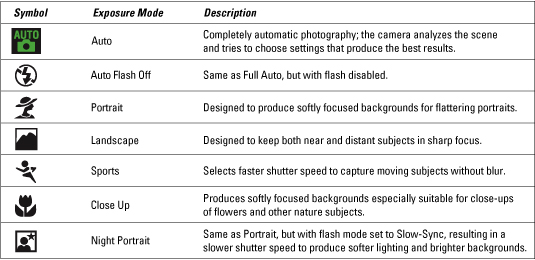
When you're just starting out with digital SLR photography, these fully automatic modes on your D3000 can make life easier. Select the mode you want to use from the dial on top of the camera and then just frame, focus, and shoot. For a little extra help, set the Mode dial to the Guide setting to access your camera's step-by-step guided menus.


image0.jpg


>


>


>


Advanced Exposure Modes for Your Nikon D3000 Digital Camera


To really take creative control, step up to one of these four exposure modes, which enable you to adjust aperture (f-stop) to manipulate depth of field (the zone of sharp focus) and adjust shutter speed to determine whether moving objects appear sharply focused or blurry. You also gain access to some features not available in the fully automatic modes, such as the option to adjust flash power and tweak white balance.


image0.jpg


>


>
dummies


Source:http://www.dummies.com/how-to/content/nikon-d3000-for-dummies-cheat-sheet.html

How to Plan a Long-Term Project

Planning and managing a long-term project presents special challenges. Often the work you perform a year or more in the future depends on the results of the work you do between now and then. Even if you can accurately predict the work you’ll perform later, the farther into the future you plan, the more likely it is that something will change and require you to modify your plans.


When developing a work breakdown structure (WBS) for a long-term project, use a rolling-wave approach, in which you continually refine your plans throughout the life of your project as you discover more about the project and its environment. The rolling-wave approach acknowledges that uncertainties may limit your plan’s initial detail and accuracy, and it encourages you to reflect more accurate information in your plans as soon as you discover it.


Apply the rolling-wave approach to your long-term project by taking the following steps:


  1. Break down the first three months’ work into components that take two weeks or less to complete.


  2. Plan the remainder of the project in less detail, perhaps describing the work in packages you estimate to take between one and two months to complete.


  3. Revise your initial plan at the end of the first three months to detail your work for the next three months in components that take two weeks or less to complete.


  4. Modify any future work as necessary, based on the results of your first three months’ work.


  5. Continue revising your plan in this way throughout the project.


dummies

Source:http://www.dummies.com/how-to/content/how-to-plan-a-longterm-project.html

Fine-Tuning Your Acting Performance on Film

Acting in film and television can require a special set of acting skills. Film and television can show anything from two normal people eating a normal lunch to microscopic people swimming through someone's arteries, and as an actor, you need to be prepared for how different genres of film and television affect how you act out your role.


Acting for the camera


In film and television acting, you often don't have the luxury of a live audience giving you feedback of any kind. Instead of a theater full of people, your audience is just a camera, the camera operator, the director, and any sound, light, and makeup technicians who happen to be standing around at the time. This means that you need to use your imagination and pretend that the cameraman staring at you is actually your long-lost lover, or that the stern look on the director's face is actually the friendly face of your best friend. When you play to the camera, you have to project emotions to the unblinking eye of the camera.


To help you "play to the camera," keep these ideas in mind:


  • Know where the camera (or cameras) are at all times. You can give the best performance of your life, but it will be worthless if the camera can't see your face.

  • Know what the camera is trying to capture. If the camera is capturing a long shot of you off in the distance, concentrating on arching your eyebrow to convey emotion will just be a waste of time since the camera won't be able to see it.

  • Know where the other actors and props are located in relation to the camera. If you step too far forward or back, your body or a simple gesture, such as waving your hand, can block the camera's view of another actor.


Watch a television show or movie on video with the sound turned off. Without any dialogue to guide you, can you guess what the actors are trying to say to each other? Body and facial gestures can convey more information to an audience than you may think. By studying films or television shows with the sound off, you can study how gestures can help (or hinder) an actor's performance on-camera.


Videotape yourself performing a monologue and look for inconsistent actions that detract from your character. For example, if you're portraying a tough, confident business-person, twirling your hair around your finger and biting your lower lip probably isn't going to support your character portrayal. Ask your acting coach or instructor to watch your videotape and comment on the type of character that he or she thinks you're portraying. If you think that you're portraying a tough guy but your acting coach thinks that your portrayal represents a timid character, you may need to work on your acting skills so that you can portray different types of characters consistently and accurately.


Acting consistently with different takes


Because everything you do in front of the camera is captured on film or videotape, you just have to deliver the best possible performance once and that's it, right? Wrong. In the world of film and television, you don't just perform a scene once. You perform the same scene over and over again, so the director can capture that scene from different angles, or so the actors can try different variations on their acting. The same scene may be shot three or four or ten different times.


If a director wants to shoot the same scene over and over, don't take it personally as if you're doing something wrong. Sometimes, the director just wants to capture several different versions of the same scene, so he can choose the best one to use later. Actor John Ritter once did a commercial where he had to kiss a woman on the beach, and the director made him do it over and over and over again. John Ritter couldn't understand what he was doing wrong, so he asked the director. The director told him that he wasn't doing anything wrong. The director just wanted to capture the different appearances of the sunset in the background.


To maintain consistency from take to take (a take is a short scene that is captured on film or videotape), you have to be aware of continuity each time you perform a scene on camera. (Continuity means making sure your body movements and appearance are identical in every take.)


From an actor's point of view, the problem with shooting the same scene over and over again is that the actors never know which scene (or parts of each scene) will ultimately be used, so they need to be consistent in appearance, movement, and acting in every scene. Part of the first scene that they filmed may possibly be used followed by part of the last take of that same scene and ending with part of the fourth take of that same scene. When viewed one after another, the different mish-mash of scene takes need to blend together seamlessly as if the camera recorded the whole scene at once from start to finish.


To achieve this illusionary blend of reality, film and television actors must know how to act consistently each time they perform a scene, no matter how many times they need to perform it. For example, if an actor is filming a dinner scene and picks up a glass with his right hand, he needs to remember to keep picking up that same glass with his right hand and not suddenly do a retake of the same scene and pick up the glass with his left hand.


The script supervisor is supposed to make sure that the actors perform, dress, and act as closely as possible with each retake of a scene. That way, when the director chooses which scene takes to use, the film or television show gives the illusion that every part of the scene was captured at the same time (even if part of the scene was captured in the morning, another part captured in the afternoon, and the beginning part of the scene captured last).


When doing multiple takes, you need to know the difference between acting and action. Acting deals with how you portray a character, while action is what you do with your body and any props. When shooting another take, subtly altering your acting is okay, but make sure that your actions remain exactly the same.


To see how well you can maintain consistency in front of the camera, videotape yourself and a fellow actor performing a short scene. Shoot the scene three or four times, and if you have a video editing program for your personal computer (such as iMovie found on the iMac), you can mix and match different parts of each take together. Does the entire scene appear to have been filmed at the same time, or can you notice any glaring differences between parts of the scene (such as your hand resting in your lap in one scene but not in another)? If you notice glaring differences, you may need to work on being more consistent when performing in front of the camera, whether it's the first take or the twenty-third take.


Successfully acting scenes out of order


Besides maintaining continuity throughout multiple takes of the same scene, you also have to worry about continuity between different scenes. For financial reasons, film and TV shows are often shot out of order. For example, if a film opens and ends with a scene on the Golden Gate Bridge in San Francisco, the director has two choices:


  • He can shoot the beginning scene on the Golden Gate Bridge and then move on to shoot the rest of the film until the end when the film crew and actors will need to travel back to the Golden Gate Bridge to film the ending.

  • Or, he can save travel and lodging expenses by shooting both the beginning and ending of the film on the Golden Gate Bridge at the same time (while the actors and film crew are already set up).

Not surprisingly, most directors opt to save money and shoot scenes out of order.


As a result, on your first day on the set, you may possibly shoot the last scene of the film. Then on the final day on the set, you may shoot the first scene. If your character is supposed to be timid and shy at the beginning of the film but aggressive and domineering by the end, your acting must reflect these characteristics. If you fail to act appropriately in a scene, your character won't make any sense when someone views the scenes in their correct order.


(Many actors mark up their scripts with notes for how their character should be acting and feeling in every scene. That way, when director shoots a scene out of order, the notes in the actors' scripts can remind them how to portray their characters accurately.)


Videotape yourself and your fellow actors performing three consecutive scenes from a play. Now perform and record the last scene, take a 10-minute break, record the first scene, take another break, and, finally, record the middle scene. Rearrange these recorded scenes (by using a video editing program on your personal computer, such as iMovie on an iMac) and play them in order. Do the three scenes appear to flow as if they really did occur one after another? Or does the acting appear jumpy and inconsistent from one scene to the other? If your acting is inconsistent between the different scenes, you may need more work acting in front of the camera.


dummies

Source:http://www.dummies.com/how-to/content/finetuning-your-acting-performance-on-film.html
How to Announce Your Engagement

You might decide to announce your engagement to the multitudes by way of your current local newspaper, your hometown newspaper, or the one where your parents currently reside. It’s the most mannerly way to alert the public of your intentions; sending out engagement announcements is frowned upon because it looks like a ploy to get gifts.


In the age of reality TV and confessional talk shows, going public with details of your engagement or wedding in a local newspaper may seem low profile and old-fashioned. Nonetheless, you need to undertake these formalities with care to present yourselves as a couple in the best possible light for public record.


Many papers no longer publish engagement announcements because they discovered that vendors deluged the couple with solicitations — and that engagements don’t always end in marriage. The papers would rather print the wedding announcement.


Some newspapers publish wedding announcements as a free service to readers, while others treat them like classified ads and charge a fee. They usually have a form you must print or type out—if your newspaper has a Web site, you may be able to download the form there. Otherwise, call to find out the procedure, submission deadline and photo specifications.


Engagement parties are another popular way to share your news. If you’re lucky enough to have friends or family who’ll host a party to celebrate your engagement, the invitation will serve as an announcement itself.


Another popular way to announce your engagement is by building a wedding Web site. After your site goes live and you’ve tested the features, send an e-mail to family and friends announcing your Web site launch.


dummies

Source:http://www.dummies.com/how-to/content/how-to-announce-your-engagement.html

Network Administration: ARP Command

Using the arp command allows you to display and modify the Address Resolution Protocol (ARP) cache. An ARP cache is a simple mapping of IP addresses to MAC addresses. Each time a computer’s TCP/IP stack uses ARP to determine the Media Access Control (MAC) address for an IP address, it records the mapping in the ARP cache so that future ARP lookups go faster.


If you use the arp command without any parameters, you get a list of the command’s parameters. To display the ARP cache entry for a specific IP address, use an -a switch followed by the IP address. For example:


C:\>arp -a 192.168.168.22
Interface: 192.168.168.21 --- 0x10004
Internet Address Physical Address Type
192.168.168.22 00-60-08-39-e5-a1 dynamic
C:\>

You can display the complete ARP cache by using -a without specifying an IP address, like this:


C:\>arp -a
Interface: 192.168.168.21 --- 0x10004
Internet Address Physical Address Type
192.168.168.9 00-02-e3-16-e4-5d dynamic
192.168.168.10 00-50-04-17-66-90 dynamic
192.168.168.22 00-60-08-39-e5-a1 dynamic
192.168.168.254 00-40-10-18-42-49 dynamic
C:\>

ARP is sometimes useful when diagnosing duplicate IP assignment problems. For example, suppose you can’t access a computer that has an IP address of 192.168.168.100. You try to ping the computer, expecting the ping to fail; but lo and behold, the ping succeeds. One possible cause for this may be that two computers on the network have been assigned the address 192.168.168.100, and your ARP cache is pointing to the wrong one.


The way to find out is to go to the 192.168.168.100 computer that you want to access, run ipconfig /all, and make a note of the physical address. Then return to the computer that’s having trouble reaching the 192.168.168.100 computer, run arp -a, and compare the physical address with the one you noted.


If they’re different, that two computers are assigned the same IP address. You can then check the Dynamic Host Configuration Protocol (DHCP) or static TCP/IP configuration of the computers involved to find out why.


dummies

Source:http://www.dummies.com/how-to/content/network-administration-arp-command.html

Considering the Reasons to Study Abroad

After you've gotten through the first year at your home university, you probably feel like you finally know all the buildings on campus, can find your way around town, know which professors to avoid, which dining hall is busiest at lunch, and of course, have made plenty of friends. So why leave this cozy little environment you've created for yourself just to go back to being the new kid on the block? Because your experience abroad is definitely worth the few trials and tribulations of starting over!


Think of study abroad as just an extension of your studies at your home university. Your time away should be an integrated part of your four-year undergraduate academic plan. When you go abroad, you will likely take courses that, in some way, build on or add to the courses you are taking at your home university. Study abroad is also a great time to begin independent research projects. Increasing numbers of students conduct research abroad and then work with faculty members when they return to convert their projects into senior theses.


Ready, set, grow!


Studying abroad definitely challenges you on a personal level. Whether you consciously realize it or not, you develop a greater self-confidence, independence, and self-reliance. By the time you return home, you may feel like a super hero: You can do anything!


Studying abroad may be the first time you are truly away from home — all your familiar surroundings here in the U.S., as well as friends and family. While this isn't always easy, most students agree that the benefits of giving up your familiar environment for a short period of time far outweigh the reasons to stay at home. Believe it or not, if you immerse yourself in a new culture, experiment with new ways of thinking, or try a different way of living, you naturally experience some sort of personal growth. After you master your new culture and the abroad academic life, you will return home much wiser and probably slightly impressed with yourself for having had a successful time abroad.


Changing your perspective


If you go abroad with an open mind, then you're certain to return to the U.S. a more enlightened person. One of the major benefits of studying abroad is its ability to broaden your world understanding and perspective on just about anything. You gain a different view of international affairs, from politics to economics to social issues. You also return with a deeper understanding and respect for your host country, knowing how another culture approaches daily life and unusual challenges.


You may also return with a new appreciation for the U.S. Living in another culture can help you understand your own on a deeper level. You may return grateful for the way of life in the U.S., its political system, or its foreign or domestic policies. Through your interactions with your abroad professors, your new peer group, and other foreign or U.S. students on your program, you can find out what others think about the U.S. (and this is usually both positive and negative).


While abroad, a new academic interest or perspective on your major may emerge. Studying at an abroad university allows you to study subjects that aren't available at your home university.


You also study familiar subjects but from a different cultural perspective. For example, if you study international relations in France, it will be from a European perspective. Alternatively, studying the U.S. and American history from a different country's point of view can be fun. And, of course, all your classroom learning is enhanced by living in your abroad location and interacting with host families, housemates, roommates, or friends who are native to your abroad country.


Jump-starting your career


Studying abroad typically gives your resume a nice boost and improves your post-graduate employment prospects, particularly if you're considering a career in business, international affairs, or government service. Nowadays, employers actively seek college graduates who have spent time studying abroad because they want employees with an international knowledge base as well as foreign language skills.


The same international skills that make you more marketable for employment are also valued by graduate schools. These skills include cross-cultural communication skills, analytical skills, teamwork, flexibility, an understanding of cultural contexts, the ability to adapt to new circumstances and deal with differences, a developed view of the world outside the U.S., independence, and self-confidence.


Experiencing a different education system


Institutions of higher education outside the U.S. function differently than what you're accustomed to. Even if your program is directed by a U.S.-based school, your experience can still differ because U.S.-based programs often employ local professors.


In the U.S., most students pay to go to college. It's kind of a pay-for-service model in which students pay for the education and in return expect their professors to conduct lectures, foster class discussion, hold office hours, and so on. This isn't usually the case in other parts of the world. If students don't pay for school or if the government (maybe through taxes) subsidizes tuition, then students don't feel as entitled. The tables are turned. Students have the privilege of going to school and therefore, it is up to them to take responsibility for their own learning.


Abroad universities are much less focused on grades. They care more about learning to increase understanding and knowledge. Therefore, you can expect much more of a lecture format to your classes and not much (if any) class discussion or participation. You can also expect to have less one-on-one interaction with your professors. (Professors at your abroad university may not even be required to hold weekly office hours.) However, the flexibility of curriculums abroad often gives students at abroad universities more freedom to explore their own interests within a course than would be allowed or even feasible in the U.S.


The difference in set ups between your home university and your host university doesn't mean you should assume that academics are easier abroad.


All these differences don't mean that the education you receive while you're abroad is better or worse than the education you get at your home university — it's just bound to be different. If you don't like your abroad classroom or learning style, chalk it up to a learning experience. Accept the challenge to learn in a different way, in a different cultural setting.


Before you take the plunge, think about your own personal reasons for wanting to go abroad because when you return from studying abroad, you'll assess whether you achieved your goals or hopes for studying abroad. Whatever your reasons for studying abroad, make sure that they are not only attainable, but also positive. For example, learning a second language, studying about another culture, diversifying your studies, preparing for graduate school, or traveling to meet new people are all good reasons to study abroad.


dummies

Source:http://www.dummies.com/how-to/content/considering-the-reasons-to-study-abroad.html

How to Make Sablés


2 of 10 in Series:
Cookie Recipes to Impress Your Friends


Sables (pronounced SAH blay) are a classic French butter cookie that originated in Normandy and are now popular throughout France. The name of these cookies means “sand,” which refers to their crumbly texture. Traditionally, the deliciously buttery shapes are round with fluted edges, but you can use any of your favorite cookie cutters.


Specialty tools: Rolling pin, cookie cutters


Preparation time: 1 hour; includes chilling


Baking time: 9 minutes


Yield: 4 dozen


2-3/4 cups all-purpose flour


1/8 teaspoon salt


3/4 cup sugar


3/4 cup (1-1/2 sticks) unsalted butter, cold


2 eggs


1 teaspoon vanilla extract


  1. Preheat the oven to 350 degrees. Line a cookie sheet with parchment paper.


  2. Combine the flour, salt, and sugar in a food processor fitted with the steel blade and pulse briefly to blend. Cut the butter into small pieces and add. Pulse until the butter is cut into very tiny pieces. In a small bowl, lightly beat the eggs with the vanilla and add to the butter mixture. Pulse until the dough forms a ball, about 30 seconds.


    To mix the dough using a mixer and bowl beat the butter until fluffy, about 2 minutes. Add the sugar and cream together well. Lightly beat the eggs with the vanilla extract and add. Blend well, stopping occasionally to scrape down the sides of the bowl. Combine the flour and salt and add to the mixture in three stages, blending well after each addition.


  3. Divide the dough in two and roll each section between sheets of lightly floured wax paper to a thickness of 1/4 inch. If the dough is soft, chill on a cookie sheet in the freezer for 10 to 15 minutes.


    Gently peel off the wax paper and use a variety of cookie cutters to shape the dough. Transfer the cookies to the lined cookie sheet, leaving 2 inches between the cookies.


  4. Bake for 9 to 13 minutes, until the cookies are golden and set.


    Remove the cookie sheets and transfer the cookies from the parchment to cooling racks. Store in an airtight container at room temperature for up to a week or freeze for longer storage.


Per serving: Calories 65 (From Fat 28); Fat 3g (Saturated 2g); Cholesterol 17mg; Sodium 9mg; Carbohydrate 8g (Dietary Fiber 0g); Protein 1g.


dummies

Source:http://www.dummies.com/how-to/content/how-to-make-sables.html

How to Evaluate Your Strategic Priorities

Eventually in the strategic planning process, you will have funneled everything you’ve gathered to date into a short list of internal and external priorities. Before you move on from there, do one last check to make sure that what you’ve decided to focus on is aligned with the other parts of your strategy.


Here are some guiding principles to keep in mind when evaluating priorities:


  • Boundary principle: Evaluate every priority based on whether it’s within your mission. Set a rule to require that the opportunity aligns with the organization’s core purpose and values.


  • How-to principle: Develop a principle that requires you to sketch out how to implement the priority if you took advantage of it before jumping in. If you can’t clearly define an action plan for the priority, you know that trying to execute it will go poorly.


  • ROI principle: Prioritize options based on how much money you want to see returned within a certain time period. Pull in your finance or accounting people to help you establish this one.


  • Vision principle: Prioritize some priorities over others based on their connection to reaching your vision. Set a rule to require that all opportunities must help you reach your vision.


Clearly, in the strategic planning process, you seek options and choices. But such decisions occur regularly outside of strategic planning. By establishing rules, you can quickly evaluate whether an opportunity is really an opportunity or a distraction.


Develop a set of principles and use it as a litmus test. If the opportunity doesn’t pass the test, it’s out. Lastly, if the priority isn’t clear to those who haven’t worked on the prioritization described in the section, it’s not going to be accepted.


dummies

Source:http://www.dummies.com/how-to/content/how-to-evaluate-your-strategic-priorities.html

Spotify Search for Firefox and Spotify Super Search

The Spotify Search for Firefox, a nifty and hugely popular little add-on, lets you highlight some website text (such as an album title or artist), right-click it (or Ctrl-click on a Mac), and then select Spotify Search from the menu that appears to open a list of search options.


You can choose to either do a free search, which is just a search for those keywords, or specifically search for an artist, album, or song. It works very well, with results loading up in Spotify just as quickly as they would if you were conducting a regular search on Spotify.


Another benefit is that the Spotify Search feature is very non-intrusive: The tool is hidden from view until you right-click the highlighted text that you want to search.


Download Spotify Search for Firefox at the Mozilla Addons site.


Jer White has created yet another excellent resource: a way to help make Spotify searching easier. At Spotify Super Search, you can search by artist, album, track, genre, or year, and then select options from the drop-down lists to look for results either matching or not matching a particular search term.


There are other options available, too, such as searching only some, but not all, search terms in your query. You can add as many terms to the search as you want.


The search is generated in real-time onscreen so that you can see what you’d normally be typing into Spotify’s search bar. This is actually a good way to figure out how to conduct advanced searches through Spotify on your own!


dummies

Source:http://www.dummies.com/how-to/content/spotify-search-for-firefox-and-spotify-super-searc.html

Getting the Most Out of Your PR Hired Help

You've looked at your checkbook, looked with dismay at your current promotion campaign, and made a major decision: You want your promotions to be first class, and you've decided to get professional help — an advertising agency, a PR firm, a freelancer, or a graphic design studio. Here are some helpful hints for getting the best work out of your outside supplier with the least amount of trouble:


  • Brief your agency. The more your PR firm or advertising agency knows about your product, your company, and your markets, the better. Tell your agency what makes your product unique. Explain its advantages over the competition's products. Explain your marketing strategy. Provide background material in the form of current ads and press releases, brochures, articles on your industry, and market-research reports. The best clients prepare comprehensive agency briefings in writing.

  • If you use separate agencies for advertising and PR, brief them both at the same input meeting. Doing so further helps ensure integration between your advertising and PR campaigns. It also saves you from having to present the same background briefing twice.

  • Do not compete with your agency in the creative area. You certainly can disapprove of the brochure copy or the press kit that your agency turns in. Make helpful criticisms and turn it back for a revision. But don't tell outside talent how to do the job. If you can write better than the writer and take better pictures than the photographer, fire them and do the work yourself.

  • Don't strain your promotions through many layers of approval. You, and possibly your business partner, should approve or disapprove the work that the outside agency submits. But don't look for approval from your purchasing agent, your accountant, your cashier, and your mother-in-law. Too many levels of approval muddy clear writing and water down the impact of the message. Worse, they dampen the creative spirit of your writers or artists so that the next thing they do will be mediocre enough to get your company's instant approval.

  • Be reasonable about paying. Making a good profit in PR or advertising is difficult, and many agencies and freelancers have gone out of business waiting for late payments from their clients. Be fair to your agencies and freelancers and pay them promptly.

By all means, watch expenses carefully, and don't pay for something you never asked for in the first place. On the other hand, too much haggling over money can cause your outside professionals to put forth less effort on your account. You will get a competent promotion, but not a great one.


That said, when you hire a PR agency to work with you, it's essential that you stay in charge of the process. If the agency is making the decisions, it's akin to the tail wagging the dog. Your practitioner is there for advice (and you should hire someone who will give you the best advice), but you are the one who knows your company best. You are the one with daily and one-on-one contact with your customers. That's why you must be the ultimate decision-maker when it comes to how you implement your PR campaign.


  • Create a budget. Before talking to an agency, know what you can afford to spend on PR. Your budget will depend on where you are in your business cycle. A mature business will have different needs from those of a new business. In a major corporation, the PR budget will be 5 to 10 percent of the entire marketing budget. You must determine the parameters before you speak to an agency or a PR practitioner.

  • Set sensible expectations. This is the number-one key component in establishing a successful, long-term relationship and must happen from the beginning. The most realistic expectation is that the process takes time. Steer clear of any agency that promises to get you on Oprah next month. Create communication documents with time lines that spell out what will happen — not just the tactics but, for example, every little task that goes into writing a press release and getting it out to the press. Assign every item to a person so you see who's doing what and when it's due. Update these documents weekly, adding new assignments, checking off what's finished, and using red flags to indicate where you're late.

  • Understand who does what from the beginning. Hiring a PR firm doesn't make your work easier. If you want PR to work, you have to keep in mind that it is a partnership and will require a commitment of your time. You need to know how PR works (reading this book is a good start, of course). Typical tasks you should expect to do include talking to the press, taking incoming calls, sending product samples to the press, and so on.

  • Establish and maintain direction in the process. Set up a weekly conference call to review the weekly update so you see exactly what goes on. The decision-makers for your company need to be on the call, so schedule the conference call around them, if necessary.


dummies

Source:http://www.dummies.com/how-to/content/getting-the-most-out-of-your-pr-hired-help.html

Open and Edit Text Files on Your MacBook

As a MacBook user, you’ll be amazed how much information still flows across the Internet in plain, simple text. Text files would seem to be another anachronism in this age of formatted web pages, rich-text format (RTF) documents, and word processors galore. However, virtually every computer ever built can read and write in standard text, so text files are often used for


  • Information files on the Internet, such as FAQs (Frequently Asked Questions files)


  • README and update information by software developers


  • Swapping data between programs, such as comma- and tab-delimited database files


Here’s the quick skinny on opening, editing, and saving an existing text file:


  1. Navigate to your Applications folder and launch TextEdit.


  2. Press Command+O to display the Open dialog.


  3. Navigate to the desired text file and double-click the filename to load it.


    You can also open an existing text file by dragging its icon from the Finder window to the TextEdit icon.


  4. Click the insertion cursor anywhere in the file and begin typing. Or, to edit existing text, drag the insertion cursor across the characters to highlight them and type the replacement text.


    TextEdit automatically replaces the existing characters with those that you type. To simply delete text, highlight the characters and press Delete.


  5. After you finish editing the document, you can overwrite the original by pressing Command+S (which is the same as choosing File→Save), or you can save a new version by choosing File→Save As and typing a new, unique filename.


  6. To exit TextEdit, press Command+Q.


dummies

Source:http://www.dummies.com/how-to/content/open-and-edit-text-files-on-your-macbook.html

How to Maintain a Positive Online Community Environment

No one goes to a party to have a bad time, so don’t invite anyone to join a lackluster community. As online community manager, you are tasked with making sure that everyone is happy. This is no easy feat, given the different types of online personalities. Still, it’s important that a good time is had by all.


You’re going to have to deal with customer issues; there’s no getting around it. Some people are going to be less than cooperative, too. For a few, it’s more about making noise and making you look bad than rectifying the situation in a positive, productive matter. Still, community managers have an obligation to keep things positive, no matter how difficult the other person is trying to be.


Here’s what you can do when you have to deal with negative customers:


  1. Listen.


    Is a community member making a complaint? What is being said? If left, even for a little while, the situation can escalate, especially if the member has a clique of friends backing him up. Follow the entire conversation to see where it began and what led to the complaint or public outburst.


  2. Reach out.


    Offer to discuss privately via phone, instant message, or Skype. Listen to the other person’s story without being judgmental or confrontational.


  3. Take action.


    Do what you need to do to rectify the issue. You may need to handle it yourself or get another person involved, but do what it takes to get this customer satisfied and confident again.


  4. Follow up.


    Don’t rest on your laurels. Follow up and make sure that the situation was handled to the other person’s satisfaction. If it has been, wish her a happy day and move on. If it hasn’t, do what it takes again. And follow up. Again. Lather, rinse, repeat as often as necessary until there’s nothing more to be done.


This four-step process accomplishes a couple of things. By taking the conversation private, you’re keeping animosity or negativity out of the airwaves. This keeps bad issues out of the public eye, but also makes the customer feel as if she’s receiving personal care. Also, negativity has a way of spawning more negativity. If you take an issue private, you’re discouraging trolls and “me too-ers” from joining the party.


Also, by handling the issue immediately, you’re not sweeping it under the rug. You’re giving your customer faith and loyalty in the brand. By following up, you’re showing the customer and other customers that person may talk to that you’re seeing the issue through until it’s resolved.


The more people who view you and the company you work for in a positive light, the more positive and productive your community will become. Both you and the brand will be seen as caring, and your community numbers will only go up.


dummies

Source:http://www.dummies.com/how-to/content/how-to-maintain-a-positive-online-community-enviro.navId-323004.html

Understanding Aussie and Kiwi Wine Labels

Every piece of information on an Aussie or Kiwi wine label must be accurate. Federal and state legislation covers the labeling of wines in Australia and New Zealand, like any product.


The mandatory wine label items include:


  • The name and address of the wine company: This information is legally more important than the winery’s name, trademark or brand name! The address must not be a post office address.


  • The country of origin: The label must state which country the wine comes from. And, in the unusual yet occasional situation when some wine from another country is blended in with an Australian wine, this mix of origin must be stated on the label as a percentage, for example, 75 percent Australian wine plus 25 percent Chilean.


  • The volume of wine: The volume of wine must be on the front label; that is, the label that is the main face and that is exposed to the consumer. This information must also be in a font that is greater than 3.3 mm high.


  • Any additives or processing aids: From 2003, all Australian wine labels must state all products used in the winemaking process. The reason behind this is to warn anyone who has an allergic reaction to any of these products. Consequently, you may find reference to egg products (egg whites), beef tissue (gelatin) or fish tissue (isinglass) on a wine label. These processing aids are sometimes used to clarify the wine and, although it is very unlikely that any of these products remain after the wine has been racked, filtered and bottled, they must be listed on the label if any trace is likely to remain.


  • The variety: If the label says Cabernet Sauvignon then the wine must be between 85 percent and 100 percent from that variety of grape. Any added variety doesn’t have to be declared. If more than one variety is listed on the label, then the one used in the biggest proportion is listed first. So in a Grenache, Shiraz, and Mourvèdre blend, Grenache makes up the largest portion, Shiraz the second, and so on. The actual proportions don’t have to be listed, although you may sometimes find this as part of the back label blurb.


  • A description of the wine: Listing the variety or varieties of grape in the wine isn’t mandatory. However, a description of the wine must be included if the variety isn’t listed. So, instead of listing the blend — for example Shiraz, Cabernet, Durif, and Malbec — you can state that it is a ‘dry red wine’.


  • The percentage of alcohol and the number of standard drinks per bottle: Australia has a law that states that the label of any alcoholic beverage must convey the number of ‘standard drinks’ per bottle. Basically, this information is to save you from doing the calculations for yourself by giving you some idea as to how much alcohol you’ve drunk, thereby guiding you as to whether you’re under the legal limit to drive or operate machinery, for example.


dummies

Source:http://www.dummies.com/how-to/content/understanding-aussie-and-kiwi-wine-labels.html

Top Ten Web Sites for Canadian Stock Investors

The Web is full of sites promising great stock investing information, but who can you trust? Here are ten sites that offer Canadian stock investors reliable, trustworthy stock investing news and commentary.


dummies

Source:http://www.dummies.com/how-to/content/top-ten-web-sites-for-canadian-stock-investors.html

How to Prepare a Trust’s Final Accounting

Before terminating a trust, you as trustee will need to prepare a final account and obtain assent from all remaindermen. These are your last steps, usually completed after distributing the final income amounts, paying the last expenses, and filing the final tax returns. Final accounting should be done for non-probate and probate trusts. Obtaining remaindermen assent can protect you from a potential lawsuit.


Final accounting for a non-probate trust


You prepare this final account just like all the others you’ve prepared up until now. You’ll know this is the final account because you’ll mark it “final” on the cover page, and Schedules C and F will show zero balances. As you prepare this account and then obtain the signatures of the beneficiaries, keep the following in mind:


  • Don’t discontinue preparing your annual accounts just because the income interest in the trust has ended. It may take years after the income interest has terminated before you actually get to prepare the final account. Sometimes, even though the trust is terminating, the assets remaining don’t transfer to the remaindermen for a very long time. As you’re responsible for any assets, you need to account for them.


  • After you prepare the final account and sign the cover page, give it to all the remaindermen to sign off on. You don’t need to have the income beneficiaries sign off on your accounts after the income interest has expired.


You may want to have an attorney draft the final assent letter. Obtaining the remaindermens’ assent releases your liability with acceptance of the distribution. If a trustee releases all the assets and fails to obtain assents, he or she could be sued later when the trust no longer has any assets.


Be sure to provide copies of accounts to beneficiaries and remaindermen when you ask for their assent. And keep the originals of all the accounts, including this final one, and all the signed assents. You can never be certain when someone will raise a question regarding your period of trusteeship.


Final accounting for a probate trust


Prepare the final probate account in the same manner as you would a non-probate account. Here are a few things to keep in mind:


  • Be sure to mark the account not only by its number but also as final. Sign the cover page as trustee.


  • Obtain assents from all the remaindermen. Usually, the probate court provides you with its official assent form to use for this purpose.


  • When mailing assents out to the remaindermen, send them either by registered or certified mail, and request return receipts. Doing so ensures that if one or more remaindermen is balky in providing the requested signature, you have proof for the probate court that you sent the form and that the remainderman received it.


After you receive all the assents, you may choose to have your accounts allowed by the probate court. If you opt for allowance, the probate judge will review your administration from the filing of the probate inventory through all the annual accounts and ending with the final account.


The probate judge then reviews the size of the fees that you took for your administration. The judge also checks to ensure that income was distributed as required and that the trust principal was distributed in accordance with the instrument.


Allowance isn’t absolutely required, but it never hurts to know that the probate court approved your administration.


If, when you petition the probate court to have your accounts allowed, any of the income beneficiaries or remaindermen are minors or are otherwise incompetent to legally act for themselves, the court may require that you have a guardian ad litem appointed to protect his or her interest.


Although this is not always avoidable, try to steer clear of this step by filing your accounts when they’re due but waiting until all the income beneficiaries and remaindermen are of legal age and capacity before you ask the court for allowance.


dummies

Source:http://www.dummies.com/how-to/content/how-to-prepare-a-trusts-final-accounting.html

Charming Your Way to Effective Magic

A four-leaf clover for luck. The suit that you always wear to job interviews for success. The ring you never take off because it represents your love for another person. The pendent you wear around your neck every day for protection. The small statue hanging from the rearview mirror of your car for safe travel. These items can all be considered charms. Magic is alive and well throughout modern society.


The people of the Craft have always used and appreciated charms. In general, a charm represents the change or outcome that a person intends to magically bring about. However, Wiccans use the word charm in two different ways:


  • Definition 1: An object that represents a desired change or outcome. The object focuses the mind and helps the person casting the spell to move and direct energy, causing the desired change to occur in the physical world. The object may be carried on the person, left in the home or other space, or used during magical or other ritual workings. Don't create a charm for someone else before getting his or her permission. You may give a charm as a gift, but generally Wiccans give charms only to other people in the Craft.

  • Definition 2: A set of words and actions that represent a desired change or outcome. These words and actions focus the mind and help the person casting the spell to move and direct the energy, causing the desired change to occur in the physical world. In this context, charm is a synonym for the word spell.

Alternatively, some Wiccans may say that they use charms to repel or attract specific energies, but if you think about it, that definition means the same as the above: to magically bring about a desired change or outcome.


Wiccans cleanse, charge, and/or consecrate their charms before they use them.


Several types of charms are common in Wicca. Amulets and talismans are popular types. Unfortunately, like the word charm, Wiccans aren't real precise about the meanings of these two words, either. Sigh. . . .


Charming basics


The following are steps for making an easy charm bag:


1. Find a small square or circle of cloth. Plain cotton is fine, but you can also use silk or velvet if you want to spend the money. Choose an appropriate color.


2. Pour any combination of the following onto the center of the cloth: herbs, stones, coins, seeds, fossils, or other materials that are relevant to the magical goal.


3. Bring up the edges of the cloth and tie with a natural vine, some string, or a ribbon.


4. If you desire, decorate the bag with words or symbols that reflect your magical intent.


Amazing amulets, nature's gifts


The following is probably the most common Wiccan definition for the word amulet:


An amulet is a natural object used as a charm. Amulets may include: stones, crystals, fossils, bird feathers found on the ground or in trees, four-leaf clovers, pieces of wood, nuts, shells (especially cowrie shells), dried flowers or other herbs, and seeds.


A good example of an amulet is a holey stone, also known as a hag stone, which is a stone with a natural (not a human-made) hole through it. Holey stones have long been carried as charms. The holes are considered doorways or portals through which someone can draw or repel energy. For example, the holey stone can bring luck or send away misfortune, bring wealth or banish deprivation, and so on. Many people look at the Moon through the holey stone in order to charge it with lunar power. Many cultures use holey stones for divination. To divine with a holey stone, the holder of the stone peers through the hole to see visions and gain wisdom.


Some fossils, such as the sand dollar, also have natural holes in them and assume the same magical qualities as a holey stone. Sand dollars have special meaning because they are natural pentacles.


Amulets may be found by accident or deliberately acquired.


Crafting talismans


The following is probably the most common Wiccan definition for the word talisman:


A talisman is a human-made or manufactured object used as a charm. Talismans may have natural elements, but they are incorporated into a human-created design.


A talisman is a magical tool, and the magic is more powerful if the person being affected by the spell is the one to make or acquire the talisman. In other words, magic is more effective if the person with the need makes the talisman and casts the spell. Making your own talisman is considered better than purchasing a manufactured one.


Many Wiccans wear or carry their talismans at all times. A common talisman is a piece of metal, wood, stone, or paper with words, symbols, or objects that are engraved, carved, painted, printed or attached. The words and/or symbols reflect a person's magical goal or intention. A common talisman is a metal disk (often made of copper) worn on a chain around the neck. If you want to wear or carry a talisman:


  • Identify the talisman as yours.

    Put your name on it (your common name or a Wiccan name). Possibly mark it with your birth date or astrological signs, or some other symbol that clearly represents you.

  • Add words, symbols, or objects that represent your desired change or outcome for the magic to the talisman.

    For example, if your goal is to overcome depression, write the word joy or optimism on your talisman. You may want to use an alphabet or symbol system from your cultural heritage, instead of the language you use every day. Or you may use an image or a symbol instead of words, for example, a butterfly emerging from a cocoon or a Phoenix bird rising from the ashes. You may attach (using glue, solder, or other means) a meaningful object, such as an appropriate stone or a found bird feather.

If your talisman has two sides (for example, a metal disk), place the identification on one side and the desired magical outcome on the other.


In addition to charms, which are used for magical purposes, many Wiccans own personal and/or ritual jewelry or other items that serve as a reminder of Deity, the Otherworld, or their own personal power or goals.


dummies

Source:http://www.dummies.com/how-to/content/charming-your-way-to-effective-magic.html