Styling food to look delicious and then taking an impressive photograph of your creation requires all kinds of tools, tricks, and know-how. You need an understanding of both the creative and the technical aspects of dealing with food as the subject, and you need to have all the equipment, props, backgrounds, and settings in place to capture the moment (because sometimes, you really have only a moment to get the perfect shot).
>
>
Food Photography Equipment Checklist
Taking great food images requires a good bit of quality photographic equipment. Unfortunately, this equipment can be somewhat expensive. A hand-held point-and-shoot camera or smart-phone camera simply won't do. The following list can help get you started in food photography:
A DSLR camera: If you're serious about food photography and hope to make money off your images, spring for a DSLR with a full-frame 35mm sensor ($2,000 and up). If photography is more of a hobby, you'll be happy with a crop-sensor DSLR ($500 and up). Forget about even high-end point-and-shoot cameras. They may offer a lot of megapixels, but the physical size of the image sensors in these cameras simply isn't large enough to capture the image detail you need.
Lenses: Look for high-quality lenses in the 40mm to 85mm range with a lower f value (such as f/2.8 or lower) to get yourself started. These lenses will allow you to take a wide variety of shots. As your budget grows, you can add a wider lens and a telephoto lens to expand your shooting options.
Camera stabilizers: Keeping your camera stable in low-light situations can really make a shot. Quality tripods and monopods can help you capture some really beautiful, clear images that would otherwise would not be possible if you were supporting the camera by hand. Avoid the flimsy $20 tripods found at low-price retailers. They aren't stable enough to use with a DSLR.
Lighting: Unless you plan to only photograph in natural light, you'll need a main light, filler light, and back light. These lights need to be good and diffused to create a soft lighting environment to best show off your food subjects. You should also consider investing in a soft box light, reflectors, and C-stands.
>
>
>
Placing Lights for Food Photography
You could be the greatest food stylist in the world, but no one will know if you don't light your photos properly. Knowing where to place lights for your shoot can really benefit the look and quality of your photos. And poor light placement can result in flat, dull images. Check out the following options:
Key light: A key light is the main or principal light that provides the majority of light for your setup. You should place the key light in front and to the side, which ensures that you get good reflections in the highlights.
Fill light: A fill light is a light that’s either lower wattage or placed farther away from the subject. The purpose of a fill light is to fill in and shape the light in a food subject. It’s a secondary light that decreases and controls the contrast when shooting.
Back light: A back light shoots across the very back of a setup. The back light provides a little smidge of light that allows a slight distinction between the subject and the background.
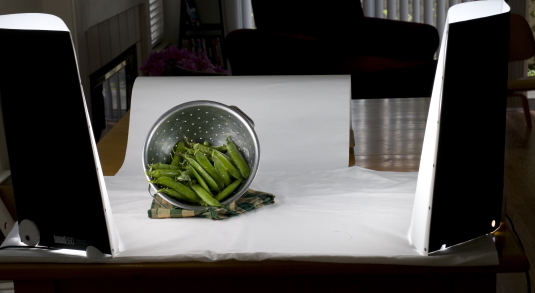
The setup in the following figure is a pretty common placement for a lighting setup. The key light on the left is closer in and stronger, and the fill light on the right is farther back and more subtle.

>
>
>
Removing Imperfections in Your Food Photography
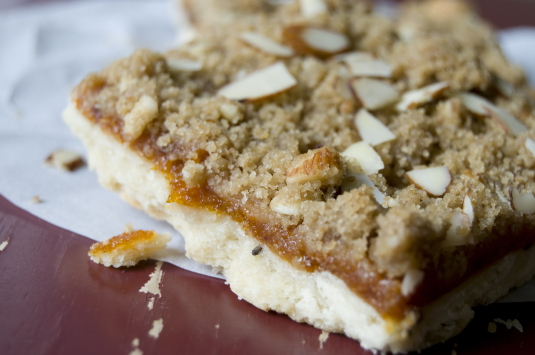
Due to the messy nature of food styling and photography, sometimes you’ll have an extra drip, bit, or speck of stuff that needs tidying up after the image has been shot. When you have a little problem that needs a bit of cleanup, use the Clone Stamp tool in Adobe Photoshop to tidy up the image. In the following figure, you see an appetizing shot of an apricot and nut square with a lavender-scented crust. Unfortunately, a little lavender piece is stuck right smack in the middle of the crust.. It's distracting.

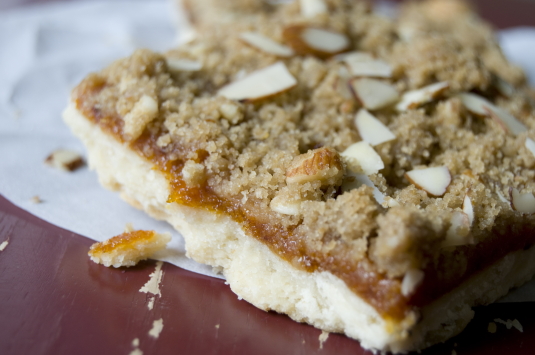
To fix the problem, zoom in, select the Clone Stamp tool, and then press the Option key and click (also referred to as Option + click) on a white area of the surrounding crust. Use the Clone Stamp tool to paint the white crust-colored pixels over the stray lavender bit. In the following figure, you can see the results. With just a few clicks, the image is left with a nearly flawless crust.

>
>
dummies
Source:http://www.dummies.com/how-to/content/food-styling-and-photography-for-dummies-cheat-she.html
No comments:
Post a Comment