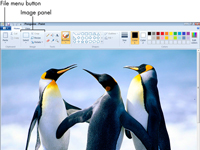
Windows Paint, Windows 7's improved drawing program, lets you resize or crop photos. Resizing photos makes them small enough for e-mails or size-specific for inclusion in a document. Many photos can also be improved by cropping — cutting out distracting elements and keeping just part of the photo — to concentrate on the most important part of the photo.
>
>
>
1
In the Pictures library, click a photo to select it. Click the triangle next to Preview and choose Paint from the menu.
>
Alternatively, you can open Paint from the Windows Photo Viewer. Choose Open→Paint to open the photo you’re previewing.
>
>
>
>
2
Click the File menu button to the left of Home and choose Save As.
>
The Save As dialog box opens. You can ignore the menu of file types, unless you know you want a particular file type.
>
>
>
>
3
Change the name in the File Name field to create a new copy of this picture. Click Save.
>
You’re now editing the new copy, so the original, unaltered file still exists under the original name. You may not need to do this for every photo, but saving a copy gives you some insurance against edits you can't fix.
>
>
>
>
4
To shrink the image, click Resize in the Image panel.
>
The Resize and Skew Dialog box appears.
>
>
>
>
5
In the Resize and Skew dialog box, enter a percentage less than 100 (without the percent sign) in the Horizontal field. Click OK.
>
If you're not happy with a change, you can undo each step by clicking the Undo button above the Home tab (or by pressing Ctrl+Z).
>
>
>
>
6
To crop, click Select in the Image panel above the photo. In the photo, click and drag a box over the area you want to keep and click Crop.
>
Everything outside this box will be deleted.
>
>
>
>
7
Click the Save button.
>
The newly cropped image is saved. However, if you decide you like the other one better, you can always go back to the original version of the image.
>
>
dummies
Source:http://www.dummies.com/how-to/content/how-to-resize-and-crop-a-photo-in-windows-7s-new-p.html


No comments:
Post a Comment