Microsoft tried to create the easiest, most intuitive collection of programs in the world. Yet chances are good that the programs are still too complicated for most mere mortals to use and understand. So rather than suffer in silence, take a few moments to customize the Microsoft Office 2003 user interface.
Changing icons on your toolbars
The toolbars in Office 2003 display the icons you use most often. However, toolbars only have a limited amount of space so you may want to choose which icons to appear on each toolbar by following these steps:
1. Click on the Toolbar Options button on the toolbar that you want to customize.
To view a toolbar that may be hidden, choose View --> Toolbars and then click on the toolbar you want to customize. When you click on the Toolbar Options button, a pull-down menu appears.
2. Click Add or Remove Buttons.
A pop-up menu appears that lists one or more toolbars such as Standard or Formatting.
3. Click on the name of the toolbar that you want to customize.
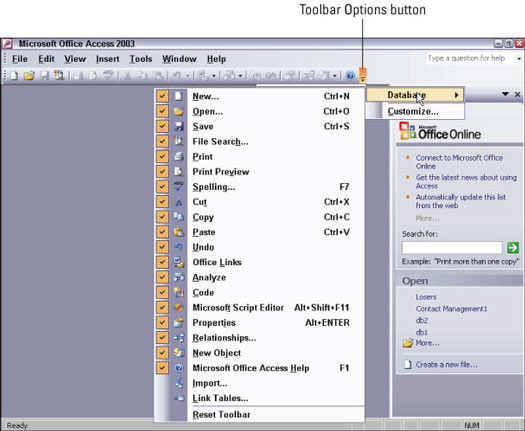
A pop-up menu appears that displays a check mark next to all the icons that currently appear in your toolbar as shown in Figure 1.

Figure 1: A check mark tells Office 2003 to display a particular icon on the toolbar.
4. Click to the left of the icon that you want to appear in your toolbar.
If you want to hide an icon from view, click its check mark to make the check mark go away. Each time you display or hide an icon, Office 2003 changes the appearance of your toolbar so you can see what it looks like.
5. Click anywhere away from the pop-up menu of toolbar icons.
Congratulations! You've just modified your toolbars.
In case you want to restore your toolbars to their original, factory-configuration, follow these steps:
1. Click on the Toolbar Options button on the toolbar that you want to customize.
To view a toolbar that may be hidden, choose View --> Toolbars and then click on the toolbar you want to customize. When you click on the Toolbar Options button, a pull-down menu appears.
2. Click Add or Remove Buttons.
A pop-up menu appears that lists one or more toolbars such as Standard or Formatting.
3. Click Customize.
A Customize dialog box appears.
4. Click the Reset menu and toolbar usage data button and then click Close.
Office 2003 restores your menus and toolbars to their original condition before you started messing around with customizing them.
dummies
Source:http://www.dummies.com/how-to/content/customizing-the-office-2003-user-interface.html
No comments:
Post a Comment