>
Figure 1: Before and after a split edit on the Timeline.
For example, pretend that you're editing a new-millennium take on Romeo and Juliet. We see Juliet standing on her balcony, calling out, "Romeo, hey Romeo. Where are you, man? Your cell phone goes straight to voicemail, and your pager's off, too!" But as Juliet calls out, we cut to Romeo, in the darkness below, to see his reaction as she continues to speak. (Translation: We've cut away from the video portion of Juliet's clip but let her audio keep playing.) That's a split edit in action, and you see 'em used all the time in movies, television, and so on.
Splitting edits from the Viewer
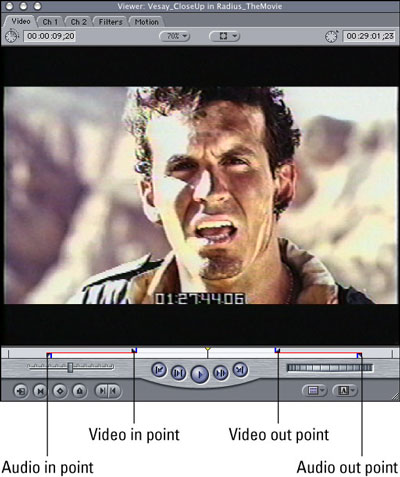
You can set up a clip's split edit points in the Viewer. Doing so is almost as easy as marking simple in and out points, but you can mark up to four points — in and out points for video and in and out points for audio.
1. Open a clip in the Viewer window.
2. Position the Viewer's playhead on the frame where you'd like your video to begin and set a video in point by choosing Mark --> Mark Split --> Video In.
You can also press Command+Option+I to mark your video in point.
3. Repeat Step 2, but mark your Video Out, Audio In, and Audio Out frames by choosing those options from the Mark Split submenu (see Figure 2 to see all video and audio in/out points set).
You can skip setting an out frame for either your video or audio — if you don't, Final Cut just makes the clip's last frame your out point. (The same works in reverse if you set out points, but not in points, for video and audio.)
Also, if you want your video and audio to either start or end on the same frame (in many cases, you want to split either the beginning of a clip but not the end or vice versa), just place a simple in or out point on that particular frame.
>

>
Figure 2: Split video and audio edits in the Viewer.
4. Move your clip to the Timeline.
You can drag your clip directly to the Timeline or drag it to the Canvas window. After moving your clip to the Timeline, notice that the clip's video and audio points are set differently, reflecting how you split them in the Viewer.
When you've moved your split-edited clip to the Timeline, you can still adjust the clip's video and audio in/out points by clicking and dragging them on the Timeline.
To clear a clip's split-edit points, open the clip from the Browser window and choose Mark --> Clear Split. The Clear Split submenu lets you clear each in and out point or all audio or all video points together.
Splitting edits on the Timeline
You can also create split edits after your clips are on the Timeline. You can see not only the clip whose audio and video you're splitting, but also the clips that you'll eventually integrate it with. But the decision to use the Timeline or the Viewer is up to you.
The easiest way to split a clip on the Timeline is to simply drag its video and audio to different points. Just hold down the Option key and drag either your video or audio to a new point — it's that easy.
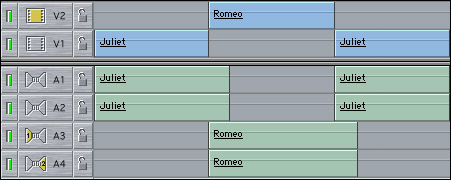
You'll naturally use split edits to carry over one clip's audio so that it overlaps onto another clip. (For example, remember the example of Juliet's dialogue continuing on, even though we've cut to the next video clip of Romeo in the bushes below her balcony.) When you're overlapping one clip's audio to another clip, putting each clip's audio on a different audio track so you can hear each playing is not unusual. For instance, when you carry Juliet's dialogue over Romeo's video, you still want to hear the audio for Romeo's clip — his breathing, the rustling of the bushes around him, and so on. And you can do that by keeping Juliet's audio and Romeo's audio on two different tracks, as shown in Figure 3.
>

>
Figure 3: Splitting audio and video on overlapping tracks.
>
dummies
Source:http://www.dummies.com/how-to/content/splitting-video-and-audio-edits-in-final-cut-pro.html
No comments:
Post a Comment