The Apple menu — see that multi-colored apple in the upper-left corner of your menu bar? — is fully configurable. Whatever is in the Apple Menu Items folder appears in the Apple menu. It's that simple.
So start transforming your Apple menu from a dull repository for barely useful software to a turbocharged powerhouse that enables you to open any file in seconds. Just open your Apple Menu Items folder (it's in your System Folder) and get ready to rock.
Before you do anything else, choose View-->by Name. Now the contents of the Apple Menu Items folder reflect the order in which they appear in the Apple menu.
Doing the right thing with your desk accessories
Most desk accessories are pretty lame and you probably won't use them very often. You can rearrange your Apple menu so that desk accessories don't take up so much space but you can still open them quickly. Here's how:
1. Double-click to open the System Folder.
2. Open the Apple Menu Items folder and create a new folder inside it by choosing File-->New Folder.
3. Name the new folder Desk Accessories.
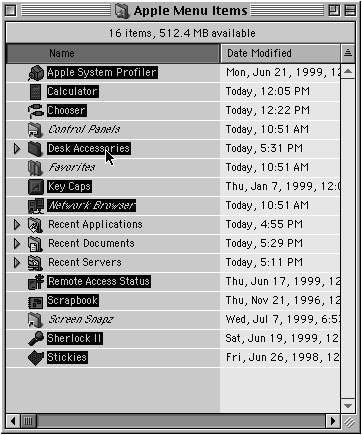
4. Select all the icons in the window except for the folders (see Figure 1).
You have two ways to do this: the easy way and the hard way. Easy way first: Press Command+A (or drag a selection box around the entire contents of the window) to select all the icons; then hold down the Shift key and click each folder. Hard way: Click Apple System Profiler, hold down the Shift key, click AppleCD Audio Player, hold down the Shift key, click Calculator, hold down Shift key, and so on until all the nonfolder icons are selected.
This step illustrates one of the Finder's finer points. You can select multiple items or deselect individual items from a selected group by holding down the Shift key and clicking the item.
 |
Figure 1: Select all the icons except the folder and folder alias icons, and drag them into the Desk Accessories folder. |
5. Drag these icons onto the Desk Accessories folder that you created in Step 2.
After you release the mouse button, all the desk accessories, applications, and aliases that aren't folders move into the Desk Accessories folder.
6. Pull down your Apple menu and revel in your handiwork.
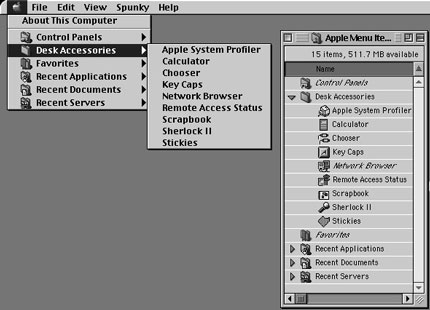
The menu should now look like the one in Figure 2.
 |
Figure 2: The Apple menu is now a lean, mean file-launching machine. |
Putting your stuff into the Apple menu
That last trick was pretty easy, wasn't it? Try one more thing before you move on. Why not add your favorite applications — the programs you use most often — to the Apple menu? Here's how:
1. Find a favorite application on your hard disk, select it, and make an alias of it.
To make an alias, choose File-->Make Alias or press Command+M.
2. Move the alias to the Apple Menu Items folder.
3. Repeat Steps 1 and 2 for any additional applications that you want to appear in your Apple menu.
dummies
Source:http://www.dummies.com/how-to/content/customizing-the-apple-menu-in-mac-os-9.html
No comments:
Post a Comment