After you connect your computer and printer with a compatible cable, provide a power source for your printer, and install the software for your printer, you need to configure your Mac so that it and your printer can talk to each other.
The Print Center application is the tool that you use to tell your Mac what printers are available. Note that many of the steps involving Print Center require that your printer is turned on and warmed up (that is, run through its diagnostics and start-up cycle).
Follow these steps to set up a printer for the first time:
1. Launch Printer Setup Utility.
You'll find Printer Setup Utility in the Utilities folder, which is inside your Applications folder. Click the Applications button in the Sidebar of any Finder window to open the Applications folder. Now open the Utilities folder and double-click Printer Setup Utility.
2. Choose Add Printer from the Printers menu.
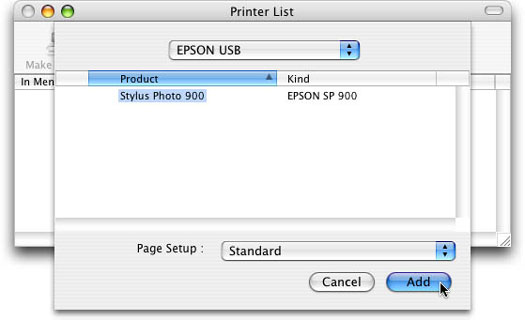
3. From the Printer List window that appears (see Figure 1), click the Add button in the window's toolbar.
If you have never set up a printer on this Mac, Steps 2 and 3 may be superfluous — the dialog box/sheet shown in Figure 1 should open automatically.
If the dialog box/sheet appears, click the Add button, as shown in Figure 1.
4. In the sheet that appears in front of the Printer List window, click the pop-up menu to select your printer's connection type.
Most printers are either connected directly to your Mac via a USB port — or over a network, using AppleTalk.
Many USB printers (such as most of the compatible printers from Epson, Canon, Lexmark, and Hewlett-Packard) will be recognized immediately without you having to perform this step.
If your printer isn't recognized at this point, you may need to install its driver software first, either from the CD that came with the printer or by downloading the latest driver software from your printer manufacturer's Web site.
AppleTalk and USB are by far the most common kinds of printer connections for Macs. Another option available in the Add Printer window is IP Printing. If your printer is on a Transmission Control Protocol/Internet Protocol (TCP/IP) network, you need to configure the printer by using its network address. IP printers usually connect via Ethernet and are almost always found on large corporate networks. Fortunately, such large networks are almost always maintained by a network administrator, who should be able to help you set up an IP printer.
If you encounter trouble setting up a printer for Mac OS X, you may want to contact your printer's manufacturer about getting the latest, greatest driver. Many printer manufacturers are offering new drivers with enhanced functionality. You may find new drivers for your printer on the Web or a major Internet Service Provider, such as America Online. Apple often includes such new drivers in the Software folder on your iDisk. And Disk 2 of the Mac OS X 10.3 Installer disks has additional printer drivers as well. Check with your printer manufacturer for details.
After you choose your printer connection type, you see the names and kinds of available printers in the Printer List window. In Figure 1, the Stylus Photo 900 appears.
>

Figure 1: Available printers with the specified connection type appear here.
5. Click the name of the printer that you want from the list and then click the Add button.
This window closes and the Printer List window reappears, containing the printer that you just added. If you've added printers before, they appear here, too.
Now you can print your first document! Make sure, though, that you have the document set to look how you want it to print.
>
dummies
Source:http://www.dummies.com/how-to/content/setting-up-a-printer-for-the-first-time-in-mac-os-.html
No comments:
Post a Comment