Deciding on a DLP Projection System

Texas Instruments has developed a new way of projecting video called DLP (Digital Light Processor). DLP has created a new category of inexpensive projector systems and has also led to a digital revolution in movie theaters. If your movie theater talks about its “digital projection,” you’ve already seen DLP (a super-high-end, expensive version) in action.


Here are some technical details on how the DLP projection system works:


  • The DLP is an entirely digital process that utilizes a semiconductor. This semiconductor is generically called the DMD (digital micromirror device).


  • The DMD contains over a million incredibly tiny, hinged mirrors. Each of these mirrors represents a single pixel on your video image. The DLP chip’s electronic logic controls the hinges on the mirrors, turning them so that they either reflect light (onto your screen) or block it (creating a dark spot on the screen).


    When the DLP’s “brains” turn these mirrors on and off, the mirrors create different levels of light between black and white that result in a grayscale version of your image.


  • A color wheel device filters light from a lamp (like the lamps found in LCD projectors), reflects this off the mirrors on the DLP chip, and provides the color in your image. If you want to know more of the nitty-gritty details, check out the Texas Instruments DLP Technology site.


The DLP system with the color wheel is called a single-chip DLP solution and is by far the most common in consumer DLP projectors. When looking at DLP projectors, the most important factor to consider is the capabilities of the DLP chip, which is the heart of the system. Most DLP systems for home theater solutions (for both front- and rear-projection TVs) offer a Full HD 16:9 aspect ratio and a 1920 x 1080 pixel resolution.


You should consider a 1080p-capable system if you’re using a front projector with a large screen.


The advantages of DLP projectors include low price, compact size (with particularly thin RPTVs possible), and immunity from image burn-in. They are also brighter and therefore better (than LCD) in rooms that aren’t too dark. A big drawback to DLP projectors is less-than-perfect reproduction of blacks (but it's better than most LCD projectors).


The future of DLP projectors (both front and rear) looks bright. They have great pictures, are relatively inexpensive, and are a snap to set up. As the technology matures, DLP may end up being the predominant projection system of the future — already, more than 75 manufacturers use the technology in their projector systems. DLP chips will likely get much cheaper and more capable faster than you can bat an eye.


dummies

Source:http://www.dummies.com/how-to/content/deciding-on-a-dlp-projection-system.html

Belters and Belt Songs You Should Hear

Listening to some technically savvy belters can be helpful when you’re figuring out how to make the right sounds. Here are some great suggestions of belt songs to try for yourself.


Male belters


For some skillful male belters, listen to


  • Chuck Berry singing “Roll Over Beethoven”


  • Elton John singing “Philadelphia Freedom” or “I Guess That’s Why They Call It the Blues”


  • Bobby Lewis singing “Tossin’ and Turnin’”


  • John Cougar Mellencamp singing “Hurts So Good”


  • Rod Stewart singing “Tonight’s the Night” or “Do You Think I'm Sexy”


You may not think of those guys as belters, but they’re using the same qualities you explore when belting out a song.


Female belters


For female belters, listen to these ladies:


  • Kristin Chenoweth: She demonstrates her belt versatility in “Popular,” from Wicked, and “My New Philosophy,” from You’re A Good Man Charlie Brown.


  • Linda Eder: She provides great examples of moving back and forth between different sounds and colors in the voice. You can listen to her recording of “Bridge Over Troubled Water,” where she moves from her head voice and on to a belt.


  • Sutton Foster: She uses her belt effectively in “Show Off,” from The Drowsy Chaperone.


  • Beyoncé Knowles: She effortlessly shows off her belt in “Listen,” from Dreamgirls.


  • Ethel Merman: Her tone is an example of very forward resonance, especially in selections such as “Some People,” from Gypsy, and “There’s No Business Like Show Business,” from Annie Get Your Gun.


  • Barbra Streisand: She demonstrates how to mix belt especially in her recording of “Memory” from Cats. You can compare Streisand’s sounds to some of the other recordings of “Memory,” where you hear singers using really heavy chest voice.


Belt songs


You may notice that belt songs tend to start out in a mix and then gradually move into a belt. Some songs stay in the belt sound the whole time, but not all do.


Consider these examples of songs that are commonly belted for the entire song:


  • “Girls Just Want to Have Fun,” as sung by Cyndi Lauper


  • “Joy to the World,” as sung by Three Dog Night


  • “Some People,” from Gypsy


  • “You Can’t Get a Man with a Gun,” from Annie Get Your Gun


Examples of songs that use both belt and mix:


  • “Faith,” as sung by George Michael


  • “Hot Stuff,” as sung by Donna Summer


  • “I'm Going Back,” from Bells Are Ringing


  • “I Wanna Dance with Somebody,” as sung by Whitney Houston


dummies

Source:http://www.dummies.com/how-to/content/belters-and-belt-songs-you-should-hear.html

How to Use Your Mobile Device as a Spotify Remote

A range of developers has introduced applications that let you use your smartphone or iPad as a remote control for Spotify on your computer. So, if you’re streaming music from your computer to some speakers (whether wired or wireless), you can use your remote to change what Spotify is playing on your computer without having to get off the sofa or walk away from your house guest.


Typically, you download the app for your phone, as well as a small program for your computer that helps the two wirelessly communicate with each other. Here are two popular options for iPhone and Android:


  • Remoteless: This Norwegian company has developed an app that’s compatible with both iPhone and iPad. It costs $3.99 (£2.50 or €2.80), and no Spotify Premium account is required. Go to Remoteless for more information.


  • ReSpot: This remote app is designed only for Android devices. The app itself is free, but you need a Spotify Premium account to use it.


For even more alternatives, see this longer list of Spotify remote controllers.


dummies

Source:http://www.dummies.com/how-to/content/how-to-use-your-mobile-device-as-a-spotify-remote.html

Customizing Finder Windows with Views in Mac OS X (Jaguar)

You have three ways to view a Finder window in Mac OS X — Column view, Icon view, and List view. Some people like columns, some like icons, and others love lists. Play with the three Finder views to see which one works best for you.


The following sections give you a look at each view.


Column view


The Column view is new in Mac OS X; previous versions of Mac OS didn't have anything like it.


To display a window in the Column view, click the Column view button in the toolbar, choose View --> As Columns from the Finder's menu bar, or use the keyboard shortcut Command+3.


You can have as many columns in a Column view window as your screen can handle. Just use the window sizer in the lower-right corner to enlarge your window horizontally so that new columns have room to open. Or click the green Maximize gumdrop to expand the window to its maximum width instantly.


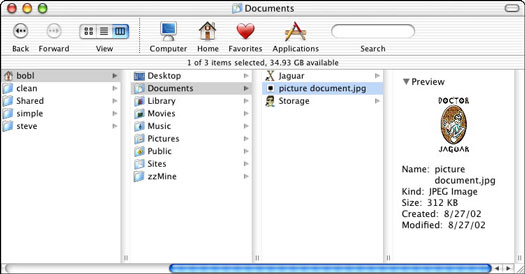
You can use the little grabber handles at the bottom of a column to resize the column widths. When you drag this handle left or right, all columns resize equally unless you hold down the Option key — then only the column to the left of the handle resizes. See what a Finder window displayed in Column view looks like in Figure 1.


>


Figure 1: A Finder window in Column view.

Here's how it works: When you click the Macintosh HD icon in the left-most column, its contents appear in the column to the right. When you click the Applications folder in the second column, its contents appear in the third column. When you click the Utilities folder in the third column, its contents appear in the fourth column. When you click the Java folder in the fourth column, its contents appear in the fifth column. Finally, when you click Applet Launcher in the fifth column, a big icon plus some information about this file appears (it's an application, 264K in size, created on July 29, 2002, and so on).


This rightmost column displays information about the highlighted item to its left, but only if that item is not a folder or disk. (If it were, its contents would be in this column, right?) That's the preview column. For most items, the picture is an enlarged view of the file's icon, as shown in Figure 1. But if that item is a graphic file saved in a format that QuickTime can interpret (most graphic file formats), a preview picture appears instead of an icon, as shown in Figure 2.


>


Figure 2: The preview of a graphic file is a picture instead of an icon.

Icon view


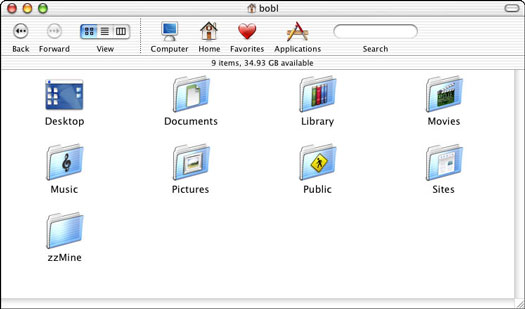
Icon view is a free-form view that allows you to move your icons around within a window to your heart's content. Check out the Finder window in Figure 3 to see what Icon view looks like.


To display a window in the Icon view, click the Icon view button in the toolbar, choose View --> As Icons from the Finder's menu bar, or use the keyboard shortcut Command+1.


>


Figure 3: Icon view is pretty and very Mac-like but wastes valuable screen real estate.

List view


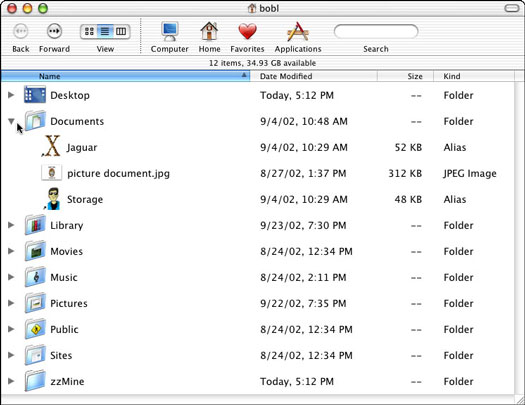
List view is just that: It lists the items in a folder in a single column. What's nice about List view is the little triangle to the left of each folder, known as a disclosure triangle, which lets you open a folder without actually opening a folder. The Documents folder is shown in its disclosed state in Figure 4.


To display a window in List view, click the List view button in the toolbar, choose View --> As List from the Finder's menu bar, or use the keyboard shortcut Command+2.


>


Figure 4: A window in List view.

A little triangle-shaped arrow appears next to the name of the selected column in a List view window. If this little arrow points up, the items in the corresponding column sort in descending order; that is, the biggest item in the Size column appears first. When you click the header (Size) once, the arrow now points down, and the items show up in the opposite (ascending) order. This behavior is true for all columns in List view windows.


To change the order in which columns appear in a window, press and hold on a column's name and then drag it to the left or right until it's where you want it. Release the mouse button, and the column moves. The exception to this (isn't there always an exception?) is that the Name column always appears first.


>
dummies

Source:http://www.dummies.com/how-to/content/customizing-finder-windows-with-views-in-mac-os-x-.html

iLife ’11: Using an iPhoto Album for Your Desktop and Screensaver

One sure way to demonstrate your skills with iLife and iPhoto is to personalize your Desktop to show your own pictures. The Desktop is the background image behind the Finder. To set your Desktop to a photo or an iPhoto album, select the photo’s thumbnail or select the album name in the Albums section of the Source pane and choose Share→Set Desktop.


You can also use any iPhoto photo album as a screen saver. The Desktop & Screen Saver preferences (choose System Preferences in Mac OS X and click Desktop & Screen Saver) let you choose not only pictures for your desktop but also animation to display when your Mac is inactive. To protect your display, you can set the Screen Saver setting to display animation if your computer hasn’t been used for several minutes. Apple provides a set of animated effects, but you can use a photo album from your iPhoto library as your screen saver — the pictures appear one after the other, like a slideshow. Scroll the list of Screen Savers until you find your iPhoto photo albums.


After clicking a photo album, click the Options button to display these options:


  • Present Slides in Random Order: When you turn on this setting, the images appear in random order rather than in the sequence you arranged for the photo album in iPhoto.


  • Cross-Fade between Slides: A cross-fade is a smooth transition from one image to another.


  • Zoom Back and Forth: The screen effect zooms into the image to show more detail, and zooms out to show the entire picture.


  • Crop Slides to Fit on Screen: Draw a smaller rectangle inside the image and cut away everything outside the rectangle, in order to fit the image onscreen. This option is useful for working with photos whose aspect ratios are different from the typical 16:10 ratio of the Mac screen.


  • Keep Slides Centered: When you turn on this option, the pictures are always centered onscreen (either letterboxed or pillarboxed, or both, if the dimensions are smaller than the screen dimensions) without the need for cropping.


dummies

Source:http://www.dummies.com/how-to/content/ilife-11-using-an-iphoto-album-for-your-desktop-an.html

Upgrading & Fixing PCs For Dummies


>


How to Remove a PC Case


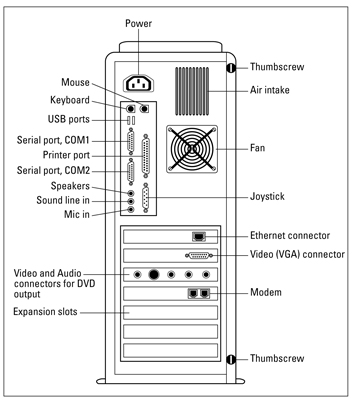
If you want to upgrade or fix a PC, you need to remove the case to get to the inner workings. The steps in the following list tell you how, and the figure shows the key components.


  1. Turn off the computer, monitor, and peripherals.


    Make sure that everything normally attached to your computer is turned off and unplugged. Your computer’s easier to move around that way.


  2. Unplug your computer from the wall or Uninterruptible Power Supply.


    Unplug the power cord from the back of your PC, too.


  3. Remove the screws from your PC’s back or outside edges.


    Many PCs use two large thumbscrews along one edge, as shown in the figure. Some new models have sides that simply flip down when you press a release.


  4. Remove the PC’s cover or side panel.


    On some computers, the cover slides toward the front; others come out the back. You might need to pull pretty hard.


  5. While the case is off, take your PC outside and use a can of compressed air to blow out all the dust from inside. Clean away the dust balls clinging to any outside vents, as well.


    To replace the cover, reverse these steps.


    >

    The working end of a PC tower.>

    The working end of a PC tower.


>


>


>


What Your PC Needs to Upgrade to a Version of Windows Vista


Upgrading your PC to Microsoft Vista means paying attention to which version you’re upgrading to and knowing what that version requires. The following table lists the needs for Vista Home Basic, Home Premium, and Ultimate. Upgrade away!


Vista Home BasicVista Home PremiumVista Ultimate
Fast CPUXXX
Powerful video
XX
5.1 or 7.1 sound
XX
TV tuner/TV out
XX
Large hard drive
XX


>


>


>


What to Try First to Fix a Microsoft Windows Problem


If you’re in the habit of upgrading or fixing PCs, sooner or later you’ll encounter a problem with Windows. When you do, use the tips in the following list as your first line of defense:


  • Always install the “Critical” updates listed by Windows Update.


  • Use System Restore to repair problems caused by damaged settings or software; return to your prior settings if it doesn’t help.


  • Install a new driver to fix problem parts.


  • Invite a computer-literate friend to fix your computer using Remote Assistance.


  • Make daily backups using Windows Vista’s Backup and Restore Center or a more full-featured third-party software.


  • Turn on Windows Vista’s firewall.


  • Vacuum dust from your computer’s fan area and vents often to prevent overheating.


>


>


>


How to Add a New Part to Your PC


Upgrading your PC may mean adding a new part to the PC’s motherboard. No need to be intimidated, just use the steps in the following list as a guide and you’ll come through your upgrade with flying colors and a new and improved PC.


  1. Copy any important information on your hard drive to a CD/DVD, another computer on your network, or a portable hard drive for safekeeping. (To be really safe, back up the entire hard drive.)


  2. Read any instructions that came with your new part.


  3. Exit any running programs, turn off your PC, and unplug it from the wall.


  4. Clean off the desk or table space next to your computer.


  5. Put your tools next to the computer.


  6. Remove your PC’s cover.


  7. Touch an unpainted part of the computer’s case to discharge any static electricity that might have built up.


    This keeps static electricity from damaging your computer’s sensitive internal parts.


    If you work in a particularly static-prone environment, buy a wrist strap or grounding mat from your computer store to help discharge static.


  8. Remove the old item and insert the new one.


  9. Plug in the PC, turn it on, and carefully test the new part to see whether it works.


  10. Turn off the PC, unplug it, and put the case back together.


  11. Plug in the PC and put away your tools.


>


>


>


Important Tips for Upgrading and Fixing PCs


You want your PC to be all it can be, so you upgrade when you can and repair as necessary. When either fixing or upgrading, use the following tips to help keep you and your PC safe:


  • Turn off and unplug your computer before taking off its cover. Please. This one’s the most important step. You can damage both yourself and your computer if you forget to turn off and unplug the computer.


  • Install parts one at a time. Always make sure the first one works with Windows before installing the next.


  • Read a USB part’s instructions before installation. Sometimes you must install the drivers before plugging in the part. Other times, you install the drivers afterward.


  • The red (or colored) wire is positive. The red (or colored) wire often plugs into the pin or socket marked by a little + sign.


  • The positive/red wire connects to Pin 1. Look for little numbers printed along the edge of a socket. Can’t see the number 1? Then push the plug into the socket with the red wire facing toward the low numbers on the socket.


>


>
dummies


Source:http://www.dummies.com/how-to/content/upgrading-fixing-pcs-for-dummies-cheat-sheet.html

How to Play Snap

Get ready for a fast and furious game! Snap is all about mental reaction time, and one of the few games in which luck plays no part at all. To play Snap, you need the following:


  • Two or more players. There is no formal upper limit, but if you play with more than six players, the neighbors may complain about the noise.


  • A standard deck of 52 cards. Play Snap with a single deck of cards if you have fewer than four players; add a second deck if more players compete. Playing this game with a used deck is a good idea — the cards can take a beating (literally).


    You don’t need a full deck of cards — a card or two can be missing from the deck. You can also play Snap with special cards designed for another game (such as an Old Maid deck), as long as most of the cards have backs identical to other cards in the deck.


The dealer deals out the whole deck of cards face-down, one card at a time to each player, in a clockwise rotation. It doesn’t matter if some players get more cards than others. What does matter, however, is that you don’t look at the cards you get.


Each player, starting with the player to the left of the dealer, takes a turn flipping over the top card of his pile and putting it face-up in front of him. After a few turns, each player has a little pile of face-up cards.


When you turn over all the cards into the pile in front of you, you pick up the pile and use it again without shuffling them.


The flipping process continues until one player turns over a card of the same rank as the top card on another player’s pile. As soon as the matching card is revealed, the first person to call out “Snap!” takes the two piles with matching cards and puts them face down under his own pile.


Frequently, two players make the Snap call simultaneously. In this case, you put the two piles with the same card together, face-up, in middle of the table. Everyone continues to turn over the top cards on their piles until someone turns over a card that matches the card on the pile in the middle of the table. The first person to shout “Snap pool!” wins the middle pile. The new piles that are being created are still up for grabs in the usual way, of course. Whenever a pairing is created, the first to shout “Snap” wins them.


When a player mistakenly calls out “Snap!” her pile goes into the center of the table; the first player to call “Snap pool!” at the relevant moment gets her pile. You have to operate with what you have left, and if you run out of cards, you are out of the game.


The player who ends up with all the cards wins the game.


For some reason, Snap brings out the worst competitive instincts in people. Establishing several informal rules can avoid Snap-induced bloodshed:


  • Set rules about the proper way to turn over your card. You can’t turn over the card so that you see it first, which means that you must flip over the card in a continuous, fast motion onto your pile.


  • Get an impartial witness to decide on all close calls. If you can, choose someone who isn’t playing the game.


A devious, cunning player remembers the order of her pile (or of another player’s pile) when the pile gets small so she gains a big edge in the calling. Keep an eye on the cards as the game draws to a close; if you don’t, you put yourself at a disadvantage. If you want to avoid this situation, you can agree to shuffle your pile when you’ve worked your way through it.


dummies

Source:http://www.dummies.com/how-to/content/how-to-play-snap.html

Essential Online Community Manager Tasks: Write, Edit, and Market

People in online community management talk a lot about the many hats worn by today’s community managers. The hat-wearing thing is a common metaphor because community managers aren’t sitting at a desk handling one task at a time. Even with the ever-changing roles, most community managers can expect to fulfill some core tasks.


How to write or edit for an online community


Being a writer and editor isn’t the same thing as being a content creator. Although you’re required to create content for your community, you don’t necessarily have to get out the formal tone or the red pencil when you’re writing a blog post. As community manager, you need to be a great communicator and have a terrific command of grammar.


Because you’re representing the community with your words, you have to be careful not to make any mistakes or typos that cause someone to call you out online. This happens all the time. One minute, you’re sending out a newsletter, and the next minute, a member is ridiculing you on her blog for spelling a word wrong.


As the voice of your community and public representative of your brand, you have to submit the cleanest copy possible. When the writing is over, put on your editing hat.


How to market to an online community


Because you know so much about what makes your community tick, you’re a regular fixture in marketing meetings and marketing-team planning sessions. The team members want your input because you know so many details that they don’t, such as these:


  • The median age of your members


  • The common locations where your members reside


  • The topics and campaigns that receive the biggest responses


  • The best search terms that leading to your website and community pages


  • What your community members are saying about you online


  • What your community members are writing to you about in their e-mails


You’re managing your community’s stats and use, and have valuable information regarding their habits. Marketing needs the same information to better plan sales and promotions. In fact, it shouldn’t put together any campaign without your input.


dummies

Source:http://www.dummies.com/how-to/content/essential-online-community-manager-tasks-write-edi.html

How to Package a Food Gift

After you’ve spent the time to make a delicious gift from your kitchen, take some packaging precautions before sending it. Keep in mind you can never have too much protection when you pack your food gifts:


  • The first layer of wrapping should be around the food itself. Make sure that it is sealed for freshness, particularly if you aren’t using an airtight container.


  • Place sheets of wax paper between layers of cookies or candies. You can also help prevent shifting in the box by placing one final layer of wax paper on top of the food. Then loosely wad tissue paper and place it on top. Use just enough to assert a little pressure, not enough to mash down the food. Close the lid gently.


  • Decorative tins are good choices for shipping because, in addition to being air tight, they’re rigid.


  • Double up on boxes. After you place your gift in a sturdy gift box, fit that into a bigger, rigid, corrugated shipping box. Leave plenty of room on all four sides, as well as the top and bottom of the box to add protective buffers. Use material that’s available — crumpled newspaper, recycled packing peanuts — but don’t skimp. Use plenty of filler in between the two boxes.


  • If you choose to send a jar or bottle, wrap a few extra layers of bubble wrap around it before you proceed with the packing.


  • Put a card with the recipient’s address on the inside of the box . . . just in case.


  • Enclose a little note with the name of the gift and, if appropriate, how to enjoy it.


  • Seal the package with a strong packing tape, not regular adhesive tape.


  • Put a strip of clear packing tape over the address on the outside of the box to keep the address from smearing.


  • Clearly mark it “Fragile” or “Handle with Care.”


dummies

Source:http://www.dummies.com/how-to/content/how-to-package-a-food-gift.html

The Circle of 5ths in Classical Guitar

The circle of 5ths (an interval encompassing five notes) is a helpful tool in classical guitar for viewing the 12 major and minor keys by the order of sharps and flats in their key signatures. The key of C (no sharps or flats) is at the top, or 12 o’clock position. Moving clockwise from C you progress, by ascending 5ths, through all 12 keys beginning with sharps.


image0.jpg


dummies

Source:http://www.dummies.com/how-to/content/the-circle-of-5ths-in-classical-guitar.html

How to Use Social Media to Put Your Résumé Online

An online résumé can be searched and discovered by recruiters looking for talent, so having several of them increases your odds of being found. (Receiving a random call from a recruiter who found you online and who was so impressed that she wants an interview is a very nice feeling!) The beauty of online résumés is that you don’t have to be a web designer to enjoy their benefits.


At the very least, you should have a LinkedIn résumé and a video résumé. If you want to have more than just these two online résumés, good for you!


Writing an online résumé is very different than writing a résumé that you intend to print out and hand to someone. Don’t think you can just copy and paste one into the other. (If you try that, your online presence can look stuffy, old fashioned, and hard to understand.)


LinkedIn for your online resume


LinkedIn happens to be the highest-leverage tool for professional networkers today — period. With it, you have access to more information about companies and people than previous generations ever did — even if they paid for it! Study after study has shown that LinkedIn is the primary resource for hiring managers and recruiters to fill positions. If you aren’t using it daily, you’re making a huge mistake.


Of course, if you aren’t using LinkedIn the right way, that’s also a mistake. First, you need to make sure your profile is 100 percent complete (meaning it shows your photo, at least three recommendations, and all the details about your work experience and education).


You also need to make sure the following parts of your profile are as appealing and informative as possible because these three parts are where recruiters look first:


  • Your profile picture


  • Your professional headline (the line of text that appears below your name)


  • Your profile summary (the larger text block that appears below your personal information)


To get the most benefit out of LinkedIn, don’t just treat it as an online résumé. Instead, treat it as a professional networking tool. In fact, use LinkedIn as your networking hub.


Sure, it may be easier to cruise job boards, but by regularly adding new people you meet to your network and getting so familiar with LinkedIn that you can use it in your sleep, you’re going to have a better shot at finding a job at your target company.


Video résumés


Not every recruiter or hiring manager is going to spend time watching video résumés for fun. However, if someone already likes your application and wants to know more about who you are, offering him a video résumé is a great way to demonstrate your personality and communication skills.


The ideal video résumé addresses three key questions:


  • Who are you?


  • What motivates you?


  • Can you do the job?


After you’ve produced a résumé that addresses each of these points, you’re ready to upload it for hiring managers’ viewing pleasure. TubeMogul allows you to share your video résumé on multiple sites with one simple uploading process, and YouTube is the second-largest search engine today.


dummies

Source:http://www.dummies.com/how-to/content/how-to-use-social-media-to-put-your-resume-online.html

Personal Writing Style as a Mom Blogger

As a mom blogger, you must balance your need to write for pleasure with the need to give something to your readers in every single post. Even if you’re already an established writer, developing your personal writing style as a blogger is something that can only come with time. If you ask established professional bloggers about their first few blog posts, you’ll likely notice a hesitation and cringe before they respond.


Blogging is different from any other writing medium. Posts need to be relatively short and have a well-defined value proposition for the reader. A value proposition is simply making sure your readers know what they’ll get out of taking the time to read your blog post.


If readers can’t determine “what’s in it for me” in a short amount of time, they’ll leave your blog. Additionally, as a blogger, you have to enjoy what you’re writing, or you won’t be writing for long.


To be successful at blogging, you really must enjoy writing for the sake of writing. This is why it’s vital to choose a topic for your blog that you’re extremely passionate about — a topic that you love so much that you’d be willing to write about for free. Because — let’s face it — at the beginning, you will be writing for free!


On top of all this, the personal nature of blogs makes it next to impossible not to write about the people and things that are a part of your life. It also can make it tricky when you want to make a business out of the parts of your life that are typically shared only privately with friends and family.


Some of the harshest criticisms leveled at mom bloggers revolve around the ethics of sharing stories about family members — especially children — who don’t (or can’t) give explicit permission to appear on your blog.


dummies

Source:http://www.dummies.com/how-to/content/personal-writing-style-as-a-mom-blogger.html

Improving Your Singing: Shaping Soft Palate Consonants

To shape and clearly sing soft palate consonants, keep the tip of your tongue against your bottom teeth, lift the back of the tongue to touch the soft palate, and shape your lips for the vowel sounds before and after the consonant. The K consonant is unvoiced, and G and NG are voiced.


While shaping the soft palate consonants in the following table, see to it that


  • The back of your tongue rises to meet the roof of your mouth at your soft palate, while the tip of your tongue continues touching your bottom front teeth.


  • Your lips stay free of tension and ready to make the vowel sound that follows the consonant.


If you have trouble with the sounds of K and NG because English isn’t your primary language, practice saying sing and sink to feel and hear the difference between the NG and the K. The NG is voiced and the K is unvoiced.


Practicing G, NG, K, and Q
GNGKQ
getsingkeepquiet
gildhungcupquote
gorebangkeyquarrel
guppyclangcaperqueen

If you struggle to sing a soft palate consonant, try this. For the first few practice sessions, make the consonant sound with the middle of your tongue arching to touch the back edge of the hard palate. By moving the consonant out of the very back of your throat, the sound won’t get trapped in the back of your mouth.


As you become more comfortable with keeping the back space open while making soft palate consonants, you’ll be able to touch the back of the tongue in the right spot on the soft palate.


dummies

Source:http://www.dummies.com/how-to/content/improving-your-singing-shaping-soft-palate-consona.html

Recognizing an Elder's Efforts to Hide Distressful Emotions

People frequently protect themselves from the pain of their own emotions (including anxiety, resentment, frustration, and depression) by hiding these feelings — from themselves and from others. They often do so without even being aware that they're doing it. Seniors are no exception.


Hiding feelings is not always a bad thing — it can be an excellent way to cope with a scary world and protect yourself from being emotionally overcome. Psychologists called these maneuvers "life's little deceptions." But life's little deceptions can be harmful as well as helpful. For example, an older man is told that he has severe emphysema. The prognosis is so frightening that he deceives himself into thinking his situation isn't as bad as the doctor claims (thus avoiding emotional distress). He may fool himself about the seriousness of his condition, but he still follows the doctor's orders. Another man with the same diagnosis is so frightened that he too deceives himself. Choosing to believe that nothing is wrong with him, the second man continues to smoke, disregarding all medical advice and refusing medication. In this case, self-deception can take him to an early grave!


Don't rush to expose your elder's self-deceptions. If they help her cope and do no harm, leave well enough alone. On the other hand, if the self-deceptions harm her health or relationships, take it up with the primary care physician. A psychiatrist, psychologist, or social worker may help your elder develop healthier ways to cope with problems and their emotional fallout.


Denying the truth


The act of denying the facts, even when the truth is obvious, usually serves a purpose. For example, denying bad news is common. ("Oh, no, it can't be true.") Otherwise, the news may so emotionally overwhelm you that you're unable to function. Acceptance takes time. Denying the truth for a little while allows a person to accept the reality gradually. On the other hand, continued denial can be risky. For example, the Department of Health condemns an elder's building and sends him an eviction notice, but the oldster insists that nothing's wrong with his building and that no one will force him out. His self-deception jeopardizes his health and safety.


Complaining of aches and pains


Bottled up emotions (especially depression and anxiety) are often expressed physically in headaches, stomachaches, backaches, and other physical problems. The conversion of feelings into physical complaints is especially common in older adults, who may find it unacceptable to complain of sadness or worry, which may be seen as signs of weakness. The physical symptoms persist despite medical attention but may disappear when the elder is treated for depression or anxiety.


Displaying false bravado


How can you explain it when a bright, usually levelheaded elder insists on climbing a ladder to hang his outdoor Christmas lights when he's subject to dizzy spells? Or when he shovels snowdrifts in below-freezing weather when the doctor warns him that his heart is too weak for such activity? Elders who boldly stare danger in the face do so in an effort to cloak their fears with sheer will. False bravado is one of the most potentially dangerous self-deceptions.


Fostering an image of helplessness


On occasion, elders act as if they're more needy than they are. The underlying feeling that's hidden here is fear of abandonment. Feigning helplessness induces caregivers to provide ever more care, which is comforting to the elder who's trying — usually outside her awareness — to shield herself from her fear of abandonment. At first, this self-deception is successful. The elder gets lots of attention; caregivers feel needed. Eventually, the elder grows increasingly passive, often complaining incessantly. The caregiver does more and more, but eventually gets weighed down with the mounting demands and becomes angry, causing the elder's fears to escalate and making her act even more helpless. The best approach to this downward spiral is to encourage your elder's independence while assuring her that she will not be forsaken.


Digging in their heels


Generally, elders are as flexible as any other age group. If your elder seems obstinate, unreasonably unyielding, or rigid, she may just be trying to defend herself against feelings of powerlessness. Fear of losing control is often underneath refusal to accept help.


Looking back to "perfect" times


Idealization occurs when an age-advantaged person glorifies her past, her status, or her importance in order to keep in check her feelings of regret about the life she led. This behavior can be healthy. On the other hand, done to excess, this practice alienates the family that has to listen to it. For example, their mother's repeated stories about the kindness of their deceased father (who in reality was a cruel alcoholic) causes the adult children to limit their visits.


Putting anger in its (wrong) place


This deception consists of redirecting disagreeable feelings rather than hiding them. Sometimes an elder will find it too threatening to experience the anger she feels toward a particular person, so she shifts that anger to a safer person. For example, a mother may be angry at a son who rarely calls or stops by. If she directs her anger toward him, he may even visit less, so she vents her anger instead toward the steadfast child — often the hardworking child who provides most of the care and who can be relied on, no matter what!


dummies

Source:http://www.dummies.com/how-to/content/recognizing-an-elders-efforts-to-hide-distressful-.html

Explore the Show Interface Detail Command in Junos

If you find that the information provided by the show interfaces command isn’t enough information, you can try the detail version of the same command. When you get to this level of detail, you’re usually troubleshooting the interface. This view of the interface gives you even more information, including (but not limited to) the following:


  • Traffic statistics: The counters displayed here indicate the total number of bytes and packets both received by and transmitted out of the interface. These numbers give you an indication of how much traffic your interface is handling. Note that these statistics are cumulative from the last time the statistics were cleared (displayed in the field Statistics last cleared, which is harder to find than it seems it should be).


  • Egress queues: The egress queues correspond to the total number of outbound CoS queues you’ve configured on the box. In this case, the default CoS queues are the only ones configured. Each queue is listed, along with the number of packets in each queue as well as the number of transmitted packets. The dropped packets should be 0 unless you’re experiencing congestion.


When you execute a show interface detail command, this is the level of detail that will be in your output:


user@router> show interfaces detail
Physical interface: fe-0/0/0, Enabled, Physical link is Down
Interface index: 128, SNMP ifIndex: 23, Generation: 303
Link-level type: Ethernet, MTU: 1514, Speed: 10m, Loopback: Disabled,
Source filtering: Disabled, Flow control: Enabled
Device flags : Present Running Down
Interface flags: Hardware-Down SNMP-Traps Internal: 0x4000
Link flags : None
CoS queues : 4 supported, 4 maximum usable queues
Hold-times : Up 0 ms, Down 0 ms
Current address: 00:05:85:02:a4:00, Hardware address: 00:05:85:02:a4:00
Last flapped : 2008-03-05 14:30:58 PST (4w3d 23:03 ago)
Statistics last cleared: Never
Traffic statistics:
Input bytes : 0 0 bps
Output bytes : 0 0 bps
Input packets: 0 0 pps
Output packets: 0 0 pps
IPv6 transit statistics:
Input bytes : 0
Output bytes : 0
Input packets: 0
Output packets: 0
Egress queues: 4 supported, 4 in use
Queue counters: Queued packets Transmitted packets Dropped packets
0 best-effort 0 0 0
1 expedited-fo 0 0 0
2 assured-forw 0 0 0
3 network-cont 0 0 0
Active alarms : LINK
Active defects : LINK

If you find that you still lack the information you need to troubleshoot your network or even a particular interface, you can use another level of detail: the show interfaces extensive command.


The output for that command is a superset of the detailed version of the same command. It includes the same information presented here, along with a detailed listing of input and output errors, and a slew of MAC (Layer 2) statistics.


dummies

Source:http://www.dummies.com/how-to/content/explore-the-show-interface-detail-command-in-junos.html

iLife ’11: Assembling Pictures for an iPhoto Slideshow


2 of 12 in Series:
The Essentials of Sharing and Presenting Photos with iPhoto


To choose photos for your iPhoto slideshow, you can browse and select thumbnails in the Viewer pane while browsing or select one or more events in Events, one or more locations in Places, or one or more faces in Faces. Or, you can select the most recently browsed event, Last Import, or Flagged in the Recent section of the iLife Source pane, or any photo album, any MobileMe, Flickr, or Facebook album, or any project.


You probably want to rearrange images in order to create slideshows that are at least interesting, if not dazzling. You can do this by choosing the best pictures and the most appropriate music.


iPhoto offers different ways to select pictures for a slideshow:


  • Show a photo album: The advantage of using a photo album is that the pictures in an album are easy to rearrange. Select a photo album in the Albums section of the Source pane, and then click the Slideshow tool. The slideshow consists of all pictures in the album, starting with the first picture. To start with a different picture, select that picture’s thumbnail first in the Viewer pane, before clicking Slideshow.


  • Show a selection of photo albums: The same advantage of using a photo album applies (as stated in the preceding bullet), and in addition, you can play multiple albums at a time by Command-clicking each one to select it first. The slideshow combines pictures from all the albums in the sequence in which they appear in the albums.


  • Show all pictures for a location, an event, or a face: Browse Events, Places, or Faces and select an event, a location, or a face. You may want to open the event, location, or face and sort the thumbnails first, to put them in a specific order (such as by date or title) for the slideshow. Then click the Slideshow tool. The slideshow starts with the first picture; to start with a different picture, select that picture’s thumbnail first in the Viewer pane, before clicking Slideshow.


  • Show the entire library: Browse Photos. You may want to sort the thumbnails first, to put them in a specific order (such as by date or title) for the slideshow. Then click the Slideshow tool.


  • Show selected pictures only: Select multiple thumbnails in the Viewer pane — either a range of pictures in consecutive order or individual pictures in nonconsecutive order. The slideshow uses only those pictures.


Not all photos fill the screen properly. You may want to use only photos that look good at full-display dimensions.


dummies

Source:http://www.dummies.com/how-to/content/ilife-11-assembling-pictures-for-an-iphoto-slidesh.html

How to Score Common Golf Penalty Shots

A stray shot in golf is frustrating, but it happens to the best golfers. Where the ball is hit makes a difference in how it is played and scored. Take a look at these common golf penalty shots and how to deal with them:


PenaltyHow to Score
Out-of-bounds1-stroke penalty plus distance. Replay the ball from where it
was just played (or tee up again if it was your first shot).
Unplayable lies1-stroke penalty. Drop the ball within two club lengths of the
original spot, no nearer to the hole. Or drop the ball as far back
as you want, as long as you keep the original unplayable lie point
between you and the hole. You may also return to the spot from
which you played your original shot if you prefer.
Water hazard (yellow stakes)1-stroke penalty. Play the ball as near as possible to the
place from which the original shot was hit. Or drop a ball behind
the water, as long as you keep the point at which the original ball
crossed the edge of the water hazard directly between the hole and
the spot on which the ball is dropped. There is no limit to how far
behind the water hazard you can go with the ball.
Lateral water hazard (red stakes)1- stroke penalty. Drop a ball outside the lateral hazard
within two club lengths of where the ball went in, but not nearer
to the hole. Or keep a point on the opposite edge of the water
hazard equidistant from the hole.


dummies

Source:http://www.dummies.com/how-to/content/how-to-score-common-golf-penalty-shots.html

Nitrogen-Rich Materials for Your Compost Pile

Greens provide bodybuilding proteins for the microorganisms crunching through your organic matter. Nitrogen-rich materials are called greens because most of them are greenish in color. The following are good sources of nitrogen for your compost pile:


  • Kitchen scraps: Leftovers from the kitchen are excellent additions to the compost pile. You do the environment a big favor too by adding the following scraps to your compost:


    • Coffee grounds and used filters


    • Condiments and sauces


    • Corncobs


    • Cut flowers


    • Eggshells


    • Fruit pits


    • Fruit rinds and cores


    • Nut shells


    • Shells from shellfish


    • Stale or moldy bread and grain products


    • Tea and tea bags


    • Vegetables (raw or cooked)


    Fruit pits, eggshells, nut shells, and shellfish shells are slow to decompose. Crush or grind them before adding them to your compost pile to speed the process.


  • Grass clippings: Grass clippings turn slimy and smelly if left in big piles or layered too thickly, so mix them up with brown materials or spread them out to dry for a few hours before mixing them into your heap.


  • Leafy plant trimmings, spent flowers, herbs, and vegetables: When your garden plants have finished producing for the season, pull them out, chop or tear them into smaller pieces, and toss them into the compost pile to recycle their nitrogen content. The same goes for leafy trimmings from landscape shrubs and trees.


  • Weeds — foliage only: A healthy crop of weeds, although annoying, is a fine source of nitrogen. Return those nutrients to your garden where they belong by composting your weeds.


  • Livestock manure: Chicken, cow, duck, geese, goat, horse, llama, rabbit, sheep, and turkey manures are safe to add to compost. Manure contains small amounts of nitrogen, phosphorus, and potassium that all plants require, as well as boron, iron, and zinc.


    If you're using manure directly on your garden, it must be at least six months old to be safe. Fresh manure, in addition to being smelly, contains concentrated nitrogen that may "burn" plant roots and tender seedlings or prevent seed germination. If you happen to obtain super-fresh wet manure, use it in the following ways:


    • Let it dry out before adding it to your compost, and blend it sparingly with a wide variety of other ingredients.


    • Compost it in a pile by itself.


    • Spread fresh manure across garden beds in fall, allowing it to rot during the winter months.


    • Spread it across beds that lie fallow six months to one year before planting.


    Always wear gloves, shoes, and a dust mask when collecting or spreading manure. Be sure to wash your hands thoroughly and scrub under your nails after handling manure.


  • Pet bedding: Small pets such as hamsters, rabbits, guinea pigs, and gerbils are bedded down with newspaper, hay, and/or shavings, and this used bedding is a very useful addition to the compost heap.


  • Feathers: If you don't live near or have access to a poultry farm, you can empty any unwanted feather pillows, down comforters, or feather-filled cushions in your home and mix in the feathers as you fill your compost bin.


  • Hair and fur: Clean your hairbrush (and Fido's and Fluffy's) over the compost bin. If you're desperate for nitrogen, ask your friendly barber, stylist, or pet groomer to save you a stash when they sweep up.


  • Hay: Nitrogen content in hay varies depending upon the plants grown and the drying process. A concern to consider before adding hay to your compost pile is its weed content.


dummies

Source:http://www.dummies.com/how-to/content/nitrogenrich-materials-for-your-compost-pile.html

Using Rich Media in Your Marketing Web Site

Multimedia, sometimes called rich media, has increased in popularity for as broadband use has exploded. Audio clips, music, video, virtual reality, and Flash animation all fall into this category. If rich media appeals to you, here are a few reasons why it might be worthwhile for your marketing Web site:


  • The media adds marketing value. It might extend your brand, help sell a product — as a virtual reality tour of real estate or a complex product might — or explain a process or service, as a video could. It might also demonstrate your capabilities, such as music clips for a composer selling songs online or animation for a Web designer.

  • It makes the site easier to use or otherwise enhances the user's experience. For instance, a live Web cam at a daycare center offers clients security and reassurance — assuming access is password-protected so only parents can view it.

  • The goal for your Web site demands it. A site that earns its keep by advertising might use rich media techniques to keep visitors on a site longer, encourage more page views, or attract repeat visits.

  • Your target audience wants or expects it. Younger audiences are much more attracted to rich media than older ones; a consumer audience with time for entertainment is more susceptible to rich media than a busy, business-to-business (B2B) audience of engineers — unless there's a reason for the rich media, such as a product demo.

  • You need rich media to stay even with, or ahead of, your competitors.

If you're now convinced that rich media is right for your site, here are a few other important considerations before you take the final plunge:


  • Will your target audience have the plug-ins, know-how, and access speed to take advantage of rich media?

  • Can you afford the cost of doing it right? Good multimedia is rarely cheap. If you can't afford to do it right, don't do it at all. Visitors won't know what they're missing, but they will know if something doesn't work properly or looks terrible.

  • Can you locate professionals to create the rich media, whether a good audio recording studio, a videographer, or an animator? Very few Web designers can do everything, but they might know subcontractors who can help. As always, review portfolios, get several bids, and check references.

  • Can you launch your Web site without rich media and add it later, or is it intrinsic to the purpose and design of your site? Adding features later lets you test site operation and assess the value of your baseline site first. Later, you can announce new features in e-mail, newsletters, press releases, and on the site itself. Implementing rich media can delay the launch of your site, as it might be the most complex and time-consuming element of your site.

  • Can you display your Flash, video, or other rich media on a page other than a splash page? (A splash page is an introductory Web page used as a lead-in to the home page. Splash pages are usually graphically intensive or use rich media, but lack navigation other than a link to enter the site. A splash page with navigation is called an entry page.) Search engines can't read Flash pages.

  • Can you give your visitors a choice of viewing a Flash versus non-Flash version of your site?

  • How much use would justify the expense? Will your statistics display the number of visits or downloads for your rich media? Can you track an association from rich media access to business outcome?

Do not use rich media just because you can. Establish a reason, an objective measure of value, and a way to measure impact on something other than your ego.


If you're uncertain about rich media, apply the KISS principle. (Keep it simple, stupid.) Be sure that sophisticated rich media will be worth the investment of money, time, and effort that it will take. It's nice to have bragging rights but even nicer to have a profit.


dummies

Source:http://www.dummies.com/how-to/content/using-rich-media-in-your-marketing-web-site.html

Collapse or Hide Comments in Acrobat CS5 Documents

One of the most powerful features of Adobe Acrobat Creative Suite 5 commenting is the ability to easily manage and share comments and annotations among reviewers.


Acrobat CS5 makes it easy to include users of the free Adobe Reader in a review process. To include Adobe Reader users in a review, choose Comments→Enable for Commenting in Adobe Reader. After saving the file, you can share it with users of Adobe Reader, who can then use commenting and markup tools and save their comments into the file.


Because the Comments List can become rather large, you can choose to collapse all comments so that only the page number on which comments appear is displayed in the list. To do so, click the Collapse All button in the upper left of the Comments List window; it has a minus sign next to it.


To view all comments, click the Expand All button in the same location; this button has a plus sign next to it.


To hide all the comments within a document, click and hold the Show button on the Commenting toolbar and choose Hide All Comments. You can then click the Show button in the Comments toolbar and choose to show comments based upon


  • Type of comment, such as note, line, or cross out


  • Reviewer, such as Bob or Jane


  • Status, such as accepted or rejected


  • Checked State, which can be checked or unchecked


Use these filtering options to view only those comments that are relevant to you.


dummies

Source:http://www.dummies.com/how-to/content/collapse-or-hide-comments-in-acrobat-cs5-documents.html

How to Reward Employees Effectively

As a business manager, you know your employees will be happier, perform better, and stay at their job longer when they're recognized and rewarded for doing a good job. Do your part as manager by using these guidelines for effectively recognizing and rewarding employees:


  • Specify the behavior you're rewarding. When you reward an employee, be sure that you're clear about exactly what behavior merits recognition. Say, for example, "You did a great job yesterday afternoon when you helped that customer figure out which product was the best for her needs," or "I really appreciate all the extra effort you put into the Scanlon project."


  • Give the reward sincerely. People greatly appreciate sincere expressions of thanks, but they won't accept insincere or false praise — in fact, they may be insulted by it. Only offer your employees rewards and recognition when they've truly earned them.


  • Be positive. When you give rewards and recognition, do so in a positive and uplifting way. Your goal is to inspire the employee — and, in turn, his or her colleagues — to continue exhibiting the behavior you're rewarding. And never immediately follow praise with a reprimand!


  • Give the reward as close to the event as possible. To have maximum impact on employee behavior, give rewards as soon as possible. Waiting days, weeks, or months will greatly lessen the impact and perhaps extinguish it altogether.


dummies

Source:http://www.dummies.com/how-to/content/how-to-reward-employees-effectively.html

Monthly Accounting Checklist for Sage One

Good online accounting needs good house-keeping, but Sage One really does make it easy for you. Every month, check that you have done the following to ensure your business finances are in tip-top condition:


  1. Create sales invoices.


  2. Enter purchase invoices.


  3. Enter cheque payments from cheque book stubs.


  4. Enter receipts from paying in book stubs.


  5. Reconcile the bank accounts.


  6. Run the Aged Debtor report.


  7. Run the Aged Creditor report.


  8. Run Profit & Loss Report.


  9. Run Balance Sheet.


  10. Run VAT return (if VAT registered).


dummies

Source:http://www.dummies.com/how-to/content/monthly-accounting-checklist-for-sage-one.html

How to Change Notification Area Icons

Since the notification area (aka the system tray) first appeared it’s been a pain in the taskbar for some users. In Windows 7 and Vista, however, that pain can easily be controlled or eliminated. Sorry, XP users. You are stuck with the pain.


Change the Notification Area Icons in Windows 7


To lord it over regular notification area icons, follow these steps:


  1. Right-click the date-and-time part of the notification area.


  2. Choose Customize Notification Icons from the pop-up menu.


    A window appears, listing all potential icons that can appear in the notification area.


  3. To pick and choose which icons appear, or to hide all icons, remove the check mark by the item Always Show All Icons and Notifications On the Taskbar.


  4. For each item in the Icon column, choose a behavior.


    The Behavior menu button lists three options:


    • Only Show Notifications: The teeny icon appears only when it needs attention or it’s active.


    • Show Icon and Notifications: The teeny icon appears all the time.


    • Hide Icon and Notifications: The teeny icon never shows up.


    To hide all icons, choose the option Hide Icon and Notifications. You also have to hide Windows own notifications, which is covered next.


  5. When you’re done, click OK.


For adding or removing Windows own notification icons, obey these steps:


  1. Right-click the date-and-time part of the notification area.


  2. Choose Properties.


    The System Icons window appears, which lists the five different icons that Windows itself tosses into the notification area: Clock, Volume, Network, Power, and Action Center.


  3. For each icon, choose On or Off from the button menu.


  4. Click OK when you’re done.


Set notification area icons in Windows Vista


To show or hide the icons in the notification area in Windows Vista, heed these steps:


  1. Right-click the date and time on the taskbar and choose Properties from the pop-up menu.


    The Taskbar and Start Menu Properties dialog box appears, with the Notification Area tab forward.


  2. To keep all icons visible, remove the check mark by the item Hide Inactive Icons.


    When you want to be choosy and select which icons show, keep the check mark by the item Hide Inactive Icons and then use the Customize button to select which icons show up.


  3. Place or remove check marks in the System Icons area to show or hide the icons Windows itself places in the notification area.


  4. Click OK.


dummies

Source:http://www.dummies.com/how-to/content/how-to-change-notification-area-icons.html

How to Open and Edit a Text File on a Mac


Navigate to your Applications folder and double-click TextEdit.


>

Your TextEdit window opens.


>
dummies

Source:http://www.dummies.com/how-to/content/how-to-open-and-edit-a-text-file-on-a-mac.html

Background and Perspective during Dog Photography

The dog you're photographing should always remain the star of the show. A big part of that is making sure your background is just that — the background. The background shouldn’t pull attention from the key elements in the photograph but rather support them in a meaningful and tasteful way.


Say you and Lucky are at the park after a rousing game of fetch, and you want to capture her post-play bliss. Before you even plop down, do a quick scan of the area to find the best, least-distracting background.


Choose a grassy patch out of the way instead of that bench right in front of the basketball court. Having a blanket of green behind Lucky allows her to shine as the subject while still telling a story about where she is (as riveting as it is, you don’t want the shirts versus skins throwdown pulling attention away from Lucky).


After you’re in your spot, look through your lens so you can home in even further on the exact scene your camera is capturing. Pay attention to distractions like litter, sticks, or dirt patches. Some distractions are okay, but try to keep them to a minimum.


You determine perspective by where and how you place your camera in relation to the subject and other key elements you’re photographing, and perspective determines a lot about the story you tell. Decide which element is most important and highlight that.


Say you’re still in the park with Lucky and you want to communicate how much she loves playing fetch. You could put her mangled ball in front of her and focus on that while she lies behind it.


The viewer would see the details of the ball — doggie slobber, teeth marks, and bits of grass — and would also see Lucky in the background, gazing lovingly at it. Such an image conveys how much she plays without her even needing to be in action.


Alternatively, you could leave the ball out of the picture and instead focus on the details of Lucky’s face, like her lolling tongue and smiling eyes. Position your camera lower than Lucky and photograph upwards to capture the full feeling of triumph Lucky has after conquering the ball. Viewers don’t need to have the ball in the photo to understand the feeling Lucky has; the angle takes care of it.


In general, if you want to celebrate your subject, you can use the technique of positioning your camera low and photographing upwards. Getting above her and photographing downwards helps you incorporate environmental elements. Try from the side and see what happens. Let your imagination run wild!


dummies

Source:http://www.dummies.com/how-to/content/background-and-perspective-during-dog-photography.navId-323783.html

How to Decide Whether to Refinance a Fixed-Rate Mortgage

If you have a fixed-rate mortgage and interest rates drop, you may want to refinance the same mortgage loan to reduce your monthly payments. The following table shows monthly payments for 15- and 30-year fixed-rate mortgages.


Interest RateMonthly Payments (30 yr)Monthly Payments (15 yr)
6%$600$843
7%$665$898
8%$733$956
9%$805$1,075
10%$878$1,104
11%$952$1,137
12%$1,029$1,200

When you decide whether to refinance, consider the following:


  • Closing costs will add to the principal. Every time you redo the paperwork, a whole assortment of people, from the lender of the title company to the appraiser, get to charge you some sort of fee. You have to add these refinancing fees into the loan principal.


  • When do you plan to move? Your monthly payment may go down, but whether that saves you money in the long run depends on how long it takes to make back the money you spent for the new loan. When you start the new loan, your first payments go almost exclusively to interest. If you sell the house after two years, you save money by making lower payments for two years, but you actually owe more on the loan than you did in the first place.


dummies

Source:http://www.dummies.com/how-to/content/how-to-decide-whether-to-refinance-a-fixedrate-mor.html

How to Make Cinnamon Stick Votives


8 of 12 in Series:
Christmas Tree-Trimming Party for 20 Kids and Parents


Christmas is a great time to get kids involved in holiday craft projects. Help them make these inexpensive glass votives decorated as gifts for their teachers. The cinnamon sticks used to decorate the candles fill the home with Christmas cheer.


To make four cinnamon stick votives, gather these supplies:


  • Glue gun and glue sticks (optional)


  • 4 plain glass, straight-sided votive holders (1-3/4 inches across the bottom x 2-1/2 inches high)


  • Glue gun with glue sticks


  • Ninety-six 3-inch cinnamon sticks


  • 2 yards thin ribbon (optional)


  • 4 votive candles (cinnamon scented, if you like)


Then follow these steps:


  1. Wash the votive holders inside and out and remove any labels.


  2. Load the glue gun with a glue stick and apply a thin strip of glue to 2 inches of a cinnamon stick, along the seam. Immediately press the stick against the votive, lining up the base of the stick where the glue begins with the bottom of the votive. The rounded side of the cinnamon stick should face out. Hold the cinnamon stick against the votive for a few seconds until the bond is solid. Repeat until you’ve covered the votive all the way around. You will use approximately 24 sticks per votive.


    You can make the votives without a glue gun. Just make sure to buy a heavy-bodied, clear glue that’s suitable for use with glass.


  3. Cut the ribbon, if you’re using one, into 18-inch lengths and tie the ribbon around the cinnamon sticks, making a small bow. Insert the votive candles.


    The ribbon you choose can make a big difference here. A gingham pattern gives the votive a country look, while a gold or silver ribbon can look quite elegant.


dummies

Source:http://www.dummies.com/how-to/content/how-to-make-cinnamon-stick-votives.navId-400688.html

Checking Your Rottweiler’s Health Regularly

Prevention is critical to the health of your Rottweiler and your wallet. To avoid unnecessary medical bills and to keep your dog happy and fit, make it a habit to check these things as you groom or snuggle with your dog:


  • Skin should be free of eruptions.


  • Coat should be thick, lustrous, and clean.


  • Ears should be clean, without an offensive odor.


  • Teeth should be white without accumulated tartar.


  • Eyes should be clear and bright with no discharge or irritation.


  • Nails should be short, with no cracks or ragged edges.


  • Check the rectal temperature whenever your dog appears out of sorts. (Normal is between 101.5 and 102 degrees Fahrenheit.)


dummies

Source:http://www.dummies.com/how-to/content/checking-your-rottweilers-health-regularly.html

Lens Basics for Dog Photography

When you purchase a camera lens for your dog photography sessions, consider its focal length and speed (in addition to the crop). The focal length determines the field of view or amount of the scene you can see through the lens. The speed of a camera lens refers to how wide its aperture (the hole that lets light through) can open up.


Aperture is measured in increments called f-stops, and the wider your aperture gets, the more light it lets in, allowing you to have a faster shutter speed, which is important for dog photography. Also, the wider your aperture gets, the lower its f-number is. A fast lens is capable of very low f-numbers, like f/2.8 and below.


If you’re looking for the perfect lens to use for dog photography, buy the fastest lens you can afford if you plan on using shallow depth of field to really make your subject pop off the background. A fast lens also comes in handy on cloudy days when you need more light or during action shoots when you want to use a very fast shutter speed.


Also look for a zoom lens with various focal lengths so you can quickly adjust your field of view as your dog moves about without having to physically get closer or back up. A zoom lens gives you much more flexibility than prime lenses. The most versatile lens is a 24–70mm f/2.8.


Don’t be confused by the term fast when it’s used to describe a camera lens. It actually has nothing to do with the speed at which the camera focuses, saves the image, or anything like that. Camera lenses that are capable of opening up to very wide apertures (f/2.8 and below) are considered fast because you can get away with using very fast shutter speeds.


For instance, if you use an extremely fast shutter speed, like 1/5000 second, you also let very little light into the camera. To compensate for the lack of light coming through the shutter, you may need to use a larger aperture.


dummies

Source:http://www.dummies.com/how-to/content/lens-basics-for-dog-photography.html

Network Cabling for the CCENT Certification Exam

The CCENT certification tests you on the different types of cabling that are used in different scenarios. The following are some key points to remember about network cabling.


  • Rollover cable: A rollover cable is also known as a console cable and gets the name rollover because the order of the wires from one end of the cable to the other are totally reversed, or rolled over. The rollover/console cable is used to connect a computer to the console port or auxiliary port of the router for administration purposes.


  • Back-to-back serial cable: The back-to-back serial cable is used to connect two Cisco routers directly together over a serial link. A back-to-back serial link will have one router act as the DCE device with the clock rate set and the other router act as the DTE device.


  • Straight-through cable: A straight-through cable is used to connect dissimilar devices together. Scenarios that use straight-through cables are computer-to-switch and switch-to-router.


  • Crossover cable: A crossover cable has wires 1 and 2 switch positions with wires 3 and 6 on one end and is used to connect similar devices together. Scenarios that use crossover cables are computer-to-computer, switch-to-switch, and computer-to-router (they are both hosts).


  • Coaxial cable: A network cable type used in old Ethernet environments, such as 10Base2 and 10Base5. Coaxial cable is seen in high-speed Internet connections with cable companies today.


  • Fiber optic cable: A unique cable type that has a glass core which carries pulses of light as opposed to copper cable carrying electrical signals (coax and twisted pair cabling).


dummies

Source:http://www.dummies.com/how-to/content/network-cabling-for-the-ccent-certification-exam.html

Sample Housetraining Schedule for Puppies

This housetraining schedule is based on the needs of a healthy four-month-old puppy. Vary the schedule according to your schedule and the age needs of your pup. If you can’t take care of all your pup’s needs due to your work schedule or other conflicts, consider hiring a helper.


Period of Day/TimeAction
Wake up (7:00 a.m.)Go to potty area (outside or papers) immediately and only for a
potty break.
Breakfast (7:30 a.m.)Fill the bowl and encourage your puppy to sit before placing it
down.
Morning walk (8:00 a.m.)Play after breakfast and/or take a walk.
Late-morning walk (11:00 a.m.)Play, potty, and/or take a walk.
Lunch (11:15 a.m.)Young puppies must eat and then go to their potty area. Fill
the bowl and encourage your puppy to sit before placing it
down.
After-lunch outing (11:45 a.m.)Potty break.
Midafternoon walk (2:30 p.m.)Play, potty, and/or take a walk.
Pre-dinner outingPotty break.
Dinnertime (4:30 p.m.)Fill the bowl and encourage your puppy to sit before placing it
down.
After-dinner outing (5 p.m.)Play, potty, and/or take a walk.
Evening (7:30 p.m.)Remove water.
Late evening (8:30 p.m.)Potty break.
Before bed (11:00 p.m.)Potty break.
Middle of the nightPotty break if necessary.


dummies

Source:http://www.dummies.com/how-to/content/sample-housetraining-schedule-for-puppies.html

Handy Tips to Reduce the GL

Having some handy tips and pointers when trying to lower your glycaemic load means that you need never get it wrong. Here’s a helpful list of things to remember.


  • Eat small or moderate portions of starchy foods such as bread, potatoes, pasta, and rice.


  • Include lots of low-GL fruit and vegetables at every meal. Aim for a minimum of five servings of fruit and veg per day. Lightly cook veggies for the minimum time or eat them raw. Fresh, frozen, or canned fruit and veg are all fine.


  • Make more of pulses including peas, beans, and lentils in soups, salads, and as a meal accompaniment instead of pasta or rice. Pulses, including dried or canned, count towards your five-a-day fruit and veg.


  • Always include a protein-rich food as part of your meal to reduce the GL. Chose from lean meat, fish, poultry, eggs, low-fat dairy foods, soya products, or quorn.


  • Adding acidic foods such as balsamic vinegar, lemon juice, vinaigrette, or pickles (for example, capers and gherkins) to your meal reduces the overall GL. Adding a little monounsaturated oil such as olive or rapeseed oil, or a little Parmesan cheese or reduced-fat cream to recipes also reduces the GL.


  • Cut right down on highly refined snack foods such as sweets, crisps or corn chips, cakes, biscuits, and pastries made from white flour and sugar. Instead, choose nuts and seeds, or dried fruits such as apple rings or apricots. Instead of milk chocolate, snack on a couple of squares of dark chocolate with over 70 per cent cocoa solids.


dummies

Source:http://www.dummies.com/how-to/content/handy-tips-to-reduce-the-gl.navId-323518.html