Gluten-Free Quadruple Chocolate Cookies

This recipe for decadent, gluten-free, quadruple-chocolate cookies includes — you guessed it — four different types of chocolate: unsweetened chocolate, semisweet chocolate, milk chocolate, and chocolate chips. For a simple variation, try white chocolate chips in place of the semisweet chocolate chips.


Preparation time: 30 minutes


Cooking time: 11 minutes


Yield: 48 cookies


4 ounces unsweetened chocolate, chopped


4 ounces semisweet chocolate, chopped


4 ounces milk chocolate, chopped


1/2 cup butter


4 eggs


3/4 cup granulated sugar


2/3 cup brown sugar


1/4 cup (30 grams) sorghum flour


1 tablespoon (10 grams) potato starch


1 tablespoon (7 grams) tapioca flour


1/4 teaspoon salt


1/4 teaspoon baking powder


1/2 cup mini semisweet chocolate chips


  1. In a heavy, medium saucepan over low heat, melt together the unsweetened chocolate, semisweet chocolate, milk chocolate, and butter.


    Stir until smooth and then remove from heat.


  2. In a large mixing bowl, beat the eggs until they’re combined. Gradually add granulated sugar and brown sugar, beating on high speed until the mixture is thick, light, and lemon-colored.


    This should take about 5 minutes.


  3. Beat in the melted chocolate mixture.


  4. In a small bowl, combine the sorghum flour, potato starch, tapioca flour, salt, and baking powder and stir with a wire whisk to combine. Add to the batter and mix well, and then stir in the chocolate chips.


  5. Let the batter stand for 25 minutes at room temperature. Preheat the oven to 350 degrees F.


  6. Line cookie sheets with Silpat liners or parchment paper. Drop the batter by spoonfuls onto the prepared sheets, about 3 inches apart.


  7. Bake for 9 to 11 minutes, or until the cookies are just set.


    Let the cookies cool on the cookie sheets for 2 minutes and then pull the parchment paper with the cookies onto a wire rack to cool completely.


Per serving: Calories 94 (From Fat 51); Fat 6g (Saturated 3g); Cholesterol 23mg; Sodium 21mg; Carbohydrate 11g; Dietary Fiber 1g; Protein 1g.


dummies

Source:http://www.dummies.com/how-to/content/glutenfree-quadruple-chocolate-cookies.html

Home Recording For Musicians For Dummies

Recording music at home means you play several roles — producer, mixer, and probably musician, too. Be sharp by knowing recording-studio lingo and how to get "your effects" by setting effects parameters for reverb and the compressor quickly and easily.


>


>


Words to Know as a Music Producer


When you produce your own music at home, you need to know the language of the music-recording industry. This glossary lets you in on the secret (or not-so-secret) language of the record producer. Read and be enlightened (or not)!


Air: Refers to frequencies above 12 kHz. A quality that allows the song to breathe a little. A feeling of spaciousness. Similar to shimmer.

Angular: This means nothing. If people use this term, ask them to explain themselves. They've just gone over the deep end.

Body: The frequency range of an instrument where it produces its richest tone, often around 800 Hz to 1 kHz.

Boomy: Too much low-frequency energy. To get rid of boominess, cut frequencies below 120 Hz.

Boxy: Too much 400-Hz to 600-Hz energy.

Bright: Lots of high end, usually referring to frequencies above 8 kHz.

Brown: A term for the sound that Eddie Van Halen used to get from his guitar amp. Brown usually refers to a low midrange quality (200 to 400 Hz) — not to be confused with muddy, however.

Cold: Lacking warmth. Often used as a derogatory term to describe digital recordings. It could also mean too much high end in a recording. In this case, reduce frequencies above 10 kHz slightly.

Crisp: See bright.

Dark: Lacking high-frequency brightness. Could also be dull.

Depth: Full-bodied sound. Often the result of enhancing frequencies just above and below the main body of the instrument.

Dry: An instrument without effects applied to it.

Dull: See dark.

Edgy: An extreme of punchy, bordering on uncomfortable, depending on the music.

Grainy: Poor digital resolution.

Harsh: Another derogatory term for digital recordings. This could also refer to frequencies in the 5-kHz to 8-kHz range that are too pronounced. Reduce harsh frequencies to suit your taste.

Muddy: Lack of definition in a sound, often as a result of too much low-mid (400- to 800-Hz) energy.

Nasally: Too much midrange energy, around 1 to 2 kHz in some instruments.

Orange: Get this guy out of your studio; he's just making stuff up!

Plosives: The result of saying or singing p or other stop consonant sounds(t, g, k, d, b).

Presence: A nice balance between an instrument's attack and its main tone. Usually attained by adding 2- to 5-kHz frequencies.

Punchy: A nice attack and sense of presence. A punchy sound can come from your performance, your instrument, or the effective use of compression (or all three). To create punch with a compressor, set the threshold to compress just a couple of decibels (dB), set the attack long enough so that the initial transient passes through uncompressed, and set the release so that it doesn't remain longer than the instrument and so that it isn't short enough to pump the compressor.

Round: Sometimes refers to sounds that have a pronounced midrange quality. When a sound is round, bass and treble are slightly reduced.

Shimmer: Frequencies above 12 kHz. Similar to air.

Sibilance: Pronounced s sounds.

Smooth: The opposite of punchy. Smooth sounds are those that have an even level to them. The body of the sound is not overshadowed by the initial attack.

Sweet: Good or great, depending on how enthusiastically you use the word.

Warm: Lacking harshness or coldness. This is a catchall term used to describe anything from analog equipment to a pleasing quality that can't be put into words. Use this term around nonrecording people whenever you want to sound like you know what you're talking about. When someone else uses this term repeatedly, take his or her recording advice with a grain of salt (a large one).

Wet: An instrument with effects applied to it.


>


>


>


Setting Effects Parameters in Your Home Recording Studio


Every effect (signal processor) that you use in your home-recording studio has certain settings, called parameters, which you can adjust to tailor the sound to your liking. The compressor and reverb are the two most common effects (signal processors).


Choosing reverb parameters


Reverb is a natural part of every sound and represents the way a room sounds as a sound bounces around it.


  • Room size/type: Whether you use a reverb patch within your DAW (Digital Audio Workstation) or a separate outboard reverb unit, you can choose the type of reverb that you want to use. You have the option of a room, hall, or plate (a type of reverb that uses a metal plate to create the sound). As well, you can choose the size of the room in either meters or feet.


  • Decay: The decay is the length of time that the reverb lasts. Larger or more reflective rooms produce a longer decay.


  • Predelay: The predelay is the amount of time from the sound's beginning to the start of the reverb (described in milliseconds). Predelay helps to define the initial sound signal by separating it from the reverb. This parameter is essential in making your reverb sound natural.


  • Density: The density parameter controls the level of the early reflections (the first few milliseconds of the reverb sound). This parameter enables you to simulate different sizes of rooms because, in a larger room, the main section of a reverb takes longer to reach you.


  • Diffusion: Diffusion affects the density of the reflections in the main section of the reverb sound. A higher diffusion setting results in a thicker sound.


Controlling compressor settings


The compressor is used to compress the dynamic range of your signal and is used in all the stages of recording: tracking, mixing, and mastering.


  • Threshold: The threshold setting dictates the level where the compressor starts to act on the signal. This is listed in dB (decibels).


  • Ratio: The ratio is the amount that the compressor affects the signal. For example, a ratio of 2:1 means that if a signal goes 1dB over the threshold setting, its output from the compressor is only 1/2dB louder.


  • Attack: The attack knob controls how soon the compressor kicks in. The attack is defined in milliseconds (ms), and the lower the number, the faster the attack.


  • Release: The release parameter controls how long the compressor continues affecting the signal after it has started. Like the attack, the release is defined in milliseconds.


  • Gain: You use the gain knob to adjust the level of the signal going out of the compressor. This is listed in decibels. Because adding compression generally reduces the overall level of the sound, you use this control to raise the level back to where it was going in.


>


>
dummies


Source:http://www.dummies.com/how-to/content/home-recording-for-musicians-for-dummies-cheat-she.html

Rabbits For Dummies

Rabbits can make wonderful pets whether you keep them indoors or in an outdoor pen with a shelter. Bunnies are lively, engaging, and endearing, and you can often tell how they’re feeling from their body language. Of course you want them feeling well health-wise, so you need to keep your bunny out of harm’s way and to pay attention to warning signs — keep emergency contact numbers handy, just in case.


>


>


Tips for Living with an Indoor Pet Rabbit


Rabbits make wonderful indoor companions, and the following tips can help you create a successful and enjoyable living arrangement for you and your furry friend. First tip: If you let your lapine roam free, be prepared to find droppings in odd places before your bunny is litter-box trained.


  • Spay or neuter to help prevent problems with health and behavior.


  • Careful rabbit-proofing minimizes damage to both home and rabbit.


  • Have patience when litter box training.


  • A proper diet is key to good health.


  • Daily exercise makes for a healthy and happy bunny.


  • Frequent grooming keeps down excess fluff in the house.


  • Knowing your rabbit’s normal behavior can help detect illness.


  • Regular cleaning is good for both your home and your bunny.


  • Use playtime as a way to build a trusting relationship.


>


>


>


Emergency Numbers to Have on Hand for Your Rabbit


Your pet rabbit can get hurt or feel sick, just like you do. So that you’re prepared for an emergency — your bunny may eat something he shouldn’t or injure a paw — write down emergency contact numbers right away when you bring your bunny home. You need to have numbers for these helpers handy:


  • Veterinarian


  • 24-Hour emergency pet hospital


  • Animal Control


  • ASPCA Animal Poison Control Center 888-4ANI-HELP (888-426-4435)


  • Pet sitter


>


>


>


Things to Keep Away from Your Rabbit


Some everyday things you don’t think twice about are dangerous to your rabbit. And some things toxic to you are especially bad for your bunny. Your hopping pet can do damage to household items as well. To keep everybun (sorry!) happy and healthy, keep your rabbit away from these things:


  • Antifreeze


  • Balconies


  • Carpet edges


  • Cleaning fluids


  • Electrical cords


  • Heating elements


  • Paint fumes


  • Stairways


  • Telephone wires


  • Toxic plants


>


>


>


How to Recognize a Rabbit Health Emergency


You need to be familiar with your rabbit’s normal condition and behavior so that you notice when something is wrong. Bleeding is fairly obvious, but raspy breathing may be harder to detect and just as dangerous. Contact your veterinarian as soon as you see any of the symptoms in the following table.


Handle an injured rabbit gently so that you don’t hurt your pet further, and be sure to use a pet carrier when transporting your bunny to the vet.


Symptom(s)Possible Cause
BleedingInjury (Apply pressure to stop the bleeding)
Blood in urineUterine disease in intact female rabbits.
Inability to stand; staggeringSevere illness
ParalysisInjury to the spine
Rapid breathing, raspy breathing, heavy coughingIllness or infection
Refusal to eatSerious illness or mild colic
Severe pain indicated by refusal to eat, teeth grinding, and
limping
Injury or illness
Straining to defecate or urinateIntestinal or urinary blockage
Swelling on body part that’s hot to the touchInjury
Teary, closed, red, or cloudy eyeEye injury or infection
Temperature significantly above or below
101–103ºF
Chill or fever
Tilted headInjury, bacterial infection


>


>


>


How to Read Your Rabbit’s Body Language


Although your rabbit may make some sounds when communicating, bunnies do most of their “talking” with their body language. The following list can help you interpret what your rabbit is saying:


  • Hopping, leaping, and racing: “Whoopee! I’m happy!”


  • Binky-ing (a high jump, with vigorous twists): “I am incredibly happy!”


  • Kicking: If being held the wrong way, “Let go!” or, if playing, “What fun!”


  • Circling: “I’m in the mood for love.”


  • Flattening: “I don’t want you to see me.” A scared rabbit will lower herself to the ground as if to hide.


  • Stretching out (on side or back): “Ah, life is good. . . .”


  • Ear shaking: “I don’t like that.” Frequent ear shaking can be a sign of a medical problem and should be assessed by a veterinarian.


  • Head butting: “Hey!” A persistent rabbit will head-butt you when she wants something — petting, food, whatever.


  • Stomping: “Warning” or, maybe, “I’m annoyed.”


  • Biting: “I don’t like what you’re doing.” A gentle nip is a rabbit’s way of saying “I’ve had enough.” You’ll be able to tell the difference between a nip and a bite.


  • Sitting up tall: “I’m curious,” or “Is there trouble afoot?”


  • Licking: “I love you.”


>


>
dummies


Source:http://www.dummies.com/how-to/content/rabbits-for-dummies-cheat-sheet.html

Five Great Web Sites for Setting Up a Canadian Small Business

The Internet provides a wealth of great Canadian resources to help you start, run, and carry on your small business. The following Web sites may be particularly helpful to you.


  1. Canada Business


    Get government and general business information on topics such as starting a business, writing a business plan, finding financing, marketing, exporting, and being an employer. There’s a CBSC (Canada Business Service Centre) for every province and territory, and they are designed for use by start-up entrepreneurs in any field.


  2. Industry Canada


    Search for information about specific business sectors. For each business sector there are also links to company directories, contacts, industry events, and statistics.


  3. The Yellow Pages


    Look for suppliers for your business in a particular business sector and/or geographic area. Let your fingers do the walking (across your keyboard instead of through the phone book)!


  4. TopTen Reviews


    Can’t decide which computer printer to buy? Don’t know which accounting software package to choose? Check out reviews for these and many other small business products and services. Their slogan is “We do the research so you don’t have to.”


  5. Resources for Managing Your Business – RBC Royal Bank


    Get information about many general business topics such as starting, managing, financing, and growing a business. Or use “The Big Idea,” an online guide through the steps of developing a business plan.


dummies

Source:http://www.dummies.com/how-to/content/five-great-web-sites-for-setting-up-a-canadian-sma.html

Selling For Dummies (UK Edition)


>


Time Planning for Maximum Sales Success


Time planning for sales success starts with setting goals because that’s the only way you can tell what the most productive tasks are at any given moment. When you’re planning for the coming day of selling, ask yourself the following questions:


  • Did I accomplish all my high-priority items today?


  • Did I reach or surpass my goals for today?


  • Did I invest as much time in persuading others as I had planned?


  • Did I contact every prospect that I put on my list for today? If not, why not? What prevented me from getting to that prospect?


  • How much time did I spend prospecting for new clients?


  • How much time did I waste chatting with colleagues or clients?


  • What is the most productive thing I did today?


  • What is the least productive thing I did today?


  • Of the things I consider a waste of time, could I have avoided or eliminated any of them?


  • How much time did I spend doing something that will profit me? Can I devote more time to that activity tomorrow?


  • Was today a productive day for me? Was it productive for my company?


  • Did I take care of all the paperwork I needed to take care of today?


  • How many of today’s activities have helped me achieve my goals?


The answers to these questions will help you see what you’re doing right and let you know what you can improve upon tomorrow.


>


>


>


Keeping Sales Prospects Happy with a ‘Thank You’


Everybody likes to be appreciated. So use a follow-up system to let your customers know that you appreciate their business. The following list offers ten instances in which thank-you notes are appropriate, followed by examples of wordings you can use for the occasion:


  • For telephone contact: ‘Thank you for talking to me on the telephone. In today’s business world, time is precious. You can rest assured that I will always respect the time you invest as we discuss the possibility of a mutually beneficial business opportunity.’


  • For in-person contact: ‘Thank you for taking time to meet me. It was a pleasure meeting you, and I’m thankful for the time we shared. We have been fortunate to serve many happy clients, and I hope to someday be able to serve you. If you have any questions, please don’t hesitate to call.’


  • After a demonstration or presentation: ‘Thank you for giving me the opportunity to demonstrate our product and discuss the potential association for the mutual benefit of our firms. We believe that quality, blended with excellent service, is the foundation for a successful business.’


  • After a purchase: ‘Thank you for giving me the opportunity to offer you our finest service. We are confident that you will be happy with this investment towards future growth. My goal now is to offer excellent follow-up service so that you will have no reservation about referring to me others with similar needs.’


  • For a referral: ‘Thank you for your kind referral. You can rest assured that anyone you refer to me will receive the highest possible professional service and courtesy.’


  • After a final refusal: ‘Thank you for taking the time to consider letting me serve you. I sincerely regret that your immediate plans do not include making the investment at this time. However, if you need further information or have any questions, please feel free to call. I’ll keep you posted on new developments and changes that may benefit you in the future.’


  • After a prospect buys from someone else: ‘Thank you for taking the time to analyse my services. I regret being unable at this time to help you appreciate the benefits that we can provide. We keep constantly informed of new developments and changes in our industry, though, so I will keep in touch with you in the hope that, in the years ahead, we will be able to do business together.’


  • After a prospect buys from someone else but offers you referrals: ‘Thank you for your gracious offer to give me referrals. As we discussed, I am enclosing three of my business cards, and I thank you in advance for placing them in the hands of three of your friends, acquaintances, or relatives whom I might serve. I will keep in touch and be willing to render my services as needed.’


  • To anyone who supplies you or gives you a service: ‘Thank you for your continued and professional service. It is gratifying to meet someone dedicated to doing a good job. I sincerely appreciate your efforts and thank you for serving me so well. If my company or I can serve you in any way, please do not hesitate to call.’


  • On an anniversary: ‘With warm regards, I send this note to say hello and, again, thank you for your patronage. We are continually changing and improving our products and service. If you’d like an update on our latest advancements, please give me a call.’


>


>


>


Getting Your Sales Patter Just Right


Most people don’t think they talk too much, but you’d be surprised by how much talking is done compared to how much is needed. To develop your ear and improve your sales technique, try these two simple exercises:


  • Listen to a salesperson selling to others or trying to sell to you. Pay attention to what her words are doing. While you’re listening, ask yourself these questions:


    • Do her words paint positive or negative mental pictures?


    • Do her words say anything that may raise a new objection to her product or service?


    • Are all her words necessary?


    • Does she ask questions and then carefully listen to the prospect’s answers?


    • Does she move forward with questions, or does she drift off course by talking about features and benefits the customer hasn’t expressed a need for?


  • Record yourself when you’re talking with a customer. You may be shocked at how much chatter you can cut out. To detect what you need to cut, ask yourself these questions:


    • What is the quality of the questions I ask?


    • Am I asking information-gathering questions to help myself move forward with my sale, or am I just asking questions to fill a sound void?


>


>
dummies


Source:http://www.dummies.com/how-to/content/selling-for-dummies-cheat-sheet-uk-edition.html

Dairy-Free Confetti Cole Slaw

Cole slaw is a staple at any picnic or potluck dinner, although some are a tad on the boring side when they're made with dairy products. Why not add flair to your slaw and surprise everyone while keeping it dairy-free? Fresh ginger, rice vinegar, and red pepper flakes give this nutrient-packed slaw an extra kick. This salad will keep in the refrigerator for five to seven days.


Preparation time: 10 minutes


Chilling time: At least 2 hours


Yield: 6 servings


4 cups finely shredded cabbage (Combinations of green and red or purple cabbage are nice if you can find them.)


2 carrots, finely shredded


4 radishes, minced


1/2 cup chopped sweet onion


1/2 cup chopped green bell pepper


2 cloves garlic, minced


1/4 cup rice vinegar


1 tablespoon lemon juice


2 teaspoons sesame oil


1 teaspoon peeled and grated fresh ginger


1 teaspoon sesame seeds


1/2 teaspoon red pepper flakes


1/4 teaspoon salt


  1. Combine all the ingredients in a large bowl and toss well. Chill for at least 2 hours before serving. Toss again before serving.


Per serving: Calories 52 (17 from Fat); Fat 2g (Saturated 0g); Cholesterol 0mg; Sodium 121mg; Carbohydrate 8g (Dietary Fiber 3g); Protein 2g.


dummies

Source:http://www.dummies.com/how-to/content/dairyfree-confetti-cole-slaw.html

How to Create E-Book Files with Mobipocket

If a file doesn't automatically open in Mobipocket Reader, you can manually import and convert it. This is a great way to make the following types of files readable by mobile devices and e-readers, including all versions of the Kindle:


  • Adobe PDF files


  • HTML Web page documents


  • Plain-text files


  • Rich Text Format (RTF) files


  • Microsoft Office files (including Word, Excel, and Access)


Launch Mobipocket from the Start menu, click the Import button near the top of the Mobipocket window, select Add Folder, and then select the folder on your file system that contains the content files that you want to convert.


You could also just drag one of the files you want to open atop the Mobipocket Reader icon in Windows Explorer or My Computer. The file automatically opens and is converted. After you have converted files, you can transfer them to your mobile device using a USB cable.


If you’re thinking that Mobipocket is an independent company that’s competing with Amazon.com for a share of the e-book market, think again. That might have been true at one time, but in 2005, Amazon purchased Mobipocket. Today, the two companies work together to provide e-books to users of the Kindle and competing electronic book readers.


dummies

Source:http://www.dummies.com/how-to/content/how-to-create-ebook-files-with-mobipocket.navId-397603.html

How to Cook for Dairy Eaters When You’re Dairy-Free

Having guests in your home can be especially challenging if you’re living dairy-free. Unless your guests also are dairy-free, they’re likely to be unfamiliar with some of the nondairy products you may be routinely eating in place of other common dairy products. They may, for example, expect to see cow’s milk in your refrigerator, not almond milk. And they may find cheeseless pizza a bit odd.


Offering choices is always a good idea when hosting visitors. Approach entertaining guests using some of the same strategies you’d use with your family. One way is to offer meals that include a range of options for customizing each dish.


Before they arrive, ask your guests about their food likes and dislikes to get a feel for how easy or challenging it may be to come up with meal ideas you can all enjoy. To the extent possible, try to identify nondairy options that everybody already likes.


If you have the extra time, you may consider creating two entree options — one with dairy and one without. Doing so isn’t the most practical step to take because with most families it usually makes more sense to fix one meal that everyone can enjoy. However, in some instances, you can make one dairy item and one nondairy item without much extra work. For example, on pizza night, make one pizza as cheesy as you want and the other dairy-free.


Because many ethnic cuisines are largely or entirely dairy-free, look to other parts of the world for inspiration. Good examples of dairy-free international dishes include Indonesian Saté and West African Peanut Soup. Other excellent options include the following:


  • Chinese cuisine: Dairy products are nearly nonexistent in Asian cuisine. A wide variety of stir-fried meals incorporate rice, vegetables, tofu, meats, and nondairy seasonings.


  • Japanese cuisine: Options include many varieties of sushi and tempura (vegetables or seafood dipped in a nondairy batter and lightly fried in oil).


  • Middle Eastern cuisine: Dishes you may want to try include hummus, falafel (deep-fried balls made from ground garbanzo beans) served in pita pockets, fattoush (a chopped green salad that includes toasted pieces of pita bread), and curried couscous salad made with saffron, raisins, slivered almonds, orange zest, onion, and spices.


Thumb through ethnic cookbooks to get other ideas, and surf the Web for hundreds of recipes to try.


dummies

Source:http://www.dummies.com/how-to/content/how-to-cook-for-dairy-eaters-when-youre-dairyfree.html

Essential Landing Page Optimization Tips

Follow these optimization tips to keep visitors who land on your Web page from moving to other sites. Optimize your landing page as part of your Web design and conversion strategy, and you'll be well on your way to online marketing success:


  • Choose keywords carefully. Your conversions will ultimately suffer if your keywords aren't researched and tested. Keywords provide the framework from which your advertising campaign is built.


  • Keep key information in the fold. The fold area is where you capture your reader's attention. Put key content and enticing elements here, starting with your heading.


  • Use trust elements. To increase conversions, gain visitors' trust with trust elements. If they don't trust you, they won't buy from you.


  • Know your demographic inside and out. Your landing page is designed around your demographic. The language, navigation, and pictures are all done with the demographic in mind; if not, your conversions will suffer.


  • Be upfront. Fees should never be hidden. Don't spring any unpleasant surprises on your customers. For those that really want your product, they'll gladly pay that little extra in shipping — if they know about it in advance.


  • Write persuasively. Write to appeal to your audience; this includes an ethical appeal, a rational appeal, and an emotional appeal.


  • Use contact information. Don't hide yourself away. Visitors gain confidence when they know how to get a hold of you.


dummies

Source:http://www.dummies.com/how-to/content/essential-landing-page-optimization-tips.html

Copy, Move, Rename, and Delete Files with UNIX

After you’re comfortable with moving around the hierarchy of your hard drive in UNIX, it’s a cinch to copy, move, and rename files and folders. To copy files from the command line, use the cp command. Because using the cp command will copy a file from one place to another, it requires two operands: first the source and then the destination.


For instance, to copy a file from your Home folder to your Documents folder, use the cp command like this:


cp ~/MyDocument ~/Desktop/MyDocument

Keep in mind that when you copy files, you must have proper permissions to do so!


If you can’t copy to the destination that you desire, you need to precede the cp command with sudo. Using the sudo command allows you to perform functions as another user. The idea here is that the other user whom you’re “emulating” has the necessary privileges to execute the desired copy operation.


When you execute the command, the command line asks you for a password. If you don’t know what the password is, you probably shouldn’t be using sudo. Your computer’s administrator should have given you an appropriate password to use. After you enter the correct password, the command executes as desired.


In case you’re curious, sudo stands for set user and do. It sets the user to the one that you specify and performs the command that follows the username.


sudo cp ~/Desktop/MyDocument /Users/fuadramses/Desktop/MyDocument
Password:

A close cousin to the cp (copy) command is the mv (move) command. As you can probably guess, the mv command moves a folder or file from one location to another. To demonstrate, this command moves MyDocument from the Desktop folder to the current user’s Home folder:


mv ~/Desktop/MyDocument ~/MyDocument

Ah, but here’s the hidden surprise: The mv command also functions as a rename command. For instance, to rename a file MyDocument on the Desktop to MyNewDocument, do this:


mv ~/Desktop/MyDocument ~/Desktop/MyNewDocument

Because both folders in this example reside in the same folder (~/Desktop/), it appears as though the mv command has renamed the file.


Again, like the cp command, the mv command requires that you have proper permissions for the action that you want to perform. Use the sudo command to perform any commands that your current user (as displayed in the prompt) isn’t allowed to execute.


On UNIX systems, not all users are necessarily equal. Some users can perform functions that others can’t. This is handy for keeping your child’s mitts off important files on your laptop. It also creates a hurdle should you choose to work on files while using your child’s restricted user account.


The sudo command lets you temporarily become another user — presumably one that has permission to perform some function that the current user can’t.


What would file manipulation be without the ability to delete files? Never fear; UNIX can delete anything that you throw at it. Use the rm (short for remove) or rmdir (short for remove directory) command to delete a folder or file. For example, to delete MyNewDocument from the Desktop folder, execute the rm command like this:


rm ~/Desktop/MyNewDocument

Once again, deleting files and folders requires that you have permission to do so. In other words, any time that you manipulate files with the command line, you’re required to have the proper permission. If your current user lacks these permissions, using sudo helps.


You should also check to make sure that your target is correctly spelled and that no pesky spaces that could wreak carnage are lurking in the command.


dummies

Source:http://www.dummies.com/how-to/content/copy-move-rename-and-delete-files-with-unix.html

Scheduling Resources into Microsoft CRM

With Microsoft CRM, you and your staff can easily deliver timely customer service. The first thing you need to do is set up your resources — that is, your facilities and equipment — on the schedule.


Here's how this works:


1. At the bottom of the CRM navigation pane, click the Settings button.


The Settings window appears on the right.


2. From the Settings window, select Business Unit Settings. Then select Local Facilities/Equipment.


You can now begin adding your resources. From here, you can also view your resources, local facilities and equipment, and subsidiary facilities and equipment using the View drop-down list.


3. In the window's toolbar, click the New button.


The Facilities/Equipment: New window appears.


4. In the Name field, name your resource.


Use the common name for the item, so that everyone in your company can find it. Naming the heavy-duty winch "Big Cheese" won't do any good if you're the only one that calls it that. You have up to 100 characters for the name of your resource. Remember that all fields in bold (red on your computer screen) are required.


5. Next up, select a Business Unit.


This field automatically defaults to your company's business unit, but you can change it by clicking the magnifying glass.


6. Choose a site for your resource.


This optional field is useful if you have more than one location for your resources. For example, you might want to indicate whether you want to use the heavy-duty winch at your Newtown facility or the one at your Portville location.


7. Enter an e-mail address.


You can use this field to send e-mails about this resource. For instance, suppose you're taking the heavy winch out and want to notify Steve, the equipment manager. You can set up a business process so that every time you schedule this resource, an e-mail to Steve is generated.


8. Choose a time zone.


The default time zone is the one for your company. However, you can change it by making a selection from the drop-down list.


9. Last but not least, enter a description of the resource.


This field is optional.


10. Click the Save and Close button.


You return to the Facilities/Equipment window.


Now that you've entered your resource into Microsoft CRM, you should create a schedule for it. The schedule tells everyone when the resource can be used.


Say you just purchased the Big Cheese (the winch) on Saturday, and it's ready for deployment in the field. However, you want downtime scheduled for maintenance every Friday:


1. In the Facilities/Equipment window, select the resource you just created by double-clicking it.


The window for this resource appears. Eyes up: Note that it has its own navigation pane.


2. In the resource's navigation pane, click Work Hours.


A tab called Monthly View appears with a monthly calendar. To change months, click the arrow on either side of the month at the top of the calendar.


3. Double-click a day where you want to either restrict work or start the schedule for the resource.


4. Choose one of the following options and then click OK:


* This day only: Changes only the date you've selected.


This date onward: Changes the schedule from this day onward.


Entire recurring weekly schedule from start to end: Changes the schedule for all dates, including past dates.


For our example, select the second option. The Weekly Schedule: Edit screen appears.


5. Fill out this page.


Most of the fields in this screen are self-explanatory. You can change or select your work hours by double-clicking the bold (blue on-screen) hours listed after Work Hours. Uncheck any day that is not available for scheduling (the default is for everything to be checked).


6. Click the Save and Close button.


dummies

Source:http://www.dummies.com/how-to/content/scheduling-resources-into-microsoft-crm.html

Meeting Privately with Employees in Conflict

Mediating a conflict at work sometimes calls for a private meeting, or caucus, with each individual involved. A private meeting is an excellent opportunity for you to provide a different venue for participants to discuss the conflict on a different level. If you opt to call a caucus, you have some choices to make. You need to decide how to break, whom to meet with first, and what kind of approach to take in the private meeting.


Be sure your employees understand that they aren’t in trouble and that you haven’t given up on the conversation. Explain that you think this is a good opportunity to take a quick break and try something new. Framing this meeting as a positive step in your process helps you manage your employees’ reactions.


Choosing who goes first


No hard and fast rule exists about how to decide whom to meet with first. You know your employees, and you’re the best person to make an assessment about what to do, but here are some determining factors that can help you:


  • Assess emotions: Decide whether meeting with this person first is an opportunity to help her vent and process, or if letting her relax alone for a few minutes while you meet with the other person is the best use of time.


  • Assess power: For this conversation to be successful, you want power to be roughly in balance between your participants. An employee who says she doesn’t care, is too overwhelmed to speak, or can’t act in her own best interests may be telling you that she feels disempowered. Meeting first with an employee who feels powerless will probably be more effective than trying to squelch or minimize the other employee’s power.


  • Assess behavior: Is one of your employees acting out of character? Do you see a typically soft-spoken employee becoming aggressive and demeaning, or an outspoken employee suddenly not making a peep? If so, it’s a sign that something has changed, and you need to check it out.


Whomever you choose to meet with first, be sure to clarify to the other person that he’ll have the same opportunity as the first person.


Allowing parties to open up with added confidentiality


When you send one of your employees out of the room so you can continue your conversation with the other, make a quick statement clarifying that during this time, you’re applying an additional layer of confidentiality. What this means, essentially, is that anything she shares with you during this time, you won’t bring up with the other employee in his private meeting or during an open session.


One of the most vital things you do during a private meeting is create a safe and open environment for your employee. You may likely see this as an opportunity to get down to the bottom of things, but you won’t be able to accomplish that unless your employee trusts that this is a safe place to have that conversation.


dummies

Source:http://www.dummies.com/how-to/content/meeting-privately-with-employees-in-conflict.html

What Goes Into a Good Location-Based Offer?

Wondering what goes into a good offer? The Ben & Jerry's offer is widely considered a good offer. The ice cream chain offers a foursquare deal of 3 scoops of ice cream for $3 on any check in. The mayor receives an extra scoop for free. This is a good offer because


  • This is a great value for all customers. The chain also offers an extra deal for its most loyal customer, the mayor of the venue.


  • The best part is that anyone can get the deal; all they have to do is check in on foursquare.


dummies

Source:http://www.dummies.com/how-to/content/what-goes-into-a-good-locationbased-offer.html

Discover Your Client’s Needs, Expectations, and Reasons for the Photo Shoot

In addition to learning about your canine subject, you need to learn about your human client. Sometimes, this is even more vital, because the human is the one paying your fee (and humans tend to be a lot harder to please than dogs)! This is another area where it pays to be thorough. Take some time to ask your human client


  • Why she wants this photo shoot. Her reasons may run the gamut from common ones to something extraordinary, like an ailing dog or a new addition to the family.


  • What her goals are for the session. Does she want just one good image for a holiday card? A whole action series? A surprise gift for her husband?


  • If she or her dog have any special needs. Go the extra mile to make sure you understand any specific requests or accommodations and be sure to communicate with her if you can’t meet her requests.


Does she have specific ideas in mind? A lot of times, clients don’t. They just want you to “do your thing.” But sometimes, clients do have ideas of what they want, so make sure you find out what those preconceived ideas are.


Also find out whether she wants indoor or outdoor shots, as well as action or posed, or maybe a combination. Ask about special spots or toys she wants you to include. Take time to engage in a discussion (even over e-mail) so you can be best prepared to deliver the product she’s looking for.


dummies

Source:http://www.dummies.com/how-to/content/discover-your-clients-needs-expectations-and-reaso.navId-380716.html

Business Plan Balance Sheet: Current Liabilities

Liabilities are amounts of money your business owes to creditors in the form of bills that are due, bank loans you’ve taken out, and bonds or warrants that you may have issued to raise money.


The basic idea behind these so-called financial instruments is always the same: You receive money or something else of value in exchange for the promise to pay the debt back over a certain period of time (usually with interest). Sometimes an asset that you own secures the debts. (If you don’t pay back what you owe as promised, the creditor can take the asset away from you.) Other times the debts are unsecured.


Current liabilities represent short-term debts that you have to repay within one year. These liabilities are closely tied to the current assets listed on the top half of your balance sheet because you have to pay them off with those assets. In most cases, current liabilities fall into two groups:


  • Accounts payable: These liabilities come in the form of bills that haven’t yet been paid for such things as utilities, telephone service, office supplies, professional services, raw materials, wholesale goods, or other invoices from providers or suppliers.


  • Accrued expenses payable: In addition to outside accounts payable, your business continuously accrues liabilities related to salaries or wages (if you have employees), insurance premiums, interest on bank loans, and taxes you owe. Any obligations that are unpaid at the time you run your balance sheet get grouped together in this category.


To figure out the money available on a day-to-day basis to keep your business up and running — known as your working capital — subtract your current liabilities from your current assets.


Working capital = Current assets @@ms Current liabilities


dummies

Source:http://www.dummies.com/how-to/content/business-plan-balance-sheet-current-liabilities.html

How to Configure Dynamic Navigation in SharePoint 2010

The navigation options in a SharePoint 2010 publishing site allow you to manage both the top navigation and the site’s Quick Launch navigation in one page. SharePoint lets you manage the two major kinds of navigation found on most websites:


  • Primary navigation is what your site visitors use to reach the main areas in your site, no matter where they are in your site. It’s usually positioned somewhere in the top of the page and is consistent across every page in your site. SharePoint calls this your global navigation.


  • Contextual navigation is usually found in the body of the page, usually on the left or right, and is used to access the pages within each major area of your site. This navigation is considered contextual because the navigation items change depending on where the visitor is in the site. SharePoint calls this your current navigation.


SharePoint provides two navigation menus that correspond with your global and current navigation. The Top Link bar is the global navigation menu that's usually present at the top of publishing pages. The Quick Launch menu provides the current navigation that appears along the left of most pages.


Both the Top Link bar and the Quick Launch menu are provided by the same navigation control — SharePoint’s AspMenu control. This is a very powerful control that has a lot of settings.


SharePoint’s publishing site assumes that you want your global and current navigation menus created dynamically based on your site hierarchy. Toward that end, configuring navigation in a publishing site requires two things:


  • A site hierarchy that matches your navigation requirements. In other words, you have subsites for the major items in your global navigation and pages for the items below. Any time you want to create a new grouping of pages in the navigation menu, you have to create a new subsite.


    This often leads to extensive nesting of sites. This is one reason that people start looking for alternative approaches to navigation.


  • The ability to think in terms of the current site you’re setting navigation options for, its parent site, its sibling sites, and any children sites that may exist. This can be extremely confusing to people, which is one reason why many people abandon dynamic navigation. It’s too hard to keep track of what’s happening where.


dummies

Source:http://www.dummies.com/how-to/content/how-to-configure-dynamic-navigation-in-sharepoint-.html

Scheduling a Meeting with Lotus Notes 6

To create a new Meeting, first open your Calendar and then click the Schedule a Meeting button on the Action bar. A blank Meeting form appears. In Figure 1, you can see a sample Meeting form.


>
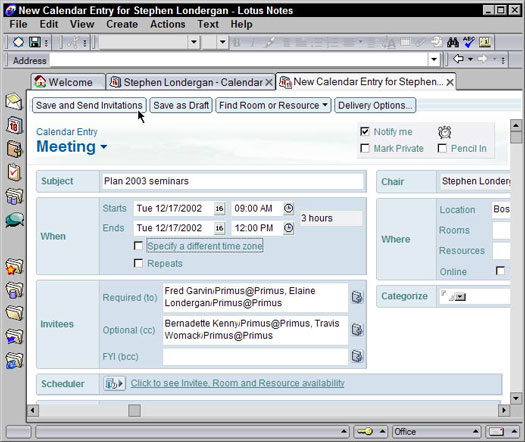


Figure 1: Creating a new meeting.

Most of the fields on a Meeting form are the same as those on an Appointment form. You need to fill in the basics, such as a subject, when, duration, and location. Next, you'll move on to consider who to invite.


Inviting the Invitees


In the simplest case, you simply enter the names of the people whom you want to come to your meeting. Just fill in the fields of the Invitees section (bottom-left side) as well as the date, time, and location sections of the new Meeting form. As you can see in Figure 1, you can invite three types of people: Required, Optional, and FYI.


  • Required: Anyone whose name you list in this field is considered by Notes to be a mandatory participant of your meeting. This is especially important when you ask Notes to find the best times for a meeting using the Scheduler.

  • Optional: As far as Notes is concerned, these folks are really just like Required people. Notes consults their schedules if you ask Notes to find the best times for your meeting. If a person is listed as an Optional invitee in a Meeting invitation, his attendance isn't necessarily mandatory.

  • FYI: Use this field if you want to send a Meeting notice — different than an invitation — to someone. Suppose that you need to schedule a meeting with your team members. You could enter each team member's name in the Required field but put your boss's name in the FYI field. That way your colleagues each receive an invitation to the meeting, but your manager just gets a meeting notice instead. That way your boss knows that you're having the meeting and that you sent the invitations but also that she isn't expected to attend.

The people in the Required and Optional fields won't see the names of anyone whom you list in the FYI field of a Meeting invitation.


Click the buttons that look like a little phone book to the right of the Required, Optional, and FYI fields to select names from the Public Directory.


The simplest way to create a new Meeting invitation is the following:


1. In the Subject field, enter a subject.


2. In the When fields, choose a start and end date and time for the meeting.


3. In the Where fields, set the location.


4. In the Invitees fields, enter the names of the people whom you want to invite.


5. Click the Save and Send Invitations button on the Action bar.


All your Invitees receive a message in their Inbox asking them to come to your meeting.


The only problem with this approach — although it's certainly direct — is that it typically starts a volley of e-mail messages back and forth between you and your guests. You know, the "I can't make it at 9:30, but how about 10, instead?" variety. Depending on the number of people whom you invite to any particular meeting, you may actually spend quite a bit of time after sending the invite trying to coordinate them as they all get back to you with these "Yes, I can" or "No, I can't" responses.


You can easily skirt this dilemma. Rather than using the simple process that listed above, ask the Notes Scheduler to first review each invitee's Calendar to find a common time when everyone is available. Armed with this information, you can set a meeting time convenient for (hopefully) everyone. Your invite arrives in your guests' Inboxes already pre-loaded with a date and time that you know (heh, heh) when they're free. Any of your guests can still decline, of course, but you reduce the chance of that happening pretty dramatically because you avoid most schedule conflicts up front.


Using the Scheduler


To have Notes suggest an optimal time for a meeting based on when your Required and Optional meeting participants are available, hold off clicking that Save and Send Invitations button just yet. Rather, fill out your Meeting form as usual and then click the Click to See Invitee, Room, and Resource Availability button, which you can find in the Scheduler section (bottom) of the Meeting form. (Refer to Figure 1.)


Figure 2 shows a sample Meeting invitation with the Scheduler opened.


>
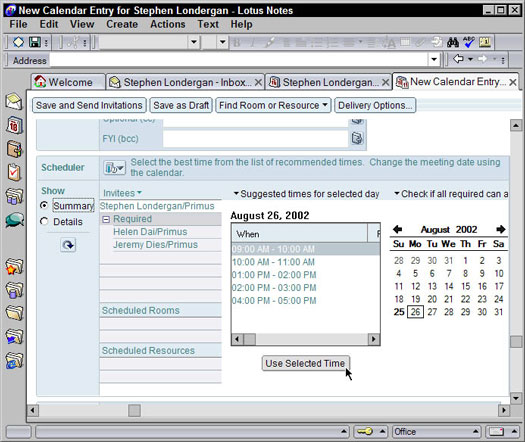


Figure 2: Use the Scheduler to find out when your guests are available to meet.

When you use the Scheduler to have Notes find meeting times for you, you have two ways to look: by best times or by schedule details. First, select the Summary radio button (under the Show heading, left side) to secure that view. This view is probably the easiest to use because you can see at a glance a blow-by-blow set of time suggestions during which all the people you're inviting are available.


To use one of the times that Notes suggests, just select a time convenient to everyone from the Suggested Times for Selected Day drop-down list and then click the Use Selected Time button below it. Notes will then adjust the times of your Meeting invitation. You can see the fields in the Whensection at the top of the Meeting form change accordingly when you click an entry in this list.


You can also click any of the dates in the small month calendar (bottom-right of the form) to examine a different day and to see when your pals are available on that day.


Check out the little arrow next to the Suggested Times for Selected Day list heading. Click this arrow to display more schedule availability choices. From the drop-down list that appears, you can choose to search for compatible free time during a particular day, week, or month. This is especially useful if the people you're inviting don't have any availability on the original date you chose.


If you have trouble finding a time that works for all your Invitees, click the Check if All Required Can Attend option and then use the ensuing drop-down list to pick a time for a smaller group of people. This is helpful when you're trying to schedule a meeting with a larger number — greater than 20 — people.


Another more visual way to find times when your Invitees are available is to view them by schedule details. Select the Details radio button (under the Show heading) to see a table that shows the times when each of your guests are available. You can see such a view in Figure 3. One advantage of this scheduling table is that you can see, per person, the free-time availability over the course of two weeks.


>
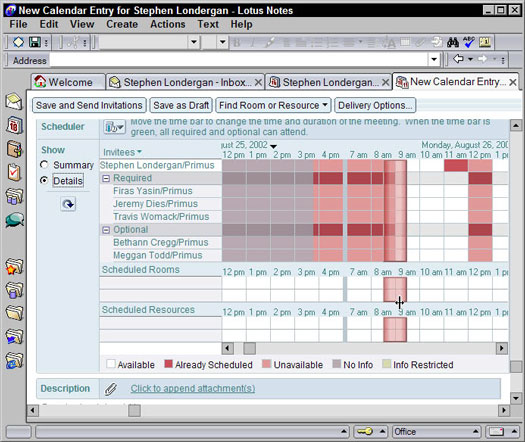


Figure 3: View individual schedule details to find free time.

Drag the big, transparent vertical bar until you find a time when everyone is available. (It turns green when this happens.) The white blocks in the table represent the times that are open and available, and the colored blocks represent the times when the given participant is otherwise occupied. If all the invitees aren't available, the vertical bar turns red to let you know that your entire posse cannot attend. (A key at the bottom of the screen reminds you of what status each color indicates.)


No matter which method you choose to find a time when you can all meet, you must click the Save and Send Invitations button on the Action bar when you're finished.


>
dummies

Source:http://www.dummies.com/how-to/content/scheduling-a-meeting-with-lotus-notes-6.html

How to Select Text with Your Keyboard in Word 2007

The secret to using the keyboard to select text in Word 2007 is the Shift key. By holding it down, you can use the standard keyboard commands that move the insertion pointer to select blocks of text. Use these Shift key methods for selecting only small chunks of text. Otherwise, you may end up tying your fingers into knots!


To Make This SelectionPress This Key Combination
A character at a time to the right of the insertion
pointer
Shift+→
A character at a time to the left of the insertion pointerShift+←
A block of text from the insertion pointer to the end of the
line
Shift+End
A block of text from the insertion pointer to the beginning of
the line
Shift+Home
A block of text from the insertion pointer to a line aboveShift+↑
A block of text from the insertion pointer to a line belowShift+↓


dummies

Source:http://www.dummies.com/how-to/content/how-to-select-text-with-your-keyboard-in-word-2007.html

Important Facebook Advertising Resources

When you create a Facebook Ads campaign, it's important to know the range of possibilities and rules. Designing your Facebook Advertising campaign is easier when you turn to the resources on the following list. It details several helpful Web pages within Facebook that focus on advertising and marketing.


dummies

Source:http://www.dummies.com/how-to/content/important-facebook-advertising-resources.html

Commodities Investments: How to Calculate Your Net Worth

Building wealth through investing in commodities takes a lot of time, effort, and discipline — unlike winning the lottery or getting a large inheritance. Achieving your financial goals takes a conscious and systematic effort. Of course, the first part is identifying and establishing your financial goals.


These goals may be as diverse as amassing enough money to retire by age 50 and travel the world, to gathering enough money to pay for college, or to making enough money to pass on to your children or grandchildren. Before you start investing in commodities (or any other asset), sit down and figure out clear financial goals. Every individual has different needs and interests.


You need to know where you are before you can determine where you want to go. From a personal finance perspective, you need to know how much you’re worth so that you can determine how much capital to allocate to investments, living expenses, retirement, and so on.


You calculate your net worth by subtracting your total liabilities from your total assets. (Assets put money in your pocket, whereas liabilities remove money from your pocket.)


Fill in the blanks to determine the total value of your assets.


AssetsValue
Annuities$_______
Bonds and other fixed income$_______
Cash in all checking and savings accounts$_______
Cash on hand$_______
Certificates of deposit (CDs)$_______
Commodity investments$_______
Futures and options$_______
Individual retirement accounts (IRAs)$_______
Life insurance$_______
Money market funds$_______
Market value of home$_______
Market value of other real estate$_______
Mutual funds$_______
Pension plans (401(k) and/or 403(b))$_______
Personal belongings (home furnishings, jewelry, and so on)$_______
Stocks and other equity$_______
Vehicles (car, boat, and so on)$_______
Other investment assets$_______
TOTAL VALUE OF ASSETS$_______

Assets are only one part of the net worth equation. After you calculate your total assets, you need to determine how many liabilities you have.


LiabilitiesValue
Car loans$_______
College loans$_______
Credit card loans$_______
Mortgage(s)$_______
Mortgage equity line$_______
Other loans$_______
TOTAL VALUE OF LIABILITIES$_______

After you determine both your total assets and total liabilities, use the following formula to determine your total net worth:


Total net worth = Total assets – Total liabilities

Determining your net worth on a regular basis is important because it allows you to keep track of the balance between your assets and liabilities. Knowing your net worth allows you to then determine which investment strategy to pursue.


Based on this simple mathematical formula, the key to increasing your net worth is to increase your assets while reducing your liabilities. Investing helps you increase your assets. Cutting down on living expenses may help you reduce your liabilities.


dummies

Source:http://www.dummies.com/how-to/content/commodities-investments-how-to-calculate-your-net-.html

Office 2011 for Mac: Rehearse and Record PowerPoint Slide Shows


4 of 11 in Series:
The Essentials of Presenting a PowerPoint Presentation with Office 2011 for Mac


You may want to create a narrated version of your presentation in PowerPoint 2011 for Mac that you can distribute or broadcast. You can’t be everywhere, and even though your audience members won’t get the benefit of your physical presence, they'll at least be able to hear you while they enjoy your PowerPoint 2011 slide show. Narrated shows can be presented in PowerPoint's kiosk mode for automatic playback in screens that seem to be everywhere these days.


PowerPoint 2011 for Mac has two features that are similar: Rehearse and Record Slide Show. Both of them play the slide show while you rehearse it or speak along. While you rehearse, both features record how much time you spend on each slide. When you’re done, PowerPoint offers to let you use those timings for the slide show.


Rehearsing your PowerPoint slide show


Use Rehearse whenever you want to practice your presentation. You can advance slides one after the other, and PowerPoint prompts you to save the timings. You turn on this feature by choosing Slide Show→Rehearse from the menu bar or by clicking the Ribbon’s Slide Show tab, and in the Presenter Tools group, clicking Rehearse. The slide show runs in Presenter view from the first slide. PowerPoint keeps track of how much time you take while you rehearse.


At the end of the show, you decide whether to keep the timings. If you opt to save these timings, they're saved as transition timings. When PowerPoint refers to an Automatic presentation, it refers to a presentation with timings, which can run unattended.


Many users work with the Rehearse Timings option to practice their PowerPoint slides aloud. They can get an idea about how long it'll take to do an actual presentation using these slides. Thereafter, they opt not to save the timings.


Recording a slide show in PowerPoint 2011 for Mac


Use the Record Slide Show feature when you want to make a version of your presentation that has narration included for distribution. Record Slide Show works the same way as Rehearse Timings, but PowerPoint records what you say while you rehearse. At the end of each slide, PowerPoint creates a sound file and adds it to the slide. If you’re not happy with the audio, you can always go back, delete the sound icon from the slide, and re-record the slide’s narration.


To start the slide show and begin recording, choose Slide Show→Record Slide Show from the menu bar, or click the Ribbon’s Slide Show tab, and in the Presenter Tools group, click Record Slide Show. The procedure is the same as for the Rehearse feature described in the previous section.


Work from a script rather than try to wing it. Even with a script, expect to spend 40 minutes or more working on the audio for each 15 minutes’ worth of audio that makes it into your presentation.


dummies

Source:http://www.dummies.com/how-to/content/office-2011-for-mac-rehearse-and-record-powerpoint.html

Basics of Dolby Digital Surround Sound

Dolby Digital is an all-digital surround sound format that handles audio compression, so it’s available only for digital content. DVDs and HDTV use Dolby Digital (DVDs may also contain some other system, such as DTS — Digital Theater Systems).


Dolby Digital 5.1 represents the current minimum level of performance that you should require from your home theater system. Also keep in mind that any receiver with Dolby Digital decoding can also decode Dolby Surround Pro Logic.


Although Dolby Digital is the more widely known consumer moniker, it also goes by the more techie name of AC-3, which is actually the name used in the official part of the DVD video standard (for “regular” non-HD-DVDs), as well as the ATSC (Advanced Television Standards Committee) standard for DTV and HDTV. AC-3 is also part of the standards for HD-DVD and Blu-ray discs. Dolby Digital is everywhere, and you definitely want your home theater gear to support it. Just about every home theater receiver built since the late 1990s supports Dolby Digital.


What’s so great about Dolby Digital is that it encodes six discrete audio channels. The older Dolby Surround encoded four channels onto two-channel soundtracks, which often resulted in all sorts of bleedovers between channels and less-than-clear demarcations in the sound details.


Because Dolby Digital has six clean channels, your receivers and controllers can precisely control the different elements of your sound mix. More importantly, the rear surround speakers are each fed by their own independent channels, enabling true spatial separation for that rear sound field. With this setup, when you hear that bullet whiz by or that starship warp overhead, the sound moving across your entire speaker system is smooth and controlled — and digital.


Dolby’s ability to encode and decode information is only as strong as its source data. If it’s working with a two-channel stereo movie, you may see something like “Dolby Digital 2.0” on the package, designating that it is a stereo signal being encoded and decoded using Dolby Digital. All fine and dandy, but it’s still a stereo signal. However, if your receiver includes Dolby Pro Logic, Dolby Pro Logic II, or even Dolby Pro Logic IIx, the stereo signal on the disc can still be listened to as a multichannel surround signal, thereby allowing you to achieve full playback on your system.


dummies

Source:http://www.dummies.com/how-to/content/basics-of-dolby-digital-surround-sound.html

Calibrate Color on Your Monitor in Windows 7

The idea behind color management isn’t to match colors on a computer monitor with colors in the real world. Instead, strive to match colors in a way that satisfies your needs. For example, match the colors on the monitor to the colors produced by a specific printer or another output device. To make it happen, you use the Windows Color Management tool.


The Windows Color Management tool isn’t something you mess with casually. My advice is to use it only when you receive instructions on which profiles to select. This information may be found in a graphics application’s reference or in your PC’s printer reference.


There’s a color calibration utility that’s unique to Windows 7. The utility can be used to ensure that your monitor is accurately displaying colors. To run the utility, follow these steps:


  1. Right-click the desktop.


  2. Choose the Personalize command.


  3. From the list of tasks on the left side of the Personalization window, choose Display.


  4. From the list of tasks on the left side of the Display window, choose Calibrate Color.


    You need to work with your monitor’s controls in coordination with the images displayed on the screen to best calibrate colors for your monitor in Windows.


  5. Work through the Display Color Calibration Wizard, obeying the directions on the screen and clicking the Next button to continue.


  6. Click the Finish button when you’re done.


There’s no such thing as perfect calibration — only what you can perceive as being perfect. As long as everything looks good enough for your own eyeballs, it’s perfect!


dummies

Source:http://www.dummies.com/how-to/content/calibrate-color-on-your-monitor-in-windows-7.html

Adding a New Name to the Outlook Contacts Folder

An Outlook Contacts folder is only as good and as thorough as the information about contacts that you put into it. To place someone on the Contacts list, open the Contacts folder and start by doing one of the following:


  • Click the New button.

  • Press Ctrl+N (in the Contacts Folder window) or Ctrl+Shift+C.

  • Choose File --> New --> Contact.

You see the Contact form. On this form, you can find places for entering just about everything you could ever need to know about a person (except his or her love life and secret vices). Enter all the information that you care to record, keeping these rules of the road in mind as you go along:


  • Full names, addresses, and so on: Although you may be tempted to simply enter addresses, phone numbers, names, and so on in the text boxes, don't do it! Click the Full Name button on the General tab, for example, to enter a name. Click the Business or Home button to enter an address in the Check Address dialog box. By clicking the buttons and entering data in dialog boxes, you permit Outlook to separate out the component parts of names, addresses, and phone numbers. As such, Outlook can use names and addresses as a source for mass mailings and mass emailings.

    When entering information about a company, not a person, leave the Full Name field blank and enter the company's name in the Company field.

  • Information that matters to you: If the form doesn't appear to have a place for entering a certain kind of information, try clicking a triangle button and choosing a new information category from the pop-up menu. Click the triangle button next to the Business button and choose Home, for example, if you want to enter a home address rather than a business address.

  • File As: Open the File As drop-down menu and choose an option for filing the contact in the Contacts folder. Outlook can file contacts alphabetically by last name, first name, company name, or combinations of the three. Choose the option that best describes how you expect to find the contact in the Contacts folder.

  • Mailing addresses: If you keep more than one address for a contact, display the address to which you want to send mail and select the This Is the Mailing Address check box. This way, in a mass mailing, you get letters sent to the correct addresses.

  • Email addresses: You can enter three email addresses for each contact. (Click the triangle button and choose Email 2 or Email 3 to enter a second or third address.)

    In the Display As text box, Outlook shows you what the To: line of email messages will look like when you send email to a contact. By default, the To: line shows the contact's name followed by his or her email address in parentheses. However, you can enter whatever you want in the Display As text box, and if entering something different can help you distinguish between email addresses, enter something different. For example, enter Lydia — Personal so that you can tell when you send email to Lydia's personal address, as opposed to her business address.

  • Photos: To put a digital photo on a Contact form, click the Add Contact Photo button and, in the Add Contact Picture dialog box, select a picture and click OK.

Be sure to write a few words on the General tab to describe how and where you met the contact. When the time comes to weed out contacts in the Contacts folder list, reading the descriptions can help you decide who gets weeded and who doesn't.


When you're done entering information, click the Save and Close button. If you're in a hurry to enter contact information, click the Save and New button. Clicking this button opens an empty form so that you can record information about another contact.


dummies

Source:http://www.dummies.com/how-to/content/adding-a-new-name-to-the-outlook-contacts-folder.html