Creating a new life is a big responsibility — you have to feed it and change it every day for years. Creating a new user in Oracle9i also carries some responsibilities, but generally the user won't wake you up in the middle of the night and send you stumbling for a bottle and a burp cloth.
Console makes quick work of creating a user and assigning it a few roles.
All right, then. Here's an easy way to create a new user life in Oracle9i by using Security Manager. If you have Security Manager open already, skip Step 1.
1. Start Console in stand-alone mode, double-click the Databases folder, double-click the database you want to work on, and log in as the DBA user (if necessary).
2. Choose Object --> Create.
You see the Create On window, where you decide what kind of thing you are creating.
3. Choose User and then click Create.
The Create User dialog box appears, as shown in Figure 1. This is not really a wizard, but it should be, because creating new life definitely is in the realm of wizards.
>

>
Figure 1: Creating a new user is a snap with the Create User dialog box.
4. In the Name box, type a name for the new user.
Oracle has rules about what you use for a user name. You can use up to 30 characters. A letter and a single-digit number each count as one character. The same rules apply to setting up passwords.
A good rule of thumb is to use a single word or acronym for a new user name. You will appreciate this later when you have to type the name as the identifier in front of every table you create.
5. Choose the type of authentication.
For the example, choose Password authentication. You can click the arrow in the Authentication box to see the three choices:
• Password. Probably the most common selection. This is the traditional method of authentication, which requires the user to type a password before he or she enters a database transaction.
• External. This method of authentication allows users to pass into the database using their identities from the operating system. For example, if you log in to your NT network as HOMER, the Oracle9i user name for you is OPS$HOMER. (OPS$ is the default value of the prefix assigned by the DBA for all externally authenticated users.) To log in to SQL*Plus or some application, you simply type a slash where you normally enter your Oracle9i user name and password. This feature is convenient because the user doesn't need to know a second name and password.
• Global. This method of authentication was new in Version 8 of Oracle. Intended for use across distributed database systems, this method requires authentication to take place outside the database using Oracle Advanced Security (OAS). This method lets you validate a common user name and password with a variety of methods, such as SSL or Kerberos, before the user can reach any database in your distributed network of databases.
6. In both the Enter Password box and the Confirm Password box, type the password.
The password appears on the screen as a line of asterisks (*).
7. Select or don't select the Expire Password Now check box.
If you select the box, users must enter a new password the first time they log in to the database.
8. Select a default tablespace.
Click the arrow in the Default box to see your choices. Normally, you select USERS as the default tablespace. This is the tablespace Oracle9i puts the user's tables in if the user creates a table and doesn't explicitly assign it to a different tablespace.
9. Select a temporary tablespace.
Click the arrow in the Temporary box to see your choices. Normally, you select TEMP as the temporary tablespace, which is the tablespace that Oracle9i puts data in while it is generating query results or preparing a view — grabbing some space and releasing it when the job is finished.
10. Select the status for the new user.
The default setting is Unlocked. This setting means that the user may log in to the database as soon as you have finished creating the user. If you want to wait and unlock the user name at some other time, select Locked, which prevents the user from logging in to the database.
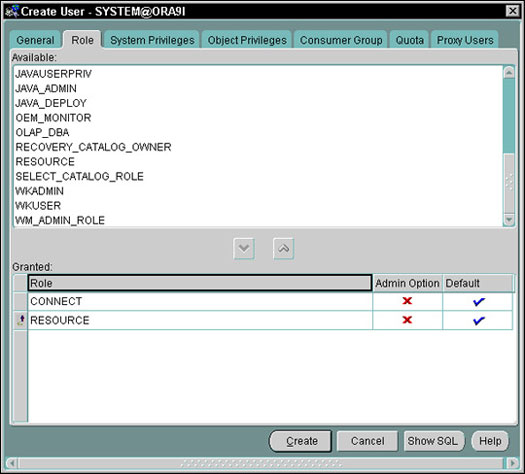
11. Assign roles to the new user.
Click the Role tab in the Create User dialog box. The list of available roles appears, as shown in Figure 2. To allow the new user to create tables, you must double-click the RESOURCE role. By default, all users are assigned the CONNECT role, which is required for logging in to the database.
>
>
Figure 2: While creating a user, you can assign the initial roles.
12. Click the Create button.
Your work is finished. Oracle9i creates the new user name and returns you to the main window of Security Manager.
Remember to write down the name and password that you create and keep them in a secure and hidden place (not taped to your monitor).
>
dummies
Source:http://www.dummies.com/how-to/content/creating-a-new-user-in-oracle9i.html
No comments:
Post a Comment