You can add images to almost any element of a MindManager map, including an image taken from the Library The method for adding an image is the same for all topics. The following steps show you how to add an image to each topic type:
1. Select the central topic of the map, and press Insert.
A main topic appears.
2. Select the new main topic and press Insert again.
So far, you have created a map with a main topic extending off of the central topic and a subtopic attached to the main topic. The next step is to add a floating topic and a callout topic.
3. Click on the Insert Floating Topic toolbar button. Place the topic on the map by clicking at the preferred location.
4. Insert a callout topic by first selecting any of the topics in the map. Click the Insert Callout Topic toolbar button.
The callout topic is attached to the topic you selected.
5. Open the Library menu. Expand the Images folder and open one of the image categories. Click and drag an image from the library onto the map.
Notice that the red tractor beam grabs the image if you get it close to another topic. By the way, you didn't miss the Insert Image Topic button on the toolbar. It isn't there. Pressing the Shift key while you drag the image onto the map can turn off the red tractor beam.
A good habit is to always click a vacant area of the map prior to performing Step 5. This action deselects all topics. You might unintentionally place many images into a map by not following this habit. It seems to be human nature to click on the library image when you find one you like. If you do and a topic is selected somewhere in the map, the image is transported directly to the selected topic. You may not even realize this has happened. The selected image may not be visible on the screen. Everything looks fine until you look around the map and see an image that doesn't belong.
MindManager provides another way to add an image topic that is worth mentioning. You can use the following method in place of Step 5: Click on the map. Make sure a topic is not selected. Open the Insert menu. Select Image --> From File. A small symbol appears on the map. Click on the map where you want to insert the image. The Select Image dialog box appears. Select an image and click Insert. The image is placed into the map. Use this technique for images you only use once and don't want to add to the library.
You could also have selected Image --> From Library. Making this selection does not add an image to the map. It opens the library. Should you make the From Library selection, you are back to the original Step 5. Seems like a circle, doesn't it?
The image is inserted into the map. MindManager treats the image like a topic. You can refer to it as an image topic. Add text to the image topic by selecting the image and typing. Typing in text does not replace the image. You may have been frustrated at trying to change the text in a topic. You erase all the text if you start typing just after selecting the topic. Not so with an image topic. One caveat is that you can have only one image. Trying to add a second image replaces the first image.
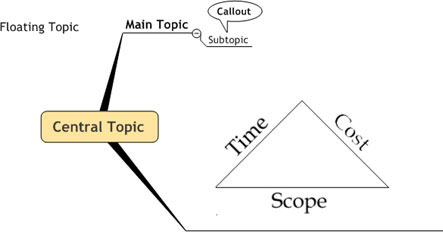
All the inserting of the last few steps results in the MindManager map shown in Figure 1. The accompanying pyramid reveals how the triple constraints of a project are connected. Change one of the constraints, and one of the others is going to change.
An image topic does not export well. Exporting to a Web page may distort the image. Sending the map to Word leaves the image behind. Exporting to PowerPoint is okay, though. The image is processed correctly.
>

Figure 1: Topics ready for images.
6. Select Floating Topic in the map. Place your cursor over an image in the library, but don't click yet.
The image that you click on is immediately placed into the topic. Got the right one? Click. The image is transported directly to the selected topic. Repeat this step for the central topic, main topic, subtopic, and callout. The process works the same for all.
7. To change the size of an image, select the topic and click on the image.
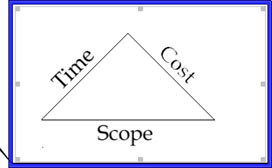
Eight small adjustment handles appear around the image. Figure 2 shows that the topic is selected (as indicated by the blue box) and that the image is selected (as indicated by the appearance of the movement boxes or handles). Put the cursor over one of the handles, and little arrows appear. Click and drag the image to the size you want. Use the corner handles to ensure that the image continues to look the same as you change the size.
>

Figure 2: Resizing the image.
You can easily remove an image. Select the topic and click on the image. The eight sizing handles appear. Press delete, and the image is removed from the map.
You have now added images to every type of topic in the MindManager map.
>
dummies
Source:http://www.dummies.com/how-to/content/adding-images-to-a-mindmanager-map.html
No comments:
Post a Comment