Entity beans provide a convenient interface between your program and the database. These beans hold data that must eventually be stored in some permanent form, most commonly a relational database. J2EE has two types of entity beans: bean-managed persistence (BMP) beans and container-managed persistence (CMP) beans. BMP entity beans open connections directly to the database, whereas CMP entity beans rely on the server (container) for interacting with the database.
The purpose of an entity bean is to allow Java data to move between memory and permanent storage, such as a database. When entity beans write their data to a database, you need to understand the basics of connecting a database to WebLogic. A basic familiarity with SQL and relational databases is assumed.
You can use nearly any sort of database with WebLogic. The examples in this article use the ODBC-JDBC bridge driver. Open Database Connectivity (ODBC) is a common standard on the Microsoft platform. Java Database Connectivity (JDBC) is the Java database standard. Using the ODBC-JDBC bridge allows you to use ODBC drivers from Java. Everything that you need to use the ODBC-JDBC bridge is already built into Java.
If you're using a database such as Oracle, DB2, MySQL, or SQL Server, you should use the appropriate driver. This will give better performance than the ODBC-JDBC bridge.
Regardless of which database you use, you must set up the appropriate tables. In SQL, a table is a database construct that holds individual rows. For example, if you were keeping an address book, the address book is the table with individual names stored in rows.
Listing 1 shows the SQL code necessary to create an example database.
Listing 1: Script to Create the Example Database
CREATE TABLE T_STUDENT (
F_ID INTEGER NOT NULL PRIMARY KEY,
F_FIRST VARCHAR(40),
F_LAST VARCHAR(40))
CREATE TABLE T_DEPARTMENT (
F_ID INTEGER NOT NULL PRIMARY KEY,
F_NAME VARCHAR(40))
CREATE TABLE T_COURSE (
F_ID INTEGER NOT NULL PRIMARY KEY,
F_NAME VARCHAR(40),
F_CREDIT INTEGER,
F_DEPARTMENT_ID INTEGER NOT NULL)
The SQL in Listing 1 should be generic enough to work with most databases. Note that each table name is prefixed with T_ and each field name is prefixed with F_. This notation ensures that a table or field name does not accidentally use a reserved word. This is important when designing for multiple databases, in which the collection of reserved words is different from database to database.
As you can see from Listing 1, each table is made up of several fields. For example, T_DEPARTMENT holds F_ID and F_NAME as fields. Every row in the T_DEPARTMENT table will hold these two values.
Creating the connection pool
WebLogic communicates with the database through a connection pool. The connection pool enables WebLogic to use a fixed number of connections to databases rather than incur the overhead of constantly creating and disposing of connections. Because of this, you must establish a data connection pool that accesses your database. To do so, follow these steps:
1. Start Administrative Console.
For more information on this step.
2. On the left side of the screen, click the Services folder, and then click the JDBC folder.
On this page, you can choose connection pools and choose to create a connection pool.
3. Type a name for the connection pool.
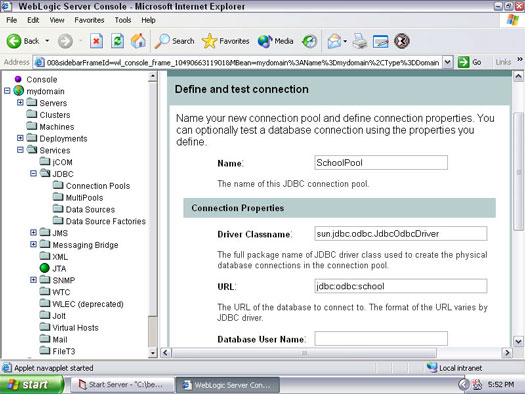
To follow along with the example, type SchoolPool for the connection pool name. This name needs to be given to the data source you create in the next section.
4. Choose your database type.
Your database type should match the database you're using. To follow along with the example, choose Other.
5. Set the driver class name and URL to whatever is appropriate for your database.
The driver class name and URL in Figure 1 are for an ODBC DSN named school.
6. Add this pool to your server.
To do so, click the Targets tab. Select your server, and then click the right arrow button to assign it.

Figure 1: Create a connection pool.
Creating the data source
After you create a connection pool, you must attach it to a data source. It is through this data source that WebLogic can access your database. To create a data source, follow these steps:
1. In Administrative Console, click the Services folder and then click the data source you want to use.
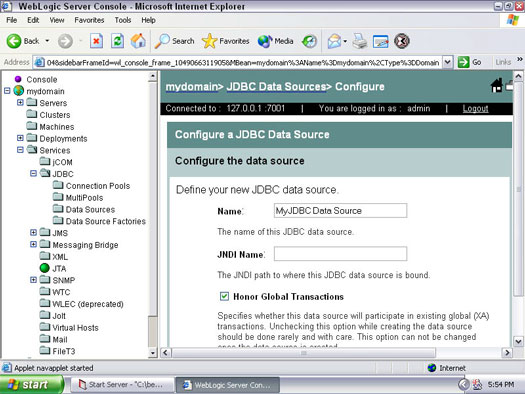
If you choose the JDBC data source, the screen shown in Figure 2 appears.

Figure 2: Create a data source.
2. Type a name for your data source.
You can choose any name you want; the name is for your reference only.
3. Type a JNDI name.
To follow along with the example, type jdbc/SchoolDataSource for the JNDI name.
4. Type a pool name.
This is the name you typed in Step 3 in the preceding section. To follow along with the example, type SchoolPool for the pool name.
5. Add this data source to your server.
To do so, click the Targets tab. Select your server, and then click the right arrow button to assign it.
Now that you've set up the database connection, you're ready to use beans that interact with that database.
dummies
Source:http://www.dummies.com/how-to/content/understanding-weblogic-database-access.html
No comments:
Post a Comment