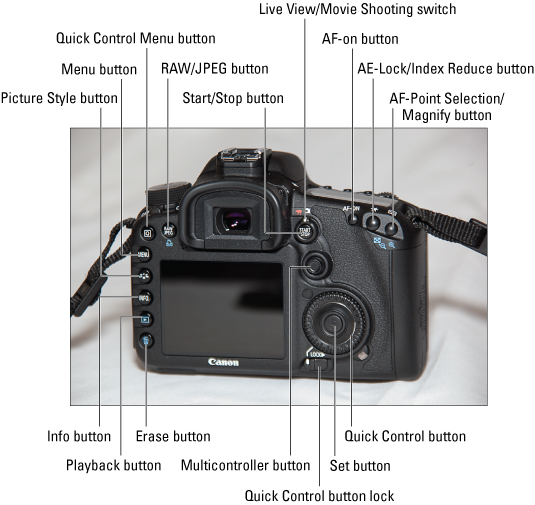
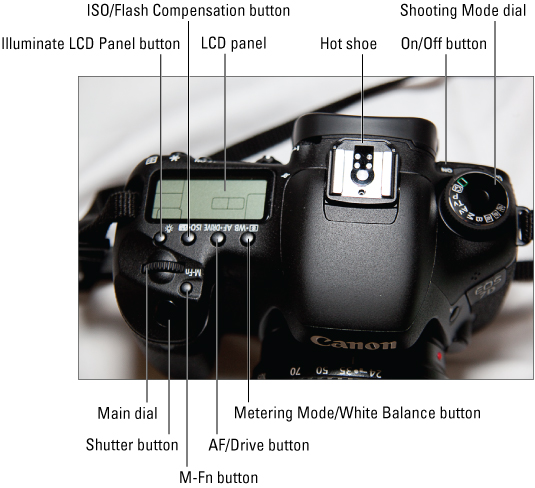
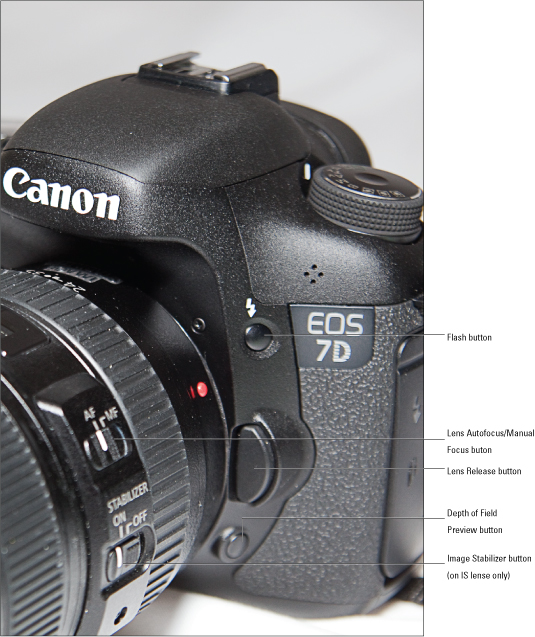
A roadmap to the dials and buttons on your Canon EOS 7D, information on shooting mode features and differences, and insight into your camera's metering modes can help you better understand and use your digital camera.
>
>
How to Identify Dials and Buttons on the Canon EOS 7D
The following images are a roadmap to the dials and buttons on the Canon EOS 7D. The lens attached is a Canon 24-105mm f/4.0L series lens with image stabilization. Your lens may have different buttons than those shown on this lens. Refer to your lens manual for further information.


>
>
>
Canon EOS 7D Camera Shooting Modes
The following list explains what each setting on the Canon EOS 7D’s Mode dial is used for. You can determine the best digital camera mode for your photographic subjects.
Full Auto: The camera chooses the shutter speed and aperture needed to properly expose the image.
Creative Auto: The camera chooses the shutter speed and aperture needed to properly expose the image. You can control the depth of field, brightness, picture style, and image format using a menu on the camera LCD monitor.
Programmed Auto Exposure: The camera chooses the shutter speed and aperture needed to properly expose the image. You can shift the exposure to change the shutter speed and aperture combination to suit the type of scene you’re photographing.
Aperture Priority: You choose the aperture (f-stop value), and the camera provides the shutter speed needed to properly expose the image.
Shutter Priority: You choose the shutter speed, and the camera provides the aperture (f-stop value) needed to properly expose the image.
Manual: You manually choose the shutter speed and aperture.
Bulb: The shutter stays open as long as the shutter button is pressed. You can also use a remote to trigger the shutter button.
C1, C2, and C3: You can apply your own settings to these buttons.
>
>
>
Camera Metering Modes for Your Canon EOS 7D
You can choose how your digital camera meters a scene to determine the exposure. Your Canon EOS 7D has the following metering modes from which to pick:
Evaluative: This is the default mode for your camera. You can use this mode for most of your work, including backlit scenes. The camera divides the scene into several zones and evaluates the brightness of the scene, direct light, and backlighting, factoring these variables to create the correct exposure for your subject.
Partial: This mode meters a small area in the center of the scene. This option is useful when the background is much brighter than your subject. A perfect example of this is a beach scene at sunset when you’re pointing the camera toward the sun and your subject is in front of you.
Center-Weighted Average: This metering mode meters the entire scene, but gives more importance to the subject in the center. Use this mode when one part of your scene is significantly brighter than the rest; for example, when the sun is in the picture. If your bright light source is near the center of the scene, this mode prevents it from being overexposed.
Spot: This mode meters a small area in the center of the scene. Use this mode when your subject is in the center and is significantly brighter than the rest of your scene. You camera may have the option to spot meter where the autofocus frame is. If your camera can move the autofocus frame to your subject, you can accurately spot meter a subject that isn't in the center of the frame.
>
>
dummies
Source:http://www.dummies.com/how-to/content/canon-eos-7d-for-dummies-cheat-sheet.html
No comments:
Post a Comment