Mac OS X with Snow Leopard offers a video application called iMovie — a feature-packed tool for serious movie production. The iMovie controls work the same as many top-notch movie-editing tools that professionals use. From basic editing to audio and video effects, iMovie has everything you need to get started creating high-quality movies.
Video editing takes up quite a bit of desktop space. In fact, you can’t run iMovie at resolutions of less than 1024 x 768, nor would you want to.
To launch iMovie, click the iMovie icon in the Dock. (It looks like a star from the Hollywood Walk of Fame.) You can also click the Application folder in any Finder window sidebar and then double-click the iMovie icon.
Follow these strenuous steps and create a new movie project:
Click the File menu and choose New Project (or press Command+N).
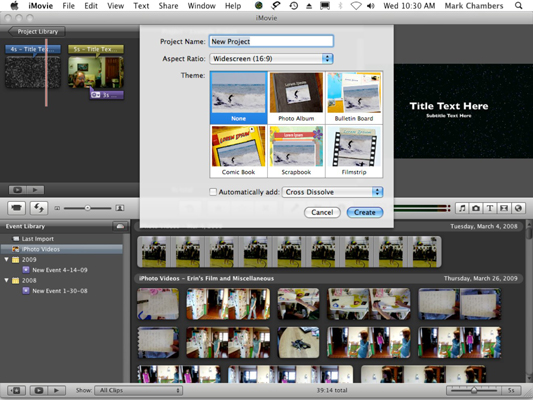
iMovie displays a New Project sheet.

Enter a project name and select the aspect ratio (or screen dimensions) for your movie.
You can select a widescreen display (16:9), a standard display (4:3), or a display especially suited for an iPhone (3:2). If compatibility with the familiar SDTV format is important, choose standard (4:3) ratio; choosing 16:9 for an SDTV set will result in those familiar black “letterbox” bars at the top and bottom of the screen.
Click a thumbnail to select a theme to apply to your finished movie.
If you choose a theme, iMovie automatically adds the transitions and titles that correspond to that theme. (Normally, this is what you want to do. However, if you want to add transitions and titles manually, deselect the Automatically Add Transitions and Titles check box.)
If you decide not to use a theme (by selecting the None thumbnail), iMovie can still add an automatic effect between clips. Click the Automatically Add check box and click the pop-up menu to choose the desired effect.
Click Create.
You’re on your way!
> >
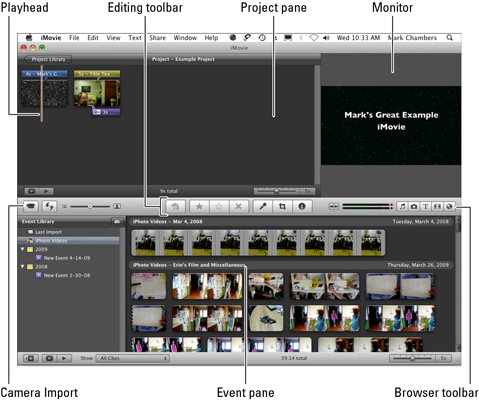
>Edit your movie with the controls in this window.
The controls and displays that you’ll use most often follow:
Monitor: Think of this as being just like your TV or computer monitor. Your video clips, still images, and finished movie play here.
Browser toolbar: This row of buttons allows you to switch between your media clips (video clips, photos, and audio) and the various tools that you use to make your film. The selected items fill the right side of the browser pane below the monitor.
Event pane: All the video clips that you use to create your movie are stored in the Event pane.
Project pane: iMovie displays the elements that you’ve added to your movie project in this pane.
Playhead: The red vertical line that you see in the Event and Project panes is the playhead, which indicates the current editing point while you’re creating your movie. When you’re playing your movie, the playhead moves to follow your progress through the movie.
Editing toolbar: This strip of buttons allows you to control editing functions, such as cropping, audio and video adjustments, and voiceovers.
Camera Import window: Click this switch to import DV clips from your DV camcorder or iSight camera.
Those are the major highlights of the iMovie window. A director’s chair and megaphone are optional, of course, but they do add to the mood.
>
dummies
Source:http://www.dummies.com/how-to/content/how-to-start-a-movie-project-with-imovie-09.navId-323836.html
No comments:
Post a Comment