To begin a design that you work in rounds, you first have to create a center ring. The center ring is the foundation for all crocheted designs that are worked in rounds — just like the foundation chain you use when working in rows. The center ring is the circle created by several chain stitches joined together to form a circle, or it can be just a single chain stitch. This article shows you the two most common methods for creating the center ring, when you want to use each, and how to end a round and be in the proper position to start the next round. The two most frequently used methods are making a ring of chain stitches or working a round of stitches into one chain stitch.
Working stitches in the hole
The most common method for creating a center ring is to make a chain and close it into a ring with a slip stitch. You would use this method when your first round is made up of a fairly large number of stitches and you need the room in which to fit them, or if the design calls for an obvious hole in the center. The following steps show you how to create a simple center ring of 6 chain stitches:
1. Chain (ch) 6.
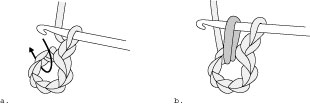
2. Insert your hook into the first chain stitch you made, forming a ring (see Figure 1).
>

Figure 1: Making the center-ring chain.
4. Draw the yarn through the stitch and through the loop on your hook, as Figure 2a shows.
Your center ring is now complete (see Figure 2b).
>

Figure 2: Completing the center ring.
The number of stitches in the beginning chain determines the size of the hole that the center ring creates as well as how many stitches you can work into the center ring. Make sure the ring is large enough to accommodate the number of stitches that you'll be working in it. On the other hand, make sure it's not so long that you have a big loose hole in the center. When you're working a pattern, it tells you how many chain stitches you need for the proper size center ring.
After you make the center ring, you're ready for the first round. Just as when you're beginning a new row, you first have to determine the number of turning chain stitches that you need in order to bring your hook up to the proper level for the next round of stitches. (The number of turning chain stitches you need depends on the stitch you're about to work.) Now here's the really easy part about working with a center ring: Instead of inserting your hook into the actual stitches of the center ring, you just go through the center hole. The following steps show how to work single crochet stitches into the center ring:
1. Chain (ch) 1 to make the turning chain for single crochet (sc).
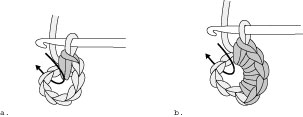
2. Insert your hook into the center ring (see Figure 3a).
>

Figure 3: Working a single crochet in the center ring.
3. Yarn over your hook (yo).
4. Draw the yarn through the center ring (refer to Figure 3b).
5. Yarn over your hook.
6. Draw the yarn through the 2 loops on your hook.
One single crochet stitch is complete (see Figure 4a).
>

Figure 4: Working a round of single crochet.
Continue to work single crochet stitches into the ring until you can't fit anymore (refer to Figure 4b). The center ring will stretch somewhat, and you'll probably be surprised at how many stitches you can fit in.
Working stitches in the chain stitch
The second most common method for creating a center ring is to work all the stitches for the first round in one chain stitch. You generally use this method when the design calls for a small hole in the center of the pattern or almost no hole at all. To start a center ring this way, you always chain 1 (this is what you work the stitches in) plus the number of stitches required for the turning chain, depending on which particular stitch you work in the first round. Follow these steps to work your first round of double crochet stitches into a chain stitch:
1. Chain (ch) 1.
2. Chain 3 more for the double crochet (dc) stitch's turning chain.
3. Yarn over your hook (yo).
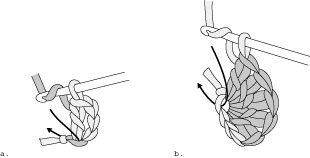
4. Insert your hook in the fourth chain from the hook (see Figure 5).
This is the first chain stitch you made and becomes your center ring chain stitch.
>

Figure 5: Insert hook into first chain stitch made.
5. Work 1 complete double crochet stitch in the center ring chain stitch.
Continue to work double crochet stitches in the same chain stitch until you're comfortable with the process. Figure 6a shows you how to begin the second stitch, and Figure 6b shows several completed stitches and growing.
>

Figure 6: Making first round of double crochet in center-ring chain stitch.
>
dummies
Source:http://www.dummies.com/how-to/content/crocheting-in-circles.html
No comments:
Post a Comment