You can create a new toolbar and put your favorite buttons on it. If you want, you can even create toolbar buttons for styles, fonts, AutoText entries, and macros. Follow these steps:
1. Choose Tools --> Customize, or right-click a toolbar and choose Customize to open the Customize dialog box.
2. Select the Toolbars tab.
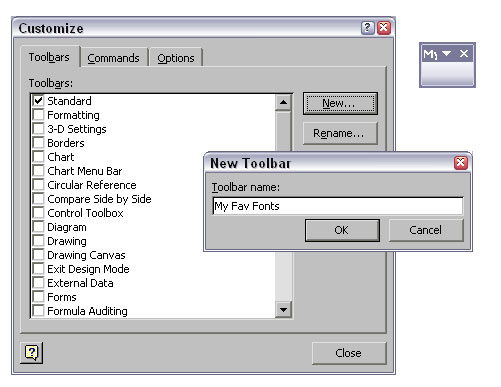
Figure 1 shows the Toolbars tab of the Customize dialog box.
>

Figure 1: Creating a new toolbar.
3. Click the New button.
The New Toolbar dialog box appears, as shown in Figure 1.
4. Enter a name for your toolbar in the Toolbar Name box.
The name you type here will appear on the View --> Toolbars submenu.
5. Click OK.
A puny toolbar with the name you entered appears on the screen, as shown in Figure 1. Locating this toolbar can be difficult; have a good look-see and you will find it. At this point, the thing is hardly bigger than a toolbar button. Drag it to a convenient location.
6. Place buttons on your toolbar.
If you've added styles or fonts to your toolbar, you may want to shorten their names to make them fit better. To do so, right-click the button whose name you want to shorten and enter a new name in the Name text box on the drop-down list. Also on the shortcut menu are commands for changing the appearance of buttons.
>
dummies
Source:http://www.dummies.com/how-to/content/creating-your-own-toolbar-in-office-2003.html
No comments:
Post a Comment