The saxophone has influenced many styles of music. Saxophonists have left their indelible mark on music whether it’s in the big bands of Count Basie and Duke Ellington, Bill Haley’s legendary rock ’n’ roll band or the funk master James Brown. And in the bossa nova song “The Girl from Ipanema,” the breathy sax is the icing on the cake. This Cheat Sheet provides some basic information to help you start playing the saxophone: buying or leasing a sax, sax parts and their functions, practicing with your sax, and playing a new sax song.
>
>
Leasing or Buying a Saxophone
Whether you choose the soprano, alto, tenor, or baritone saxophone, another decision remains: Should you buy a saxophone or lease one? (Don’t worry, you’re not alone on this — your wallet has something to say here.) Each option has its pros and cons. The following sections help you choose the option that’s right for you.
Leasing a saxophone
Are you still dabbling in dreams of being a saxophonist? If you’re unsure about whether the saxophone suits you, and you’re not ready to spend a lot of money, leasing is a good idea. Many music stores and dealers offer this option. You can get a decent instrument and pay for it month to month. If, later, you decide to buy it, some retailers will credit what you’ve already paid toward the purchase price. And if you decide that the saxophone isn’t your musical match, simply return it.
Buying a saxophone: New or used?
If the saxophone is the instrument you were meant to play, and you’re ready to make the commitment, you’re likely prepared to buy.
When buying a saxophone — or any important accessories — consider asking an expert, such as your future saxophone teacher or an experienced saxophonist, to be your personal sales consultant. Getting an expert opinion is worth the peace of mind and it almost guarantees that you’ll find the right saxophone for you.
Many people choose to buy new instruments, but some used saxophones are available in good or very good condition and are ready to play. Perhaps the previous owner didn’t play much, or the instrument was recently reconditioned. Some vintage horns are real classics. For example, most pros would only sell their old Selmer Mark VI over their dead bodies. These old instruments can sound beautiful and their value often doubles in price compared to a new one.
A well-maintained saxophone can last a long time. For example, the pads (the leather on the underside of the keys) can remain intact for six to ten years, depending on the quality of the pads, maintenance, and usage.
With a used saxophone, pay special attention to the condition of the instrument:
What condition are the pads in? Is the leather still smooth, dark, and hard, or is it cracked and moldy?
Do the pads still cover the tone holes perfectly?
Do the mechanics run clean? Can you press down on all of the keys comfortably and simultaneously?
If you answer no to any of these questions, the sax in question might need a general overhaul. And if it’s in really bad shape, repairs could cost more than the instrument is worth! Get advice from an expert if you’re concerned.
>
>
>
Saxophone Parts and Their Functions
The saxophone is a woodwind, not a brass, instrument. This fact can be hard to believe, because the saxophone is, after all, made mostly of brass. The saxophone is considered a woodwind instrument because the part that creates the actual sound, called the reed, is made out of wood, or more specifically, cane (similar to bamboo).
This section familiarizes you with the important components of the saxophone, by describing how they fit together and how the whole system works.
The saxophone is made up of the following parts:
Reed: The sound generator, which has the same function as human vocal chords. It’s fixed onto the mouthpiece by a ligature.
Mouthpiece: When you blow into the mouthpiece, the reed vibrates. Without the aid of the other parts of the saxophone, it produces a high, shrill sound.
Neck: The mouthpiece is attached to the neck, which is the joint between the mouthpiece and the body. The sound generated by the vibrating reed enters the body through the neck. If you compare the saxophone’s neck with your own, and with your voice, the saxophone’s neck works the same way.
Body: This is the most important resonance chamber of the saxophone. The sound vibrates within the body and is amplified. By holding down the keys, which are located on the body, you change the length of the air column to create a different pitch or note. The longer the air column, the lower the corresponding note; the shorter the column, the higher the note.
Neck strap: More of an accessory, this is a strap that is looped through an eyelet on the back side of the horn and worn around the player’s neck. The neck strap lets the player carry the saxophone and supports the instrument so the fingers can move freely over the keys.
Thumb hook: The right thumb sits in the thumb hook, which is a hooked-shaped piece of metal or plastic, to balance the saxophone’s weight.
Thumb rest: The left thumb sits on the thumb rest (located below the octave key) to balance the saxophone.
>
>
>
Saxophone Practice
Practicing with your saxophone brings you closer to your musical goals. Your saxophone should perform the way you want it to. Good technique, knowledge, and experience will help with this, and that means you have to practice, practice, practice.
Practice with your saxophone regularly
As in sports and many other activities, you improve by practicing regularly a little bit at a time, rather than practicing a lot every now and then. Five 15-minute practice sessions per week are much better than a single marathon session of two or five hours right before your next saxophone lesson. The regularity helps you memorize and internalize what you’re practicing. You can get accustomed to your saxophone step by step. Even three sessions of five minutes per day is productive.
Structure your saxophone practice
Try devising a practice schedule or a practice routine. Such a routine can look like this:
First, warm up.
Start in the middle range and play soft, long tones.
Second, turn to different combinations of notes to work on your finger technique.
Next, start phrasing and articulation exercises.
These help the coordination of your tongue and fingers.
Now, practice a scale, preferably from memory.
This trains your fluency and speed.
Last, select a piece and play it.
If you’re interested in improvisation, play typical jazz phrases or use the vocabulary of a different musical style, possibly in one or more keys. If you need more to practice, you can work on rhythmic exercises. And listen to exemplary solos from your favorite recordings and transcribe them, or focus on training your ear.
You can always find something to practice or improve on. Not everything has to go by the schedule, even if you set out to do so.
>
>
>
Playing a New Saxophone Song
You want to learn a new song to play on your saxophone, and this section tells you how to do so effectively. You can learn new saxophone pieces and even master difficult songs this way. The idea is that you approach the song from different angles. Put appropriate emphasis on note material, rhythm, and dynamics. Follow this approach:
Examine the key and scale
Your first glance should be toward the notation on the upper left. What is the key signature? Does it contain sharps or flats? For instance, one sharp in the key signature indicates G major, and one flat indicates F major.
When working on a new piece, you learn the key by playing the corresponding scale. This is a good approach for preparing to play the song.
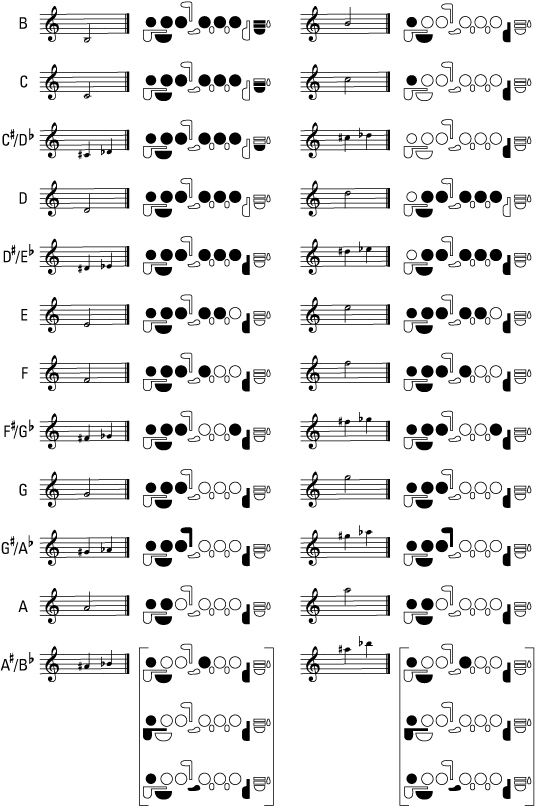
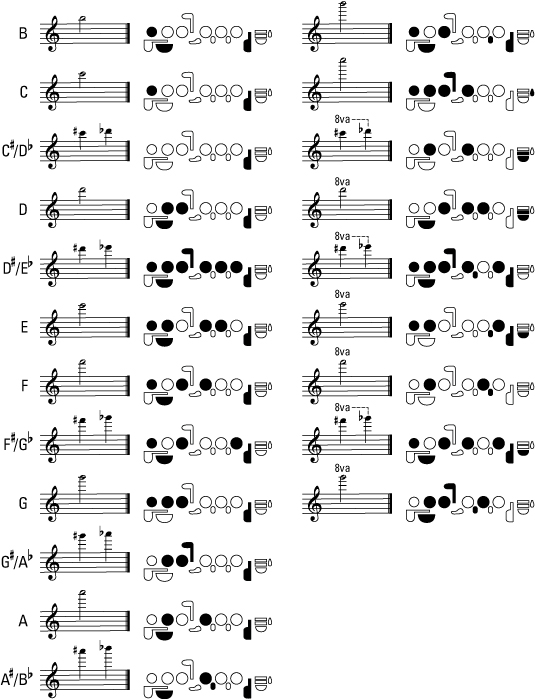
Practice the notes and fingerings
Practice the notes and their fingerings independently of the rhythm. As soon as you recognize the notes instantly, finger and blow all the notes of the song in sequence. You can handle difficult note combinations best if you repeat them often, that is, if you “loop” them.
Work on the rhythm
At this stage, work on just the rhythm, meaning figure out the note and rest lengths without considering their pitch. Go through individual bars of the song. Clap the rhythm. In the case of rhythmically complex measures, get an overview by penciling the main beats (1, 2, 3, 4) with a vertical line above the notes. Clearly structure each measure. Filter out difficult rhythms and clap them several times — just like the note combinations — and “loop” them.
Pair the notes with the rhythm
When the notes and rhythm are second nature to you, combine the two. Approach this measure by measure and increase the tempo gradually.
Pay attention to breath marks and song sequences
When you can play the entire song, go into more detail. Pay attention to the notated breath marks and try only to breathe where indicated. If no breath marks are given, try to find spots at which it makes sense to inhale, and mark them with your pencil. You should inhale only after slurs, and during rests in such a way that you always have enough air for playing.
Also try to notice a few other things: Musical symbols, such as repeat signs, that could be marked with first and second endings. In addition, look for Da capo (D.C.), Dal segno (D.S.), and Coda symbols.
Focus on articulation and dynamics
Musical notation also includes articulation symbols that give instruction on how you should use your tongue and air. Emphasize the accented notes (>) accordingly, or play notes with the staccato symbol (snappy and short) as indicated.
Next pay attention to dynamics:
Crescendo and decrescendo also indicate volume, which you should consider.
>
>
dummies
Source:http://www.dummies.com/how-to/content/saxophone-for-dummies-cheat-sheet.html
