Accounts are companies. Subaccounts may be divisions of the main company or may be separate physical locations of the same company. Anything you add in Microsoft CRM, you can edit. And anything you add can be deleted, but a better practice is to deactivate an Account rather than delete it. If you deactivate, you can always resurrect the information if you discover later that you need it. Deletion is forever.
Taking the shortcut approach: Quick Create
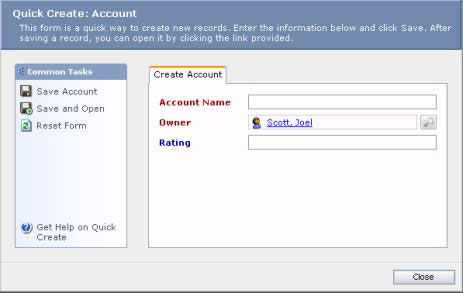
Quick Create, which you access in the lower-left portion of the CRM Home Page, lets you enter a new Account, Contact, Lead, or Opportunity as quickly as possible. Quick Create is the lazy man's approach to data entry. The Quick Create function achieves its speed by eliminating everything other than Business Required fields. These are the field labels that appear in red on the screen. Business Required fields are mandatory fields that the system needs in order to properly save and retrieve Records later.
Within the Quick Create window, you may choose to create several types of Records by accessing the pick list in the window. To begin adding a new Account via the Quick Create function, follow these steps:
1. Open Quick Create.
2. Choose Accounts in the Quick Create window.
3. Click the Go button in the same window.
The Create Account window appears, as shown in Figure 1.

Figure 1: The Quick Create method of starting a new Account.
4. In the Account Name field of the Quick Create dialog box, enter the name of the company whose Record you are creating.
As the User, your name appears as the Owner by default.
5. Select the Save option or the Save and Open option.
Selecting Save stores the Record you just specified and brings you to another blank Quick Create dialog box, enabling you to create another Account Record. The Save function is efficient if you have more than just a few Records to enter all at once. The Save and Open function also stores the Record you just created, but it immediately brings you to the full set of Account Record screens and fields so you can do a more complete job of entering information for that one Record.
Despite your best intentions to go back later and fill in the rest of the information, you may procrastinate. Consider using the Save and Open option. Even if you start with the Quick Create option, selecting Save and Open when you are done entering all the required fields brings you to the Detail window. This is the place to be.
Account Records and their four sections
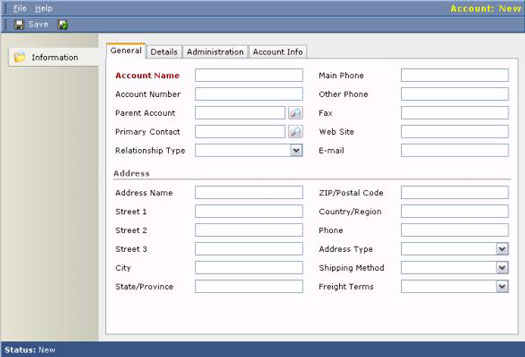
Each Account Record actually has four related windows: General, Details, Administration, and Account Info. You can access these windows, or actually create a new Account, by going to the Account List View Grid and selecting New Account from the Actions Bar. This method, as distinguished from Quick Create, is the full-fledged, data-entry-intensive way to start a new Account Record.
Figure 2 shows the General tab of the Account window.

Figure 2: The General tab of the Account window.
The General tab has most of the critical contact information for your Account, including the required field: Account Name. Most of the fields on the General tab are self-explanatory, but the other three tabs deserve a little discussion:
- The Details tab contains mostly financial information, such as annual revenue and stock symbol if the company is publicly traded. This provides potentially useful demographic information about the account, assuming someone in your organization does the research to fill in the information and keeps it current.
- The Administration tab has accounting information, which is used for billing purposes.
- The Account Info tab has demographic information, and not much of it at that. This is a good area to add additional, custom fields that are important to your organization. Custom fields can be added to any of these four areas, but there's plenty of real estate available in the Account Info sub-area.
Setting up subaccounts
Account Records may be parents of other Account Records. A child Record may also be referred to as a subaccount. Typically, you would use the subaccount system to subordinate one Record to another. A good example occurs when you are dealing with a company that has multiple locations. The headquarters would be the parent Account, and each regional location would be a subaccount. By relating the Accounts this way, you can use the reporting system to consolidate, subtotal, or total revenue for all the related Accounts.
The General window, which is the first and default window when you are creating a new Account Record, contains the field that relates one account to another. This field is labeled Parent Account and has a pick list containing all the other existing Accounts in the system. There is virtually no limit to the number of levels of parenting that is possible. In other words, every parent Account can have many children, grandchildren, and great-grandchildren.
As you create this structure, the best approach is to map out the relationships between the Accounts and begin at the top. First enter the parent Account and then enter the children.
dummies
Source:http://www.dummies.com/how-to/content/adding-and-editing-new-microsoft-crm-accounts.html
No comments:
Post a Comment