Word 2007 assembles a table of contents (TOC) for you by listing the headings (each with the page number) you designate throughout your document beforehand. Word takes care of counting pages, and even adjusts the TOC for you if the document’s page numbers change. When you create a TOC, Word searches your document for heading paragraphs to include in the table, recognizing them by the styles you assign to them.
>
>
>
1
Apply heading styles to your chosen headings.
>
To apply a heading style, put the cursor in the chosen paragraph and then press Ctrl+Alt+1 (for Heading 1) or Ctrl+Alt+2 (for Heading 2), and so on.
>
>
>
>
2
Move the insertion point to the place where you want the Table of Contents to appear.
>
The TOC generally appears on its own page near the beginning of a document. Press Ctrl+Enter to create a new page if necessary and then click to position the insertion point on the empty page.
>
>
>
>
3
Click the References tab on the Ribbon and then click the Table of Contents button found in the Table of Contents group.
>
A menu that lists several Table of Contents styles is displayed.
>
>
>
>
4
Click the Table of Contents style you want to use.
>
The TOC appears in the document. Note that the shaded frame that’s drawn around the Table of Contents is visible only when you hover the cursor over the table. (This frame doesn’t appear when you print the document.) You’re done!
>
>
>
>
5
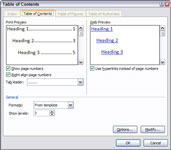
To customize your TOC, click the Table of Contents button and select Insert Table of Contents Field.
>
This action summons the Table of contents dialog box, where you can choose options for your table:
Show Page Numbers: Deselect this check box if you want the TOC to show the document’s outline but not page numbers.
Right-Align Page Numbers: Deselect this check box if you want the page numbers placed right next to the corresponding text rather than at the right margin.
Tab Leader: Use this drop-down list to change or remove the dotted line that connects each TOC entry to its page number.
Formats: Use this drop-down list to select one of several predefined formats for the Table of Contents.
Show Levels: Use this control to specify which heading levels to include in the table.
After you create the TOC, it does not reflect later changes you make to the document unless you update (rebuild) it by following these next two steps:
>
>
>
>
6
Click the Update Table button in the Table of Contents group of the References tab.
>
The Update Table of Contents dialog box appears. Here you can choose whether to rebuild the entire table or just update the page numbers.
>
>
>
>
7
Click OK to update the table.
>
You can also update a Table of Contents by selecting the table and pressing F9. Or, you can right-click the table and choose Update Field from the shortcut menu.
Another option is to press Ctrl+A (to select the entire document) and then press F9 (to update all TOCs in the document).
>
>
>
>
8
Save your file after you update the tables.
>
If you want to update the TOC again, repeat these steps.
>
>
>
>
9
To delete a TOC, select the entire table and press Delete.
>
Alternatively, you can click the Table of Contents button on the References tab on the Ribbon. From the menu that appears, choose Remove Table of Contents.
>
>
dummies
Source:http://www.dummies.com/how-to/content/creating-a-table-of-contents-in-word-2007.html


No comments:
Post a Comment