>
Figure 1: Drag the Noise generator from the Effects tab to the track above your clip in the Timeline.
6. In the Timeline, drag the playhead over the Noise clip in the Timeline.
7. Double-click the Noise generator clip in the Timeline so that it loads into the Viewer window.
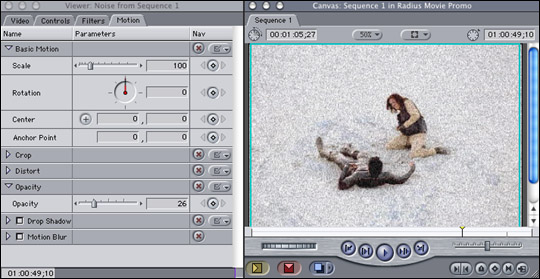
8. In the Viewer window, click the Motion tab and click the little triangle next to the Opacity setting.
9. Move the Opacity slider, as shown in Figure 2 to get the grainy look to your liking.
This effect is shown in the Canvas window as you move the Opacity slider. Keep moving the slider until the amount of grain you want is generated.
>

>
Figure 2: The Noise generator clip's Opacity can be modified under the Motion tab to create a grainy look for your project.
10. Select the Noise generator clip in the Timeline and choose Sequence --> Render Selection.
After the rendering process is complete, move the playhead just before the clip in the Timeline and press the spacebar to play the clip.
Noise looks considerably different on your tiny little computer Canvas preview window than it does on a TV. You need to experiment with the final product to find the right opacity setting to get the effect you want in your project. Having a TV hooked up to your Final Cut workstation is a big help here. If you're generating a movie for the Web, skip the noise if you can. It doesn't compress well and tends to pixilate (develop a checkered pattern) if you reduce the dimensions.
>
dummies
Source:http://www.dummies.com/how-to/content/getting-that-old-grainy-film-look-in-final-cut-pro.html
No comments:
Post a Comment