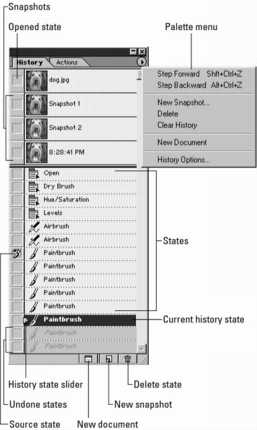
Photoshop keeps a record of changes you make to your images, and you can use the History palette (see Figure 1) to go back to a particular point in the development of your image. As you perform each operation, Photoshop names each state and displays a corresponding icon according to the tool or command used. It ignores recording operations, such as palette and tool setting and color and preferences chance.
 |
Figure 1: The History palette records each step, enabling you to return to a given point in time. |
The History Brush tool provides an artistic, free-form way of revealing a previous state of an image. To brush back to a source state, follow these steps:
1. Select the History Brush tool.
 | To select the tool from the keyboard, press the Y key. |
2. Select a brush mode from the Mode drop-down menu in the Options bar.
Using the brush modes is one advantage the History Brush has over the Erase to History option. You can achieve different effects by using various modes.
3. From either the Brush Presets picker on the Options bar or from the Brushes palette, select a brush size and style.
The Airbrush settings also are available for the History Brush.
4. In the History palette, select the source state you want to brush back to.
5. Drag the History Brush on the image.
Like the eraser, as you drag, you reveal the way the image looked at that point in time.
dummies
Source:http://www.dummies.com/how-to/content/going-back-in-time-with-photoshops-history-brush.html
No comments:
Post a Comment