Photoshop supports the JPEG (pronounced jay peg and short for Joint Photographic Experts Group) format. The JPEG format uses lossy compression. Lossy is the computer nerd's way of saying that stuff is lost during the compression process — namely, some of the data that makes up your image.
The good news, however, is that you probably won't miss what's not around anymore — sort of like when you were a kid and you "lost" your little brother at the park. You may notice a slight difference in your on-screen image after you save the file using JPEG, but when the image is printed, the compression is usually undetectable.
JPEG compression saves you lots of disk space. In fact, a JPEG image takes up less space on disk than a compressed TIFF file — half as much space, maybe a tenth as much, depending on your settings. Although JPEG isn't supported by as many programs as TIFF, it's becoming more and more common. JPEG compression works well with continuous tone images, such as photographs.
 | So should you use JPEG or TIFF? Here's a thought: Save in TIFF when excellent print quality is vital — for example, in high-resolution printing — or when you're editing an image. Then when you think you're finished editing and you want to conserve space, save in JPEG at the Maximum setting. You generally won't see the results of JPEG right away. But editing an image can bring out its weaknesses, and JPEG definitely weakens an image. So, going to JPEG after you finish editing is usually best. |
Also, if you want to distribute your image on the World Wide Web, you have to save it in either the JPEG, GIF, or the new and not yet widely supported PNG format. JPEG works well with photographic images, especially people, where there is a wide range of colors. TIFF isn't an option for Web publishing.
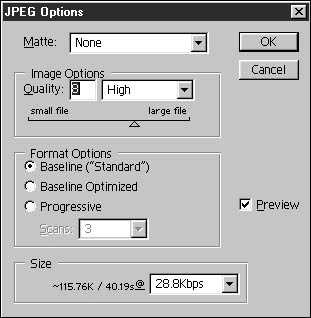
When you choose the JPEG option in the Save As dialog box and press Enter (Return on the Mac), the dialog box shown in Figure 1 appears. Here's a rundown of the options you need to worry about for images you want to print:
 |
Figure 1: When saving a JPEG file, select the Maximum option or, if space is limited, select the High option. |
- The Quality pop-up menu lets you choose the amount of compression that's applied to your image and therefore the quality of your saved image. The higher the image quality, the less the file is compressed and the more space it takes on disk.
- The Quality option box and the slider bar beneath the box give you other ways to choose your compression setting. The slider bar and option box give you access to 13 settings (0 through 12), whereas the pop-up menu gives you access to only four. But, unless you're a real control freak, you can just select one of the pop-up menu options.
- Choose the Maximum or High option from the Quality pop-up menu. The Maximum option is best because it preserves the most image data, but the High option is okay if you're really short on disk space.
- For Format options, use the default setting of Baseline ("Standard").
 | Photoshop recompresses a JPEG image every time you save it. During a single edit session, this compression won't hurt because JPEG works from the on-screen version. But, if you close, reopen, and resave it in JPEG format, some damage, albeit small, occurs. Repeat this process over and over, however, and the damage increases each time. Some advice — apply all your necessary edits to the image, save in JPEG format, and leave well enough alone. If you need to edit an image over a longer length of time, save it in a native Photoshop format. Then save it as a JPEG only after you have completed your editing process. |
dummies
Source:http://www.dummies.com/how-to/content/getting-to-know-photoshops-jpeg-file-format.html
No comments:
Post a Comment