QuickTime Pro makes a great tool for converting media files. As your collection of multimedia grows, you'll eventually find yourself wishing that certain files were in a different format. For example, you might want to convert a QuickTime movie to a DV file for use with iMovie. With a few clicks, QuickTime Pro can open a media file in one of dozens of formats and convert it to most any other format that QuickTime understands. To do so, you must import the file into QuickTime and then export it into the format that you prefer.
Importing files
For most operations, you can open a file with QuickTime Player by using the usual File --> Open menu item. For some formats, however, this won't work. In these instances, QuickTime gives you the chance to import a file. The difference between open and import is subtle but important: If QuickTime can natively handle a file's media, you can use the Open menu. If it can't handle a media's data natively, it must import the file. The import process converts the file to a format that QuickTime can use. To start the import process, just choose File --> Import.
For example, QuickTime doesn't normally display text files. Using the Import command, however, converts a text file into a movie file. Then you can view the text in a traditional movie player window. Figure 1 shows an imported text file movie.
>

Figure 1: Choose File --> Import to import a file.
Table 1 lists the file types that QuickTime can import.
Table 1: QuickTime Import File Types
Category | File Types |
Audio | -AIFF/AIFC, AAC, Audio CD, MP3, Sound Designer II, System 7 Sound, µLaw (AU), WAV |
Video | AVI, DV, Motion JPEG, MPEG-1, MPEG-4 |
Images | -BMP, GIF, JPEG/JFIF, MacPaint, PICT, PNG, Photoshop (with layers), SGI, Targa, FlashPix, TIFF |
Animation | 3DMF, Animated GIF, FLC/FLI, Flash, PICS |
Other | _-KAR (Karaoke), MIDI, QuickDraw GX, QuickTime Image File, Text |
Exporting files
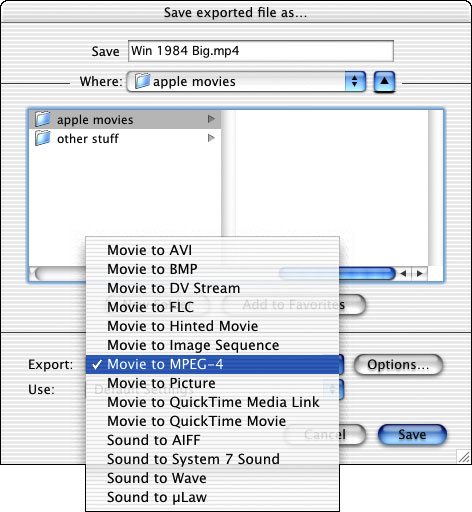
After you open or import a media file, QuickTime Pro will let you export it to one of many formats — for example, you might export a QuickTime movie to an AVI movie for those Windows users who don't have QuickTime installed. To export a movie, choose File --> Export. In the dialog that appears (as shown in Figure 2), select the desired output format from the Export pop-up menu. Each export type also has a set of options. To view them, click the Options button on the right side of the Export dialog.
>

Figure 2: Use QuickTime to export your media files to a variety of formats.
>
dummies
Source:http://www.dummies.com/how-to/content/importing-and-exporting-files-with-quicktime.html
No comments:
Post a Comment